
TourVoz Documentation
From account creation to site settings, content management, and traveler inquiries, follow the documentation step by step to build your TourVoz website.
Register and Sign In to TourVoz
Before creating a TourVoz account, you only need an email address that can receive messages. After registration and password setup, you can sign in to the dashboard and start building your website.
Create Your TourVoz Account
Go to the TourVoz signup page and enter your account and website information. Use an email address that you can access and plan to keep using, because the password setup link will be sent to this address.
Enter your name or nickname so your TourVoz account can be identified and managed.
Enter an email address that can receive messages. After registration, the password setup link will be sent to this address.
Enter the name of your travel agency, travel business, or brand. You can update your brand information later in Site Settings.
Set your TourVoz subdomain. For example, if you enter greatwalltravel, your website address will be greatwalltravel.tourvoz.com.
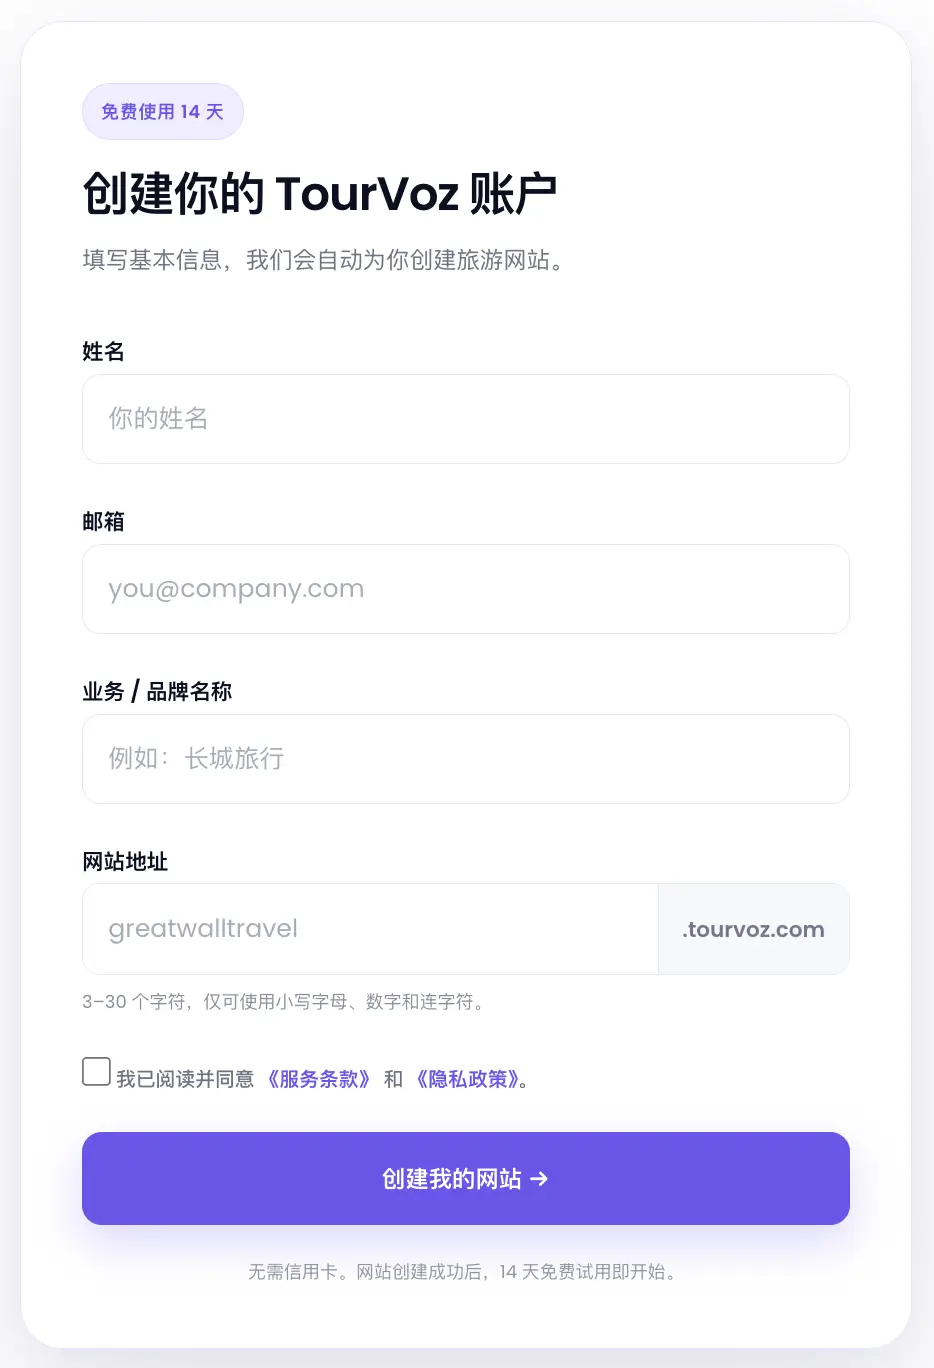
The website address can contain 3–30 characters and may use lowercase letters, numbers, and hyphens only. If you want to use your own domain later, you can first build the site on your TourVoz subdomain and then connect a custom domain through Custom Domain.
After confirming your information, read and agree to the Terms of Service and Privacy Policy, then click Create My Website.
No credit card is required. Your 14-day free trial begins after the website is created.
Check Your Account Email
After your website is created, open the email account you used during registration. TourVoz will send an account email containing a link to set your login password.
Click the password setup link in the email to continue setting up your account.
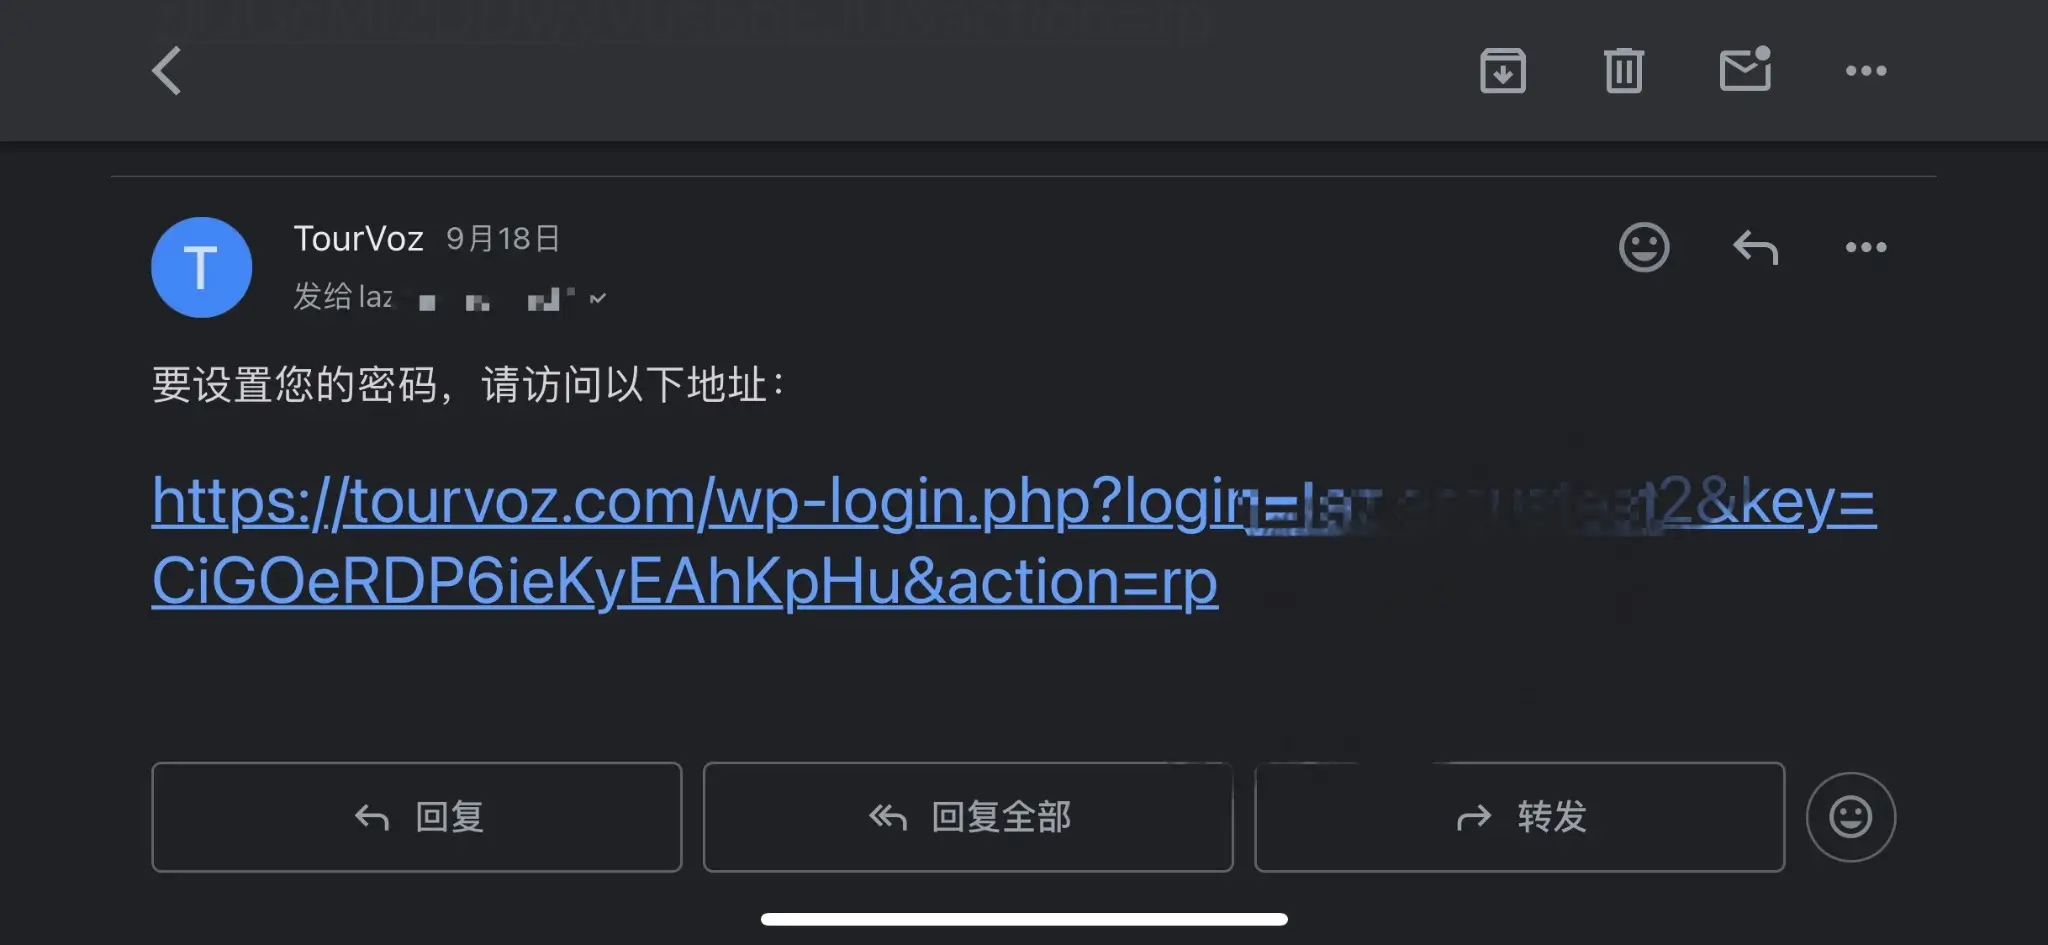
Check your spam or junk folder first, and make sure the email address entered during registration is correct.
Set Your Login Password
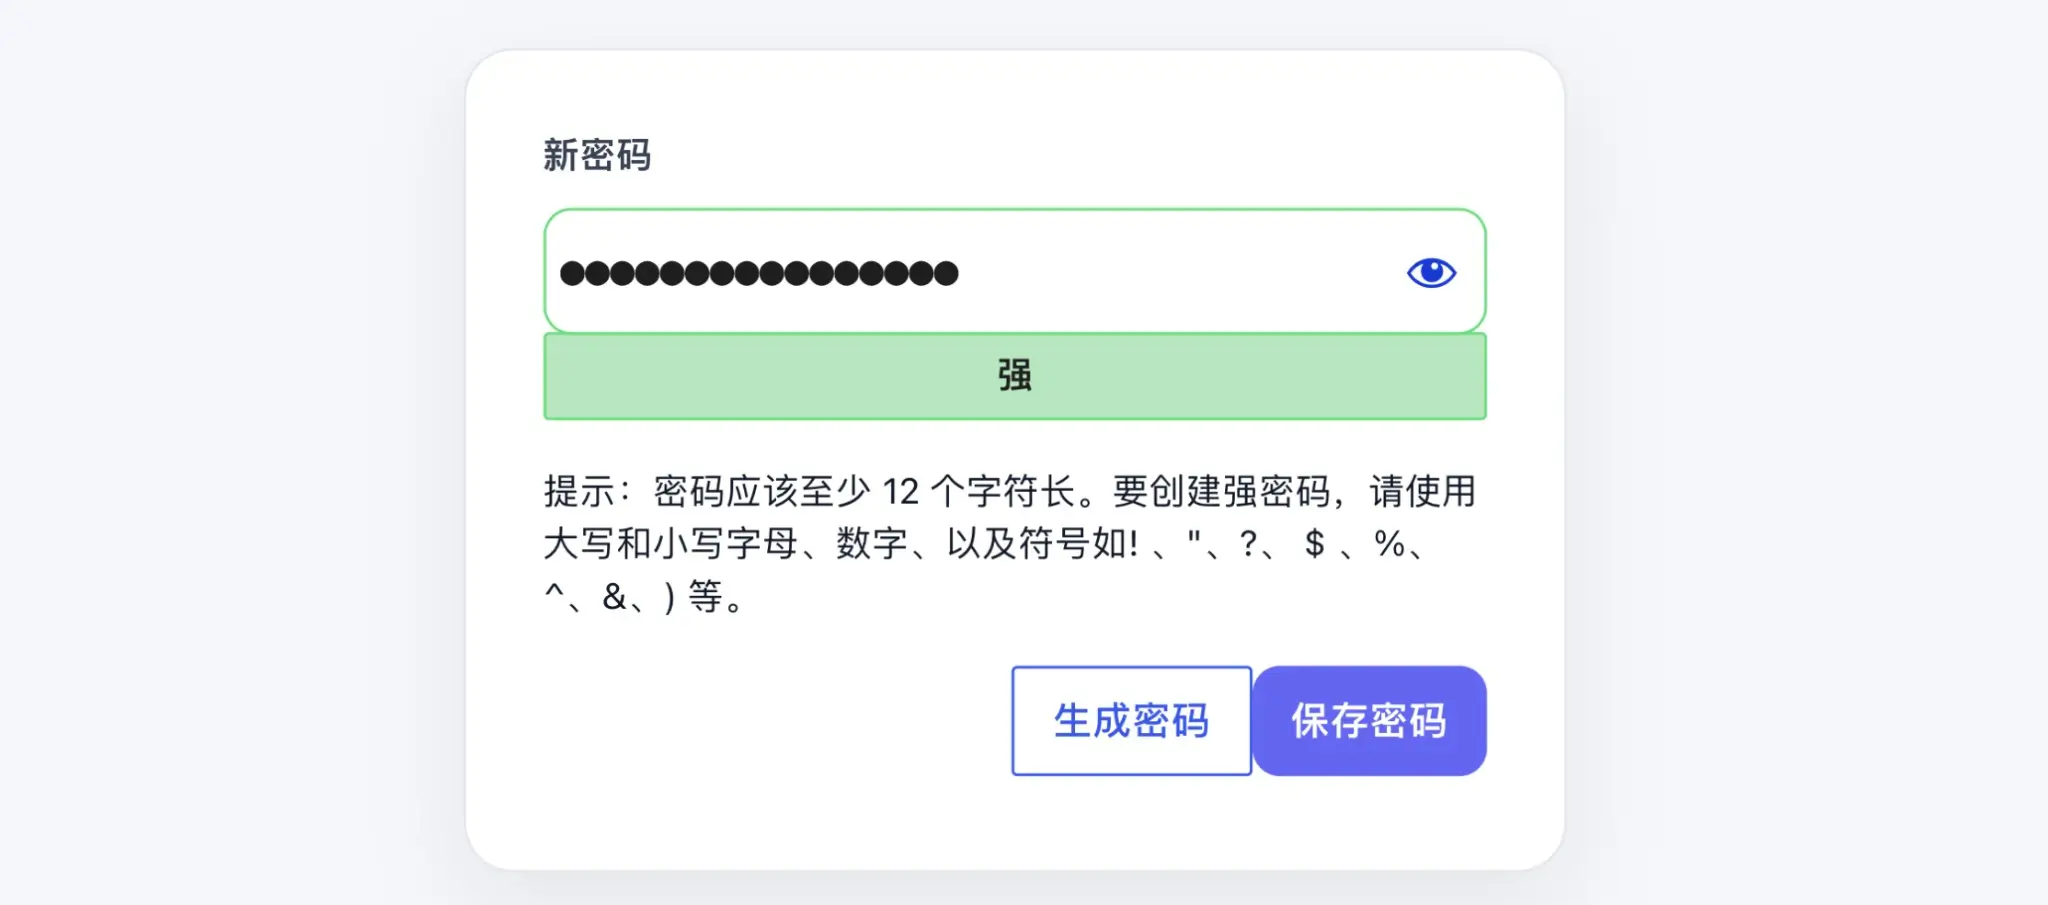
After clicking the password setup link in the email, follow the instructions on the page to create a login password for your TourVoz account.
Save your password securely after setting it. You can then use your account information to sign in to the TourVoz dashboard.
Sign In to TourVoz
After setting your password, go to the TourVoz login page. Enter your account information and the password you just created, then sign in to the dashboard.
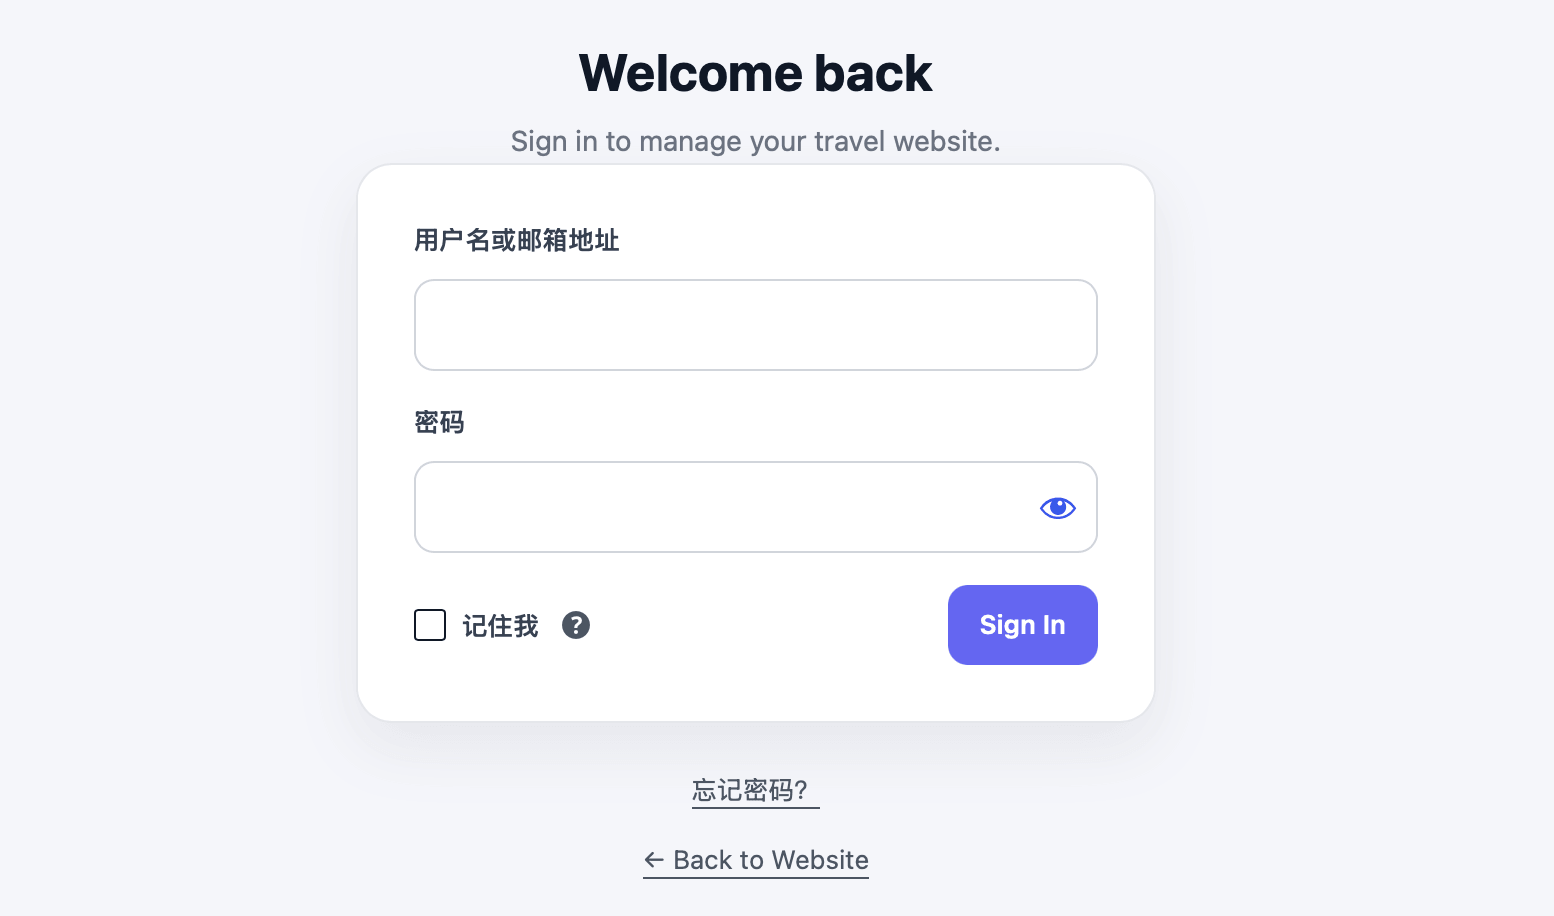
Once signed in, you can start setting up and managing your TourVoz website.
TourVoz Dashboard Overview
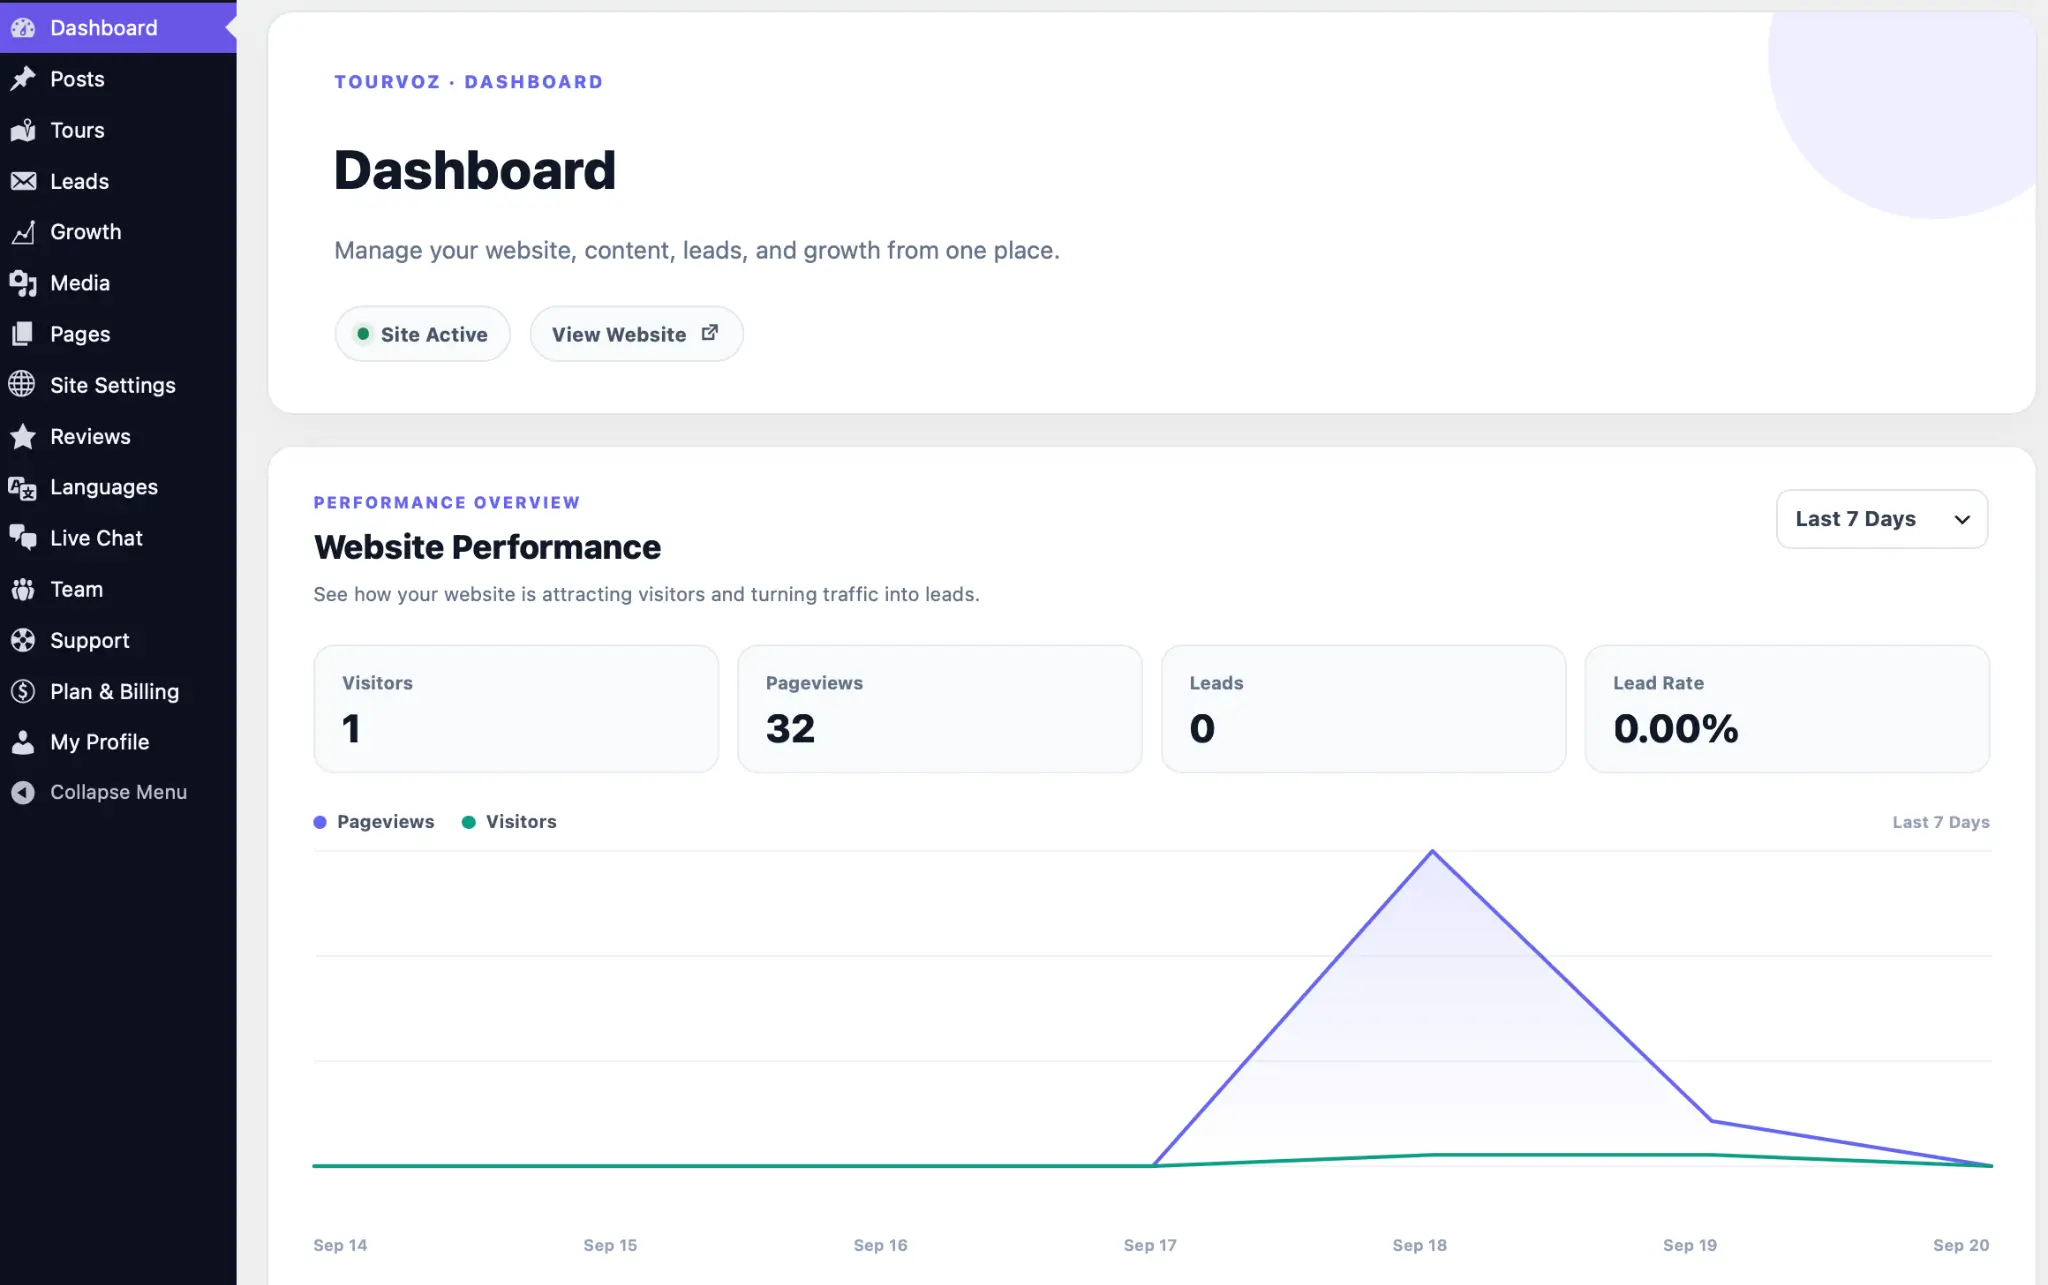
After signing in to TourVoz, you will first arrive at the Dashboard. Here you can check your website status and basic traffic data, and use the left menu to access website management features.
Content Management
Posts、Tours、Media 和 Pages 用于创建和维护网站文章、旅游线路、图片素材和页面内容。
Leads & Growth
Leads、Growth、Reviews 和 Live Chat 用于管理游客询盘、查看网站表现,并完善游客沟通和信任内容。
Website Management
Site Settings、Languages 和 Custom Domain 用于管理网站基础内容、多语言页面和独立域名。
Account & Services
Team、Support、Plan & Billing 和 My Profile 用于管理团队成员、服务支持、套餐订阅和账户信息。
We recommend completing your basic website information, branding, and homepage settings in Site Settings before adding destinations, tours, and articles.
Site Settings
Site Settings is the central place for your TourVoz website setup. Here you can manage branding, theme colors, the header, homepage content, SEO, and core information for key website pages.
When setting up your website for the first time, work through the menu from top to bottom. Start with your brand and basic information, then continue with the Header, homepage, and other pages.
Business Information
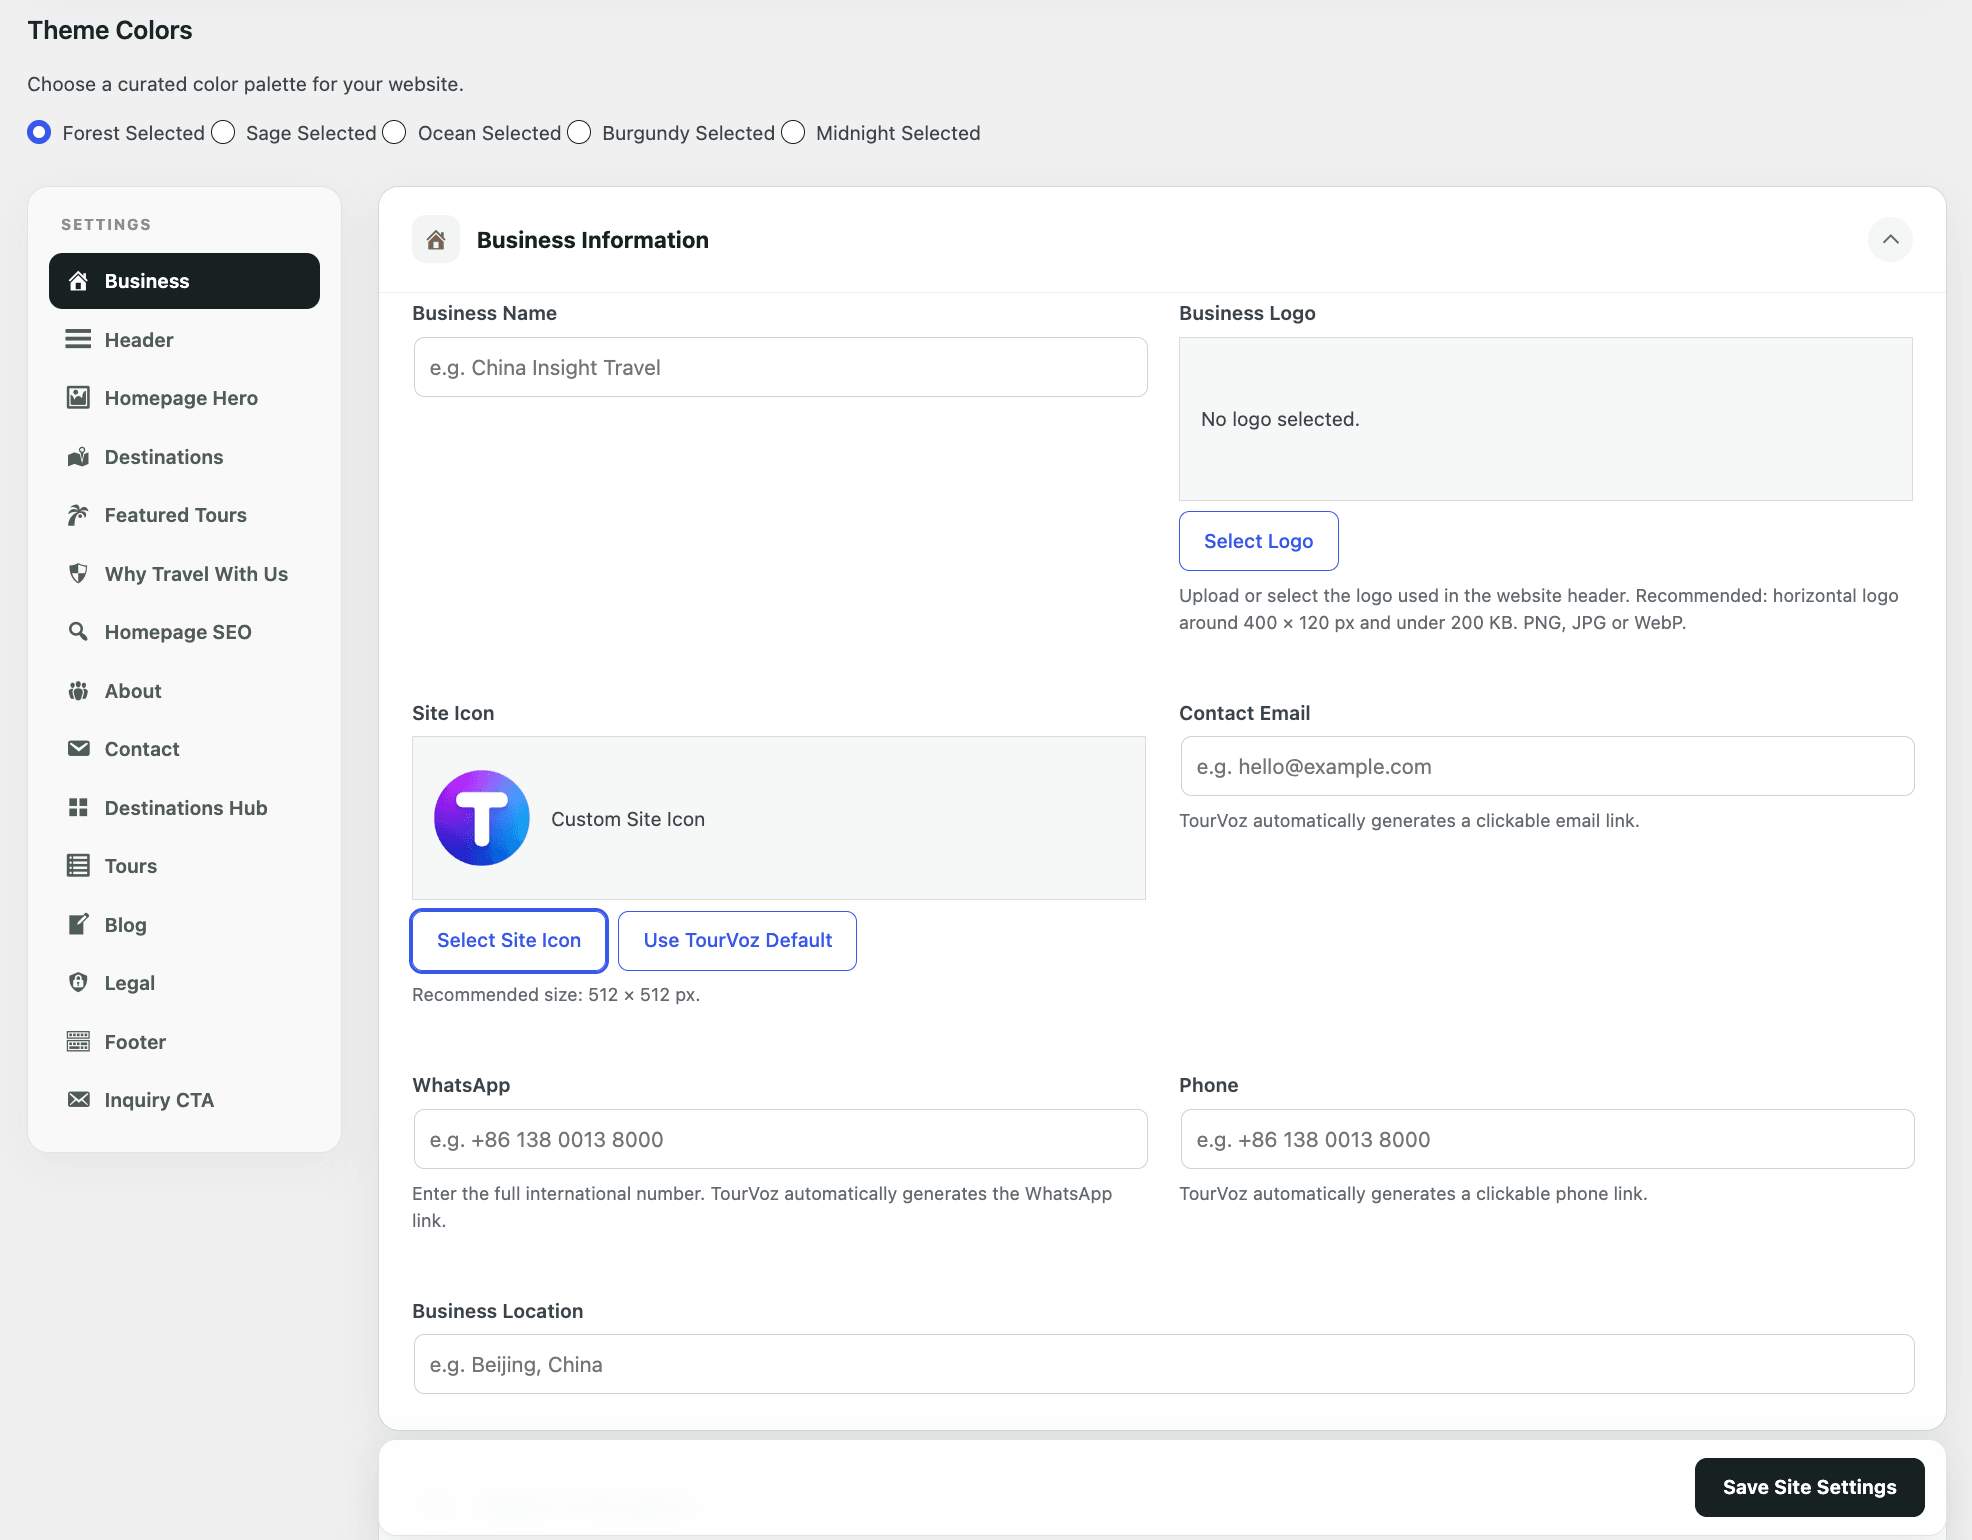
Business settings are used to configure your website's core brand information, theme colors, and contact details. We recommend completing these settings before editing homepage and travel content.
Choose Your Website Theme Colors
Theme Colors controls the overall color palette of your website. TourVoz provides five preset palettes—Forest, Sage, Ocean, Burgundy, and Midnight—so you can choose the one that best fits your brand and website style.
If you do not have a defined brand palette yet, choose the option that best matches your logo and brand identity. You can return to Site Settings and change it at any time.
Complete Business Information
Enter the name of your travel agency, travel brand, or business for brand display across the website.
Upload the brand logo used in your website Header. A horizontal logo around 400 × 120 px and under 200 KB is recommended. PNG, JPG, and WebP are supported.
Set your site icon, which is typically shown in browser tabs and similar locations. A square 512 × 512 px image is recommended. If you do not have your own icon yet, you can use the TourVoz default icon.
Enter the public contact email for your business. TourVoz automatically turns it into a clickable email link.
Enter the full international phone number, for example +86 138 0013 8000. TourVoz automatically generates the corresponding WhatsApp contact link.
Enter the phone number travelers can use to contact you. TourVoz automatically creates a clickable phone link.
Enter your business location, for example Beijing, China. Use a city and country or region name that travelers can easily understand.
After making changes, click “Save Site Settings” at the bottom of the page. Then check the live website to confirm that your brand and contact information display correctly.
Header & Navigation
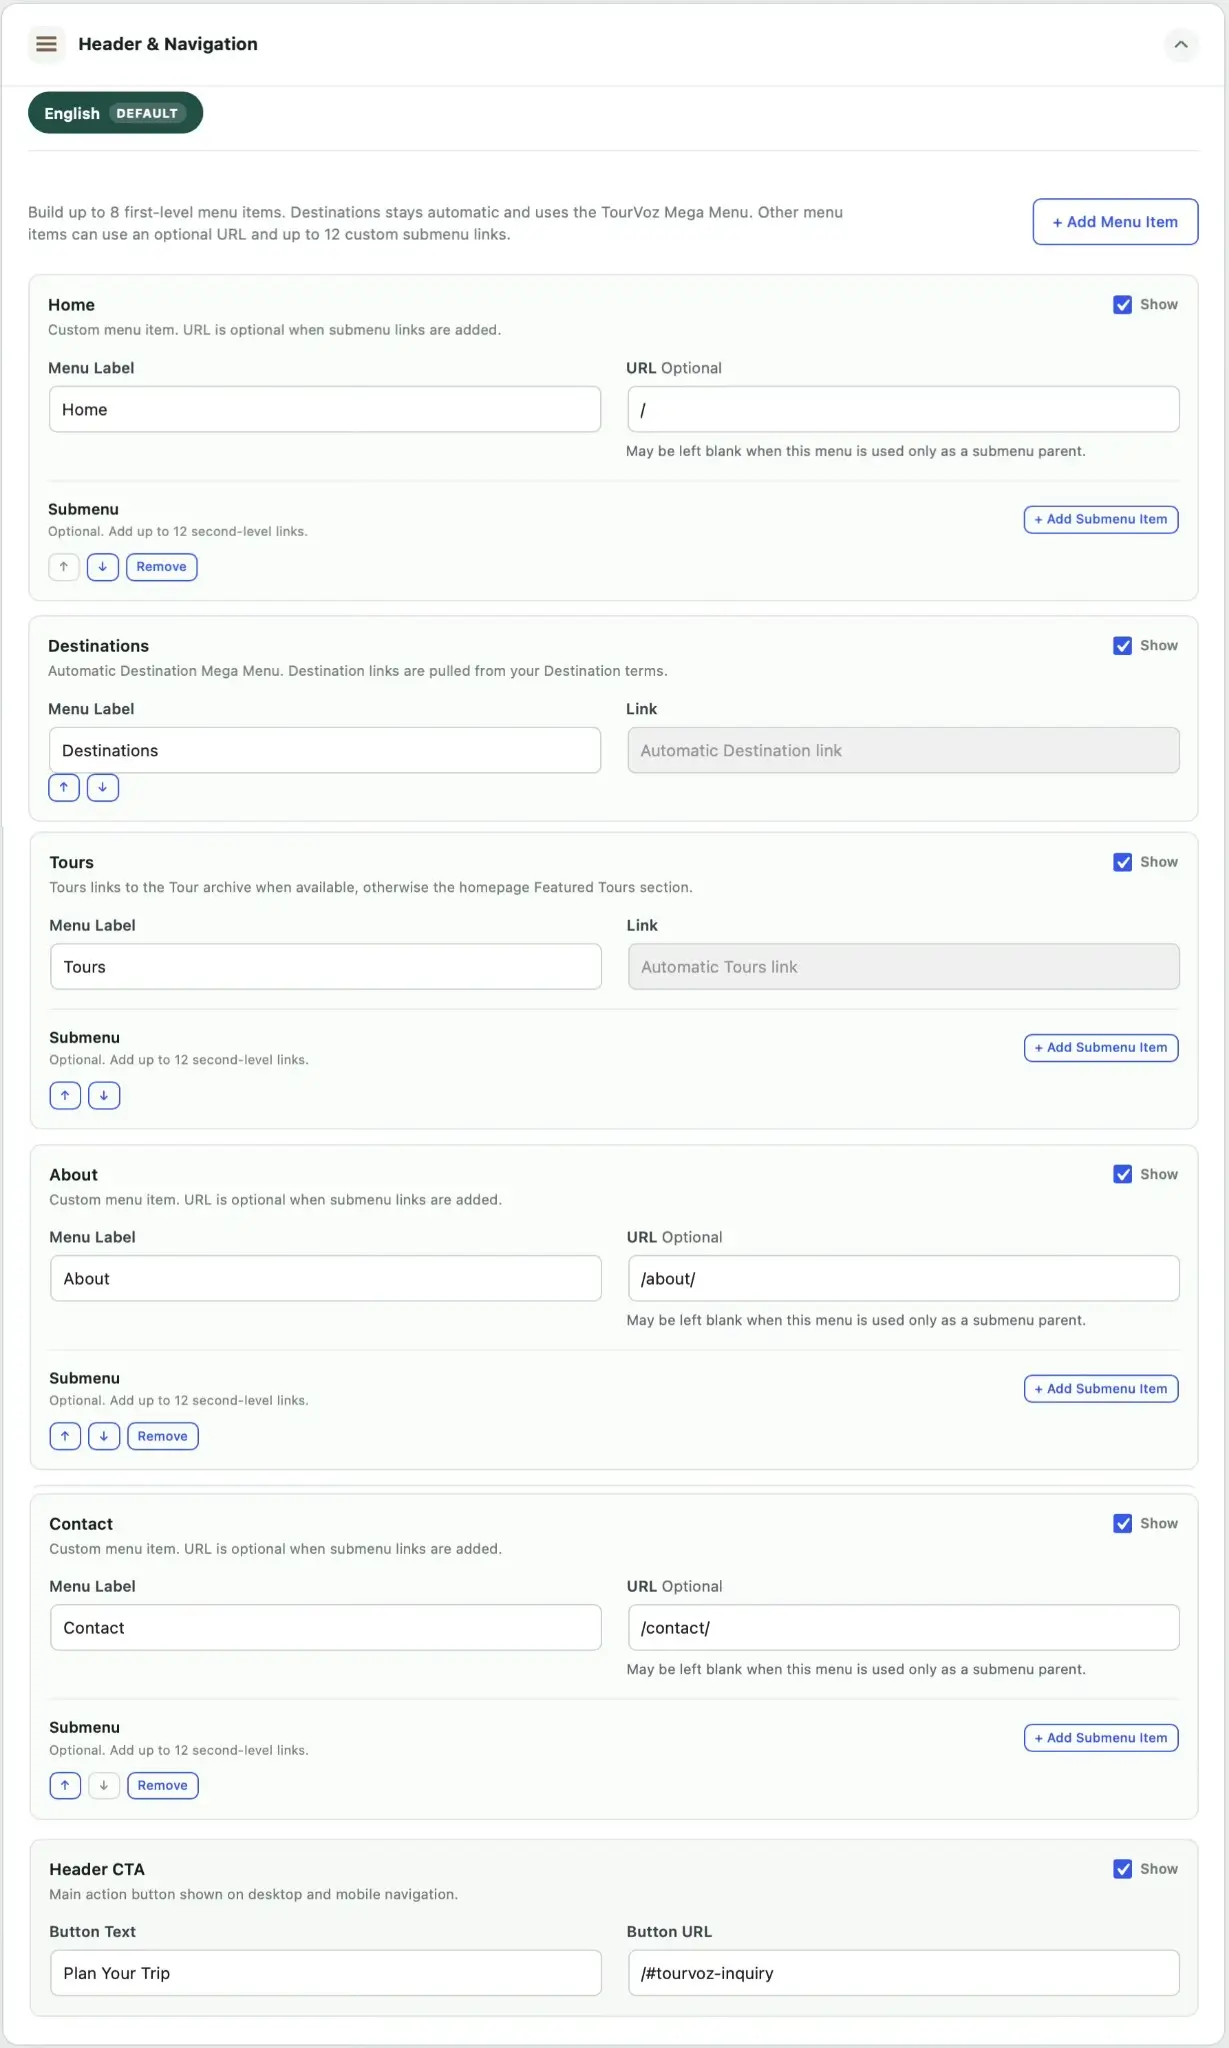
Header & Navigation manages your website's top navigation. You can change menu labels, links, visibility, and order, and add new top-level items, submenu items, and a Header CTA button.
Manage Top-Level Navigation
TourVoz supports up to 8 top-level menu items. For standard menu items, you can change the label and link, and use Show to control whether the item appears in the website Header.
Set the label shown in the website Header, such as Home, About, or Contact.
Set the destination opened when the menu item is clicked. The URL is optional for standard menu items and can be left blank when the item is used only as a parent for submenus.
Control whether the menu item appears in the website Header. If you do not need an item for now, simply uncheck it instead of deleting it.
Use the up and down arrows at the bottom of each item to change its order. Custom menu items that can be deleted can be removed with Remove.
Add a New Top-Level Menu Item
If the default navigation does not fit your website structure, click “+ Add Menu Item” to add another top-level item. You can have up to 8 top-level items in total.
Yes. If a standard menu item is used only to organize submenu items, you can leave its URL blank and use it as the submenu parent.
Automatic Destinations Menu
Destinations works differently from a standard custom menu. It is an automatically managed TourVoz destination Mega Menu, and destination links are generated from the Destination content you create.
You can change the Destinations menu label, visibility, and position, while TourVoz automatically reads the individual destination links. When you add or manage destinations later, you do not need to return to the Header to maintain every destination link manually.
Tours Menu
Tours uses a link generated automatically by TourVoz. When the Tours archive is available, the menu links to the Tours page; otherwise, it points to the Featured Tours section on the homepage.
You can still add custom submenu items under Tours to provide additional navigation for tour-related content.
Add Submenu Items
Standard top-level items and system items that support submenus display a Submenu section. Click “+ Add Submenu Item” to add a second-level link. Each top-level menu item can contain up to 12 submenu items.
Use submenus when several related pages belong under one top-level item. This keeps the number of top-level Header items manageable and makes the website structure clearer.
Set the Header CTA
The Header CTA is the primary action button shown in both desktop and mobile navigation. Use it to guide travelers to submit an inquiry, plan a trip, or visit another important conversion page.
Set the text shown on the button, for example Plan Your Trip.
Set the destination URL for the button, such as an inquiry page or an inquiry section anchor.
After adjusting the Header, click “Save Site Settings” at the bottom of the page. Then check both desktop and mobile views to make sure the menu order, submenus, and CTA button display correctly.
Homepage Hero
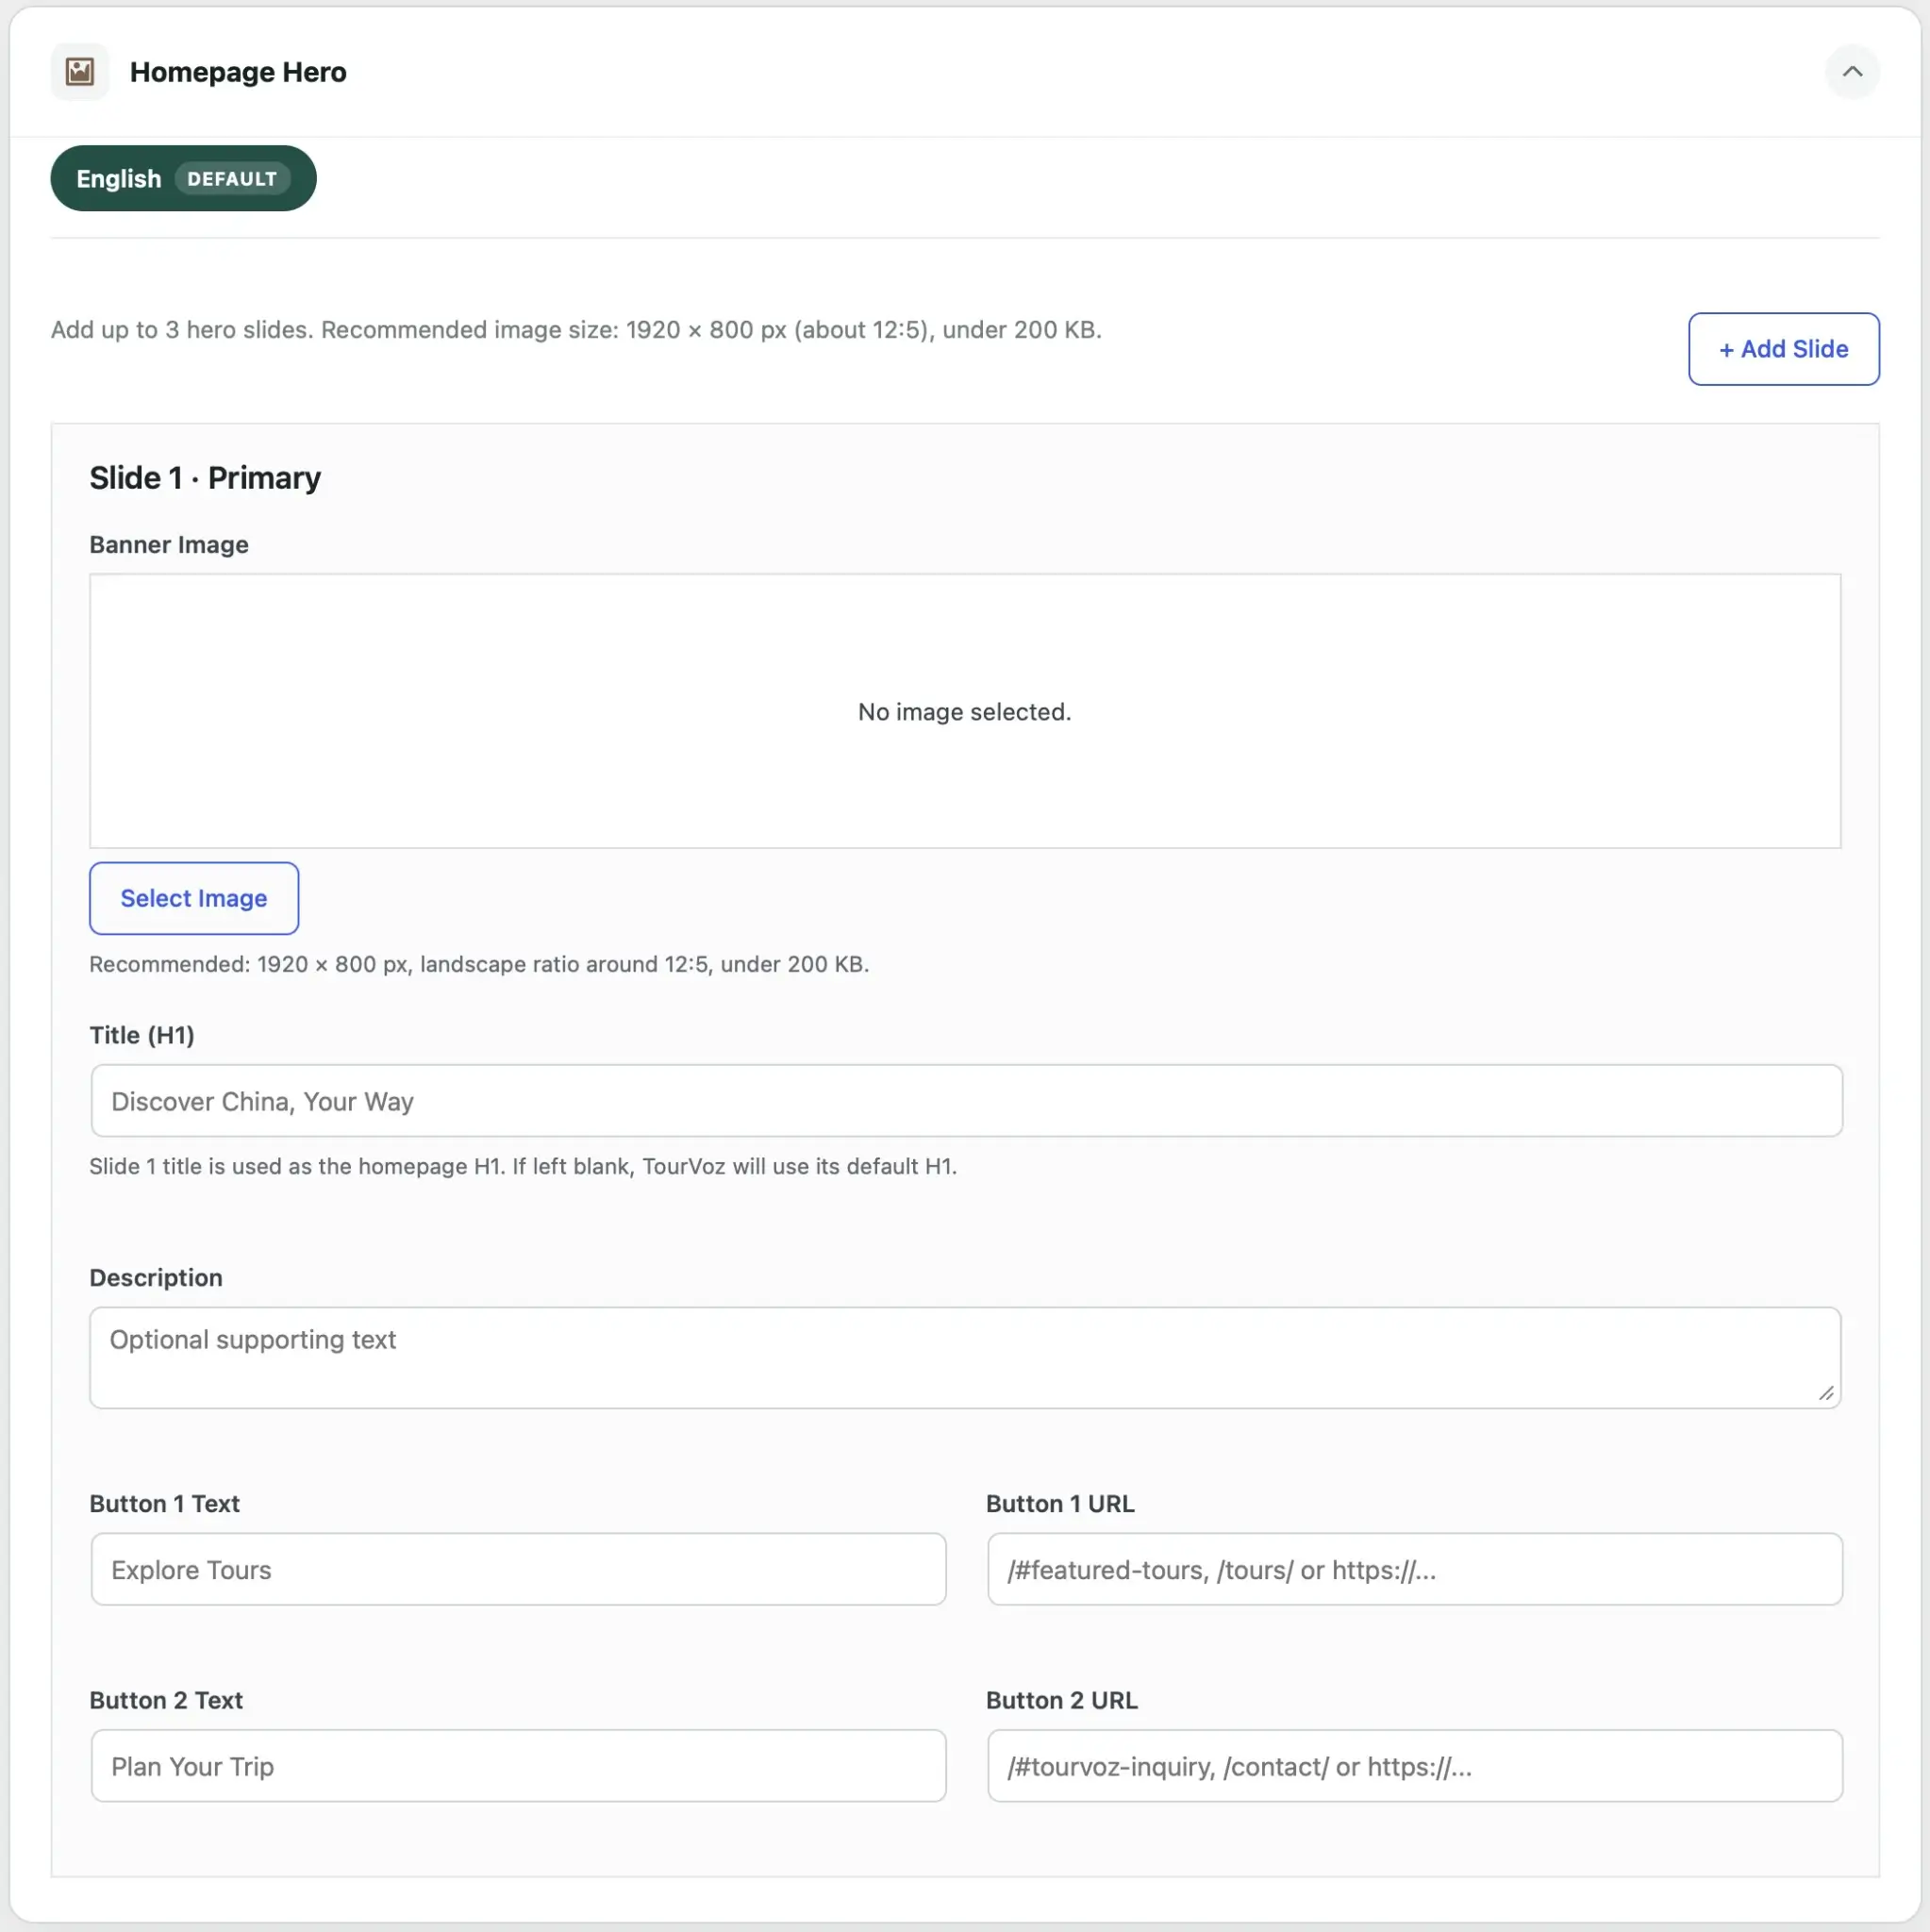
Homepage Hero controls the main visual area at the top of your homepage. You can add a banner image, headline, supporting text, and CTA buttons, with up to 3 Hero Slides available.
Set Up Hero Slides
TourVoz supports up to 3 Hero Slides on the homepage. Each slide can have its own banner image, title, description, and two CTA buttons.
If you only need a single static Hero, keep Slide 1. To highlight multiple themes, destinations, or key travel products, click + Add Slide to create additional slides.
Banner Image
Click Select Image to upload or choose the banner image used for the current slide. For more consistent display across desktop and mobile devices, use a landscape image and keep the main subject or visual focus near the center.
1920 × 800 px, with a landscape ratio of approximately 12:5.
Keep the image under 200 KB when possible to help reduce homepage loading time.
Title (H1)
Enter the main headline displayed in the Hero, for example Discover China, Your Way.
The Title used for Slide 1 becomes the H1 of your homepage. If this field is left blank, TourVoz will use the default H1.
Keep the headline concise and make sure it clearly communicates the core focus of your travel business.
Description
Description is the supporting text displayed below the main Hero headline. You can use it to briefly introduce your travel services, destinations, or key selling points.
This field is optional. Keep the copy concise so visitors can quickly understand what your business offers.
Set Up Hero CTA Buttons
Each Hero Slide can include up to two CTA buttons, configured through Button 1 and Button 2.
Button Text
Enter the text visitors will see on the button, such as Explore Tours, View Destinations, or Plan Your Trip.
Button URL
Set where the button should lead. You can use an internal page, a page anchor, or a complete URL.
How Should I Enter a Button URL?
Different URL formats can be used depending on where you want the button to lead.
Page URL
For example /tours/,
to link to another page on your website.
Page Anchor
For example /#featured-tours or
/#tourvoz-inquiry,
to jump to a specific section of a page.
Full URL
To link to another website,
enter the complete address beginning with https://.
Consider using Button 1 for content discovery, such as viewing Tours, and Button 2 for your primary conversion action, such as Plan Your Trip or submitting an inquiry.
When your Hero setup is complete, click Save Site Settings at the bottom of the page. Then open your homepage and check that the banner image, headline, description, and CTA buttons display correctly.
Homepage Destinations
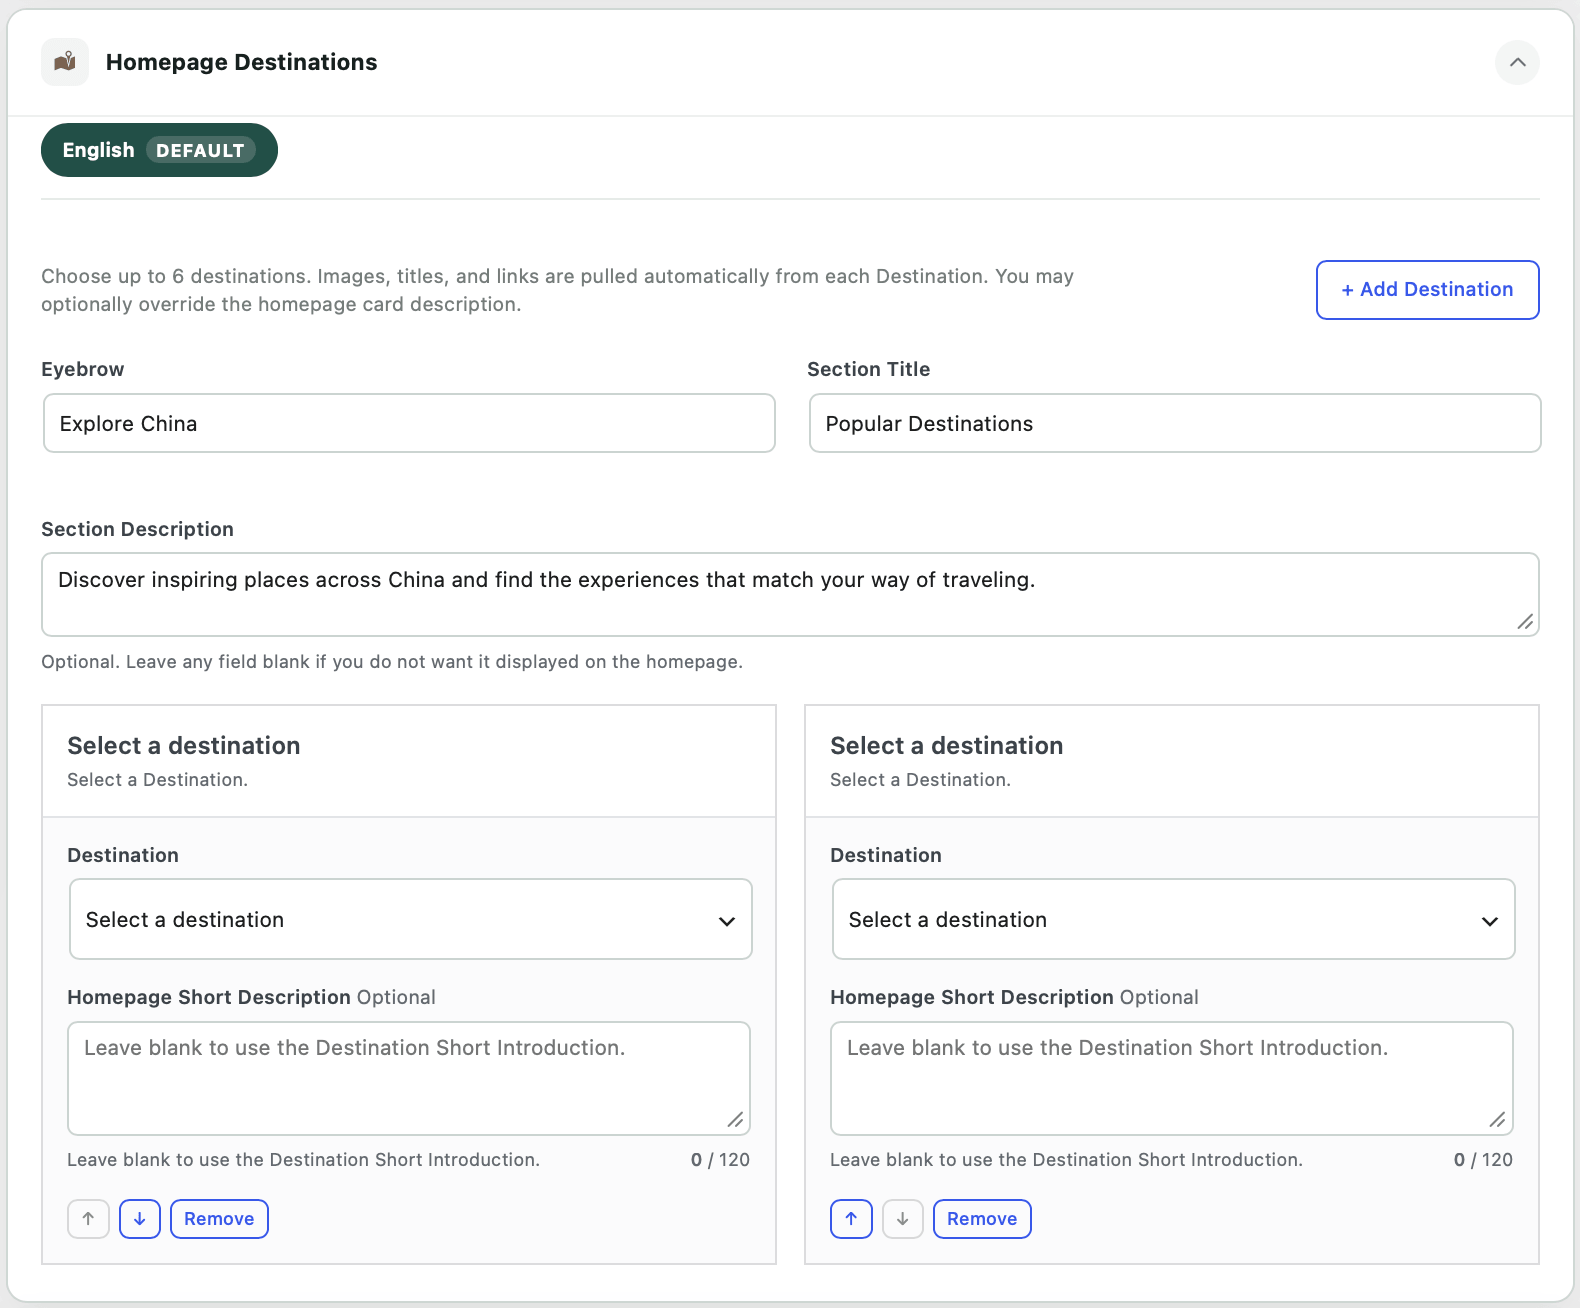
Homepage Destinations controls the destination section displayed on your homepage. You can customize the section heading and introduction, then select up to 6 existing Destinations to feature.
Set Up the Destination Section Heading
Homepage Destinations provides three content fields for controlling the heading and introduction shown above your destination cards.
Eyebrow
A small label displayed above the main section title, such as Explore China.
Section Title
The main heading for the destination section, such as Popular Destinations.
Section Description
A short introduction displayed below the heading to help visitors understand the destinations being featured.
Eyebrow, Section Title, and Section Description can all be left blank. Any field left blank will not be displayed on the homepage.
Add Destinations to the Homepage
Click + Add Destination in the upper-right corner to add another destination slot. TourVoz supports up to 6 Destinations in this section.
In each destination card, open the Destination dropdown and select the destination you want to feature on the homepage.
Homepage Destinations is used to select Destinations that have already been created.
If the destination you need does not appear in the dropdown, create that Destination first, then return to Site Settings → Destinations and select it here.
Where Does the Destination Card Content Come From?
Once a Destination is selected, TourVoz automatically uses the existing information from that Destination. You do not need to enter its image, title, or link again.
Image
The card automatically uses the image configured for that Destination.
Title
The Destination name is automatically used as the homepage card title.
Link
TourVoz automatically links the card to the corresponding Destination page.
Homepage Short Description
Homepage Short Description lets you customize the short description shown for this Destination specifically on the homepage.
If this field is left blank, TourVoz automatically uses the Destination Short Introduction.
If you want a shorter or more homepage-focused version, enter it here. This overrides only the description shown on the homepage card and does not change the Destination's original Short Introduction.
Homepage Short Description supports up to 120 characters. Focus on the most useful or appealing information so your destination cards remain clean and consistent.
Change the Destination Order
Use the up and down controls at the bottom of each Destination card to change the order in which destinations appear on the homepage.
Consider placing your most important or popular destinations first.
Remove or Add Destinations
To stop displaying a destination on the homepage, click Remove at the bottom of its card.
To add another destination slot, click + Add Destination. You can feature up to 6 destinations.
Removing a Destination here only removes it from the homepage section. The Destination and its page content remain unchanged.
After selecting, describing, and arranging your destinations, click Save Site Settings at the bottom of the page. Then open your homepage and check the destination images, titles, descriptions, order, and links.
Homepage Featured Tours
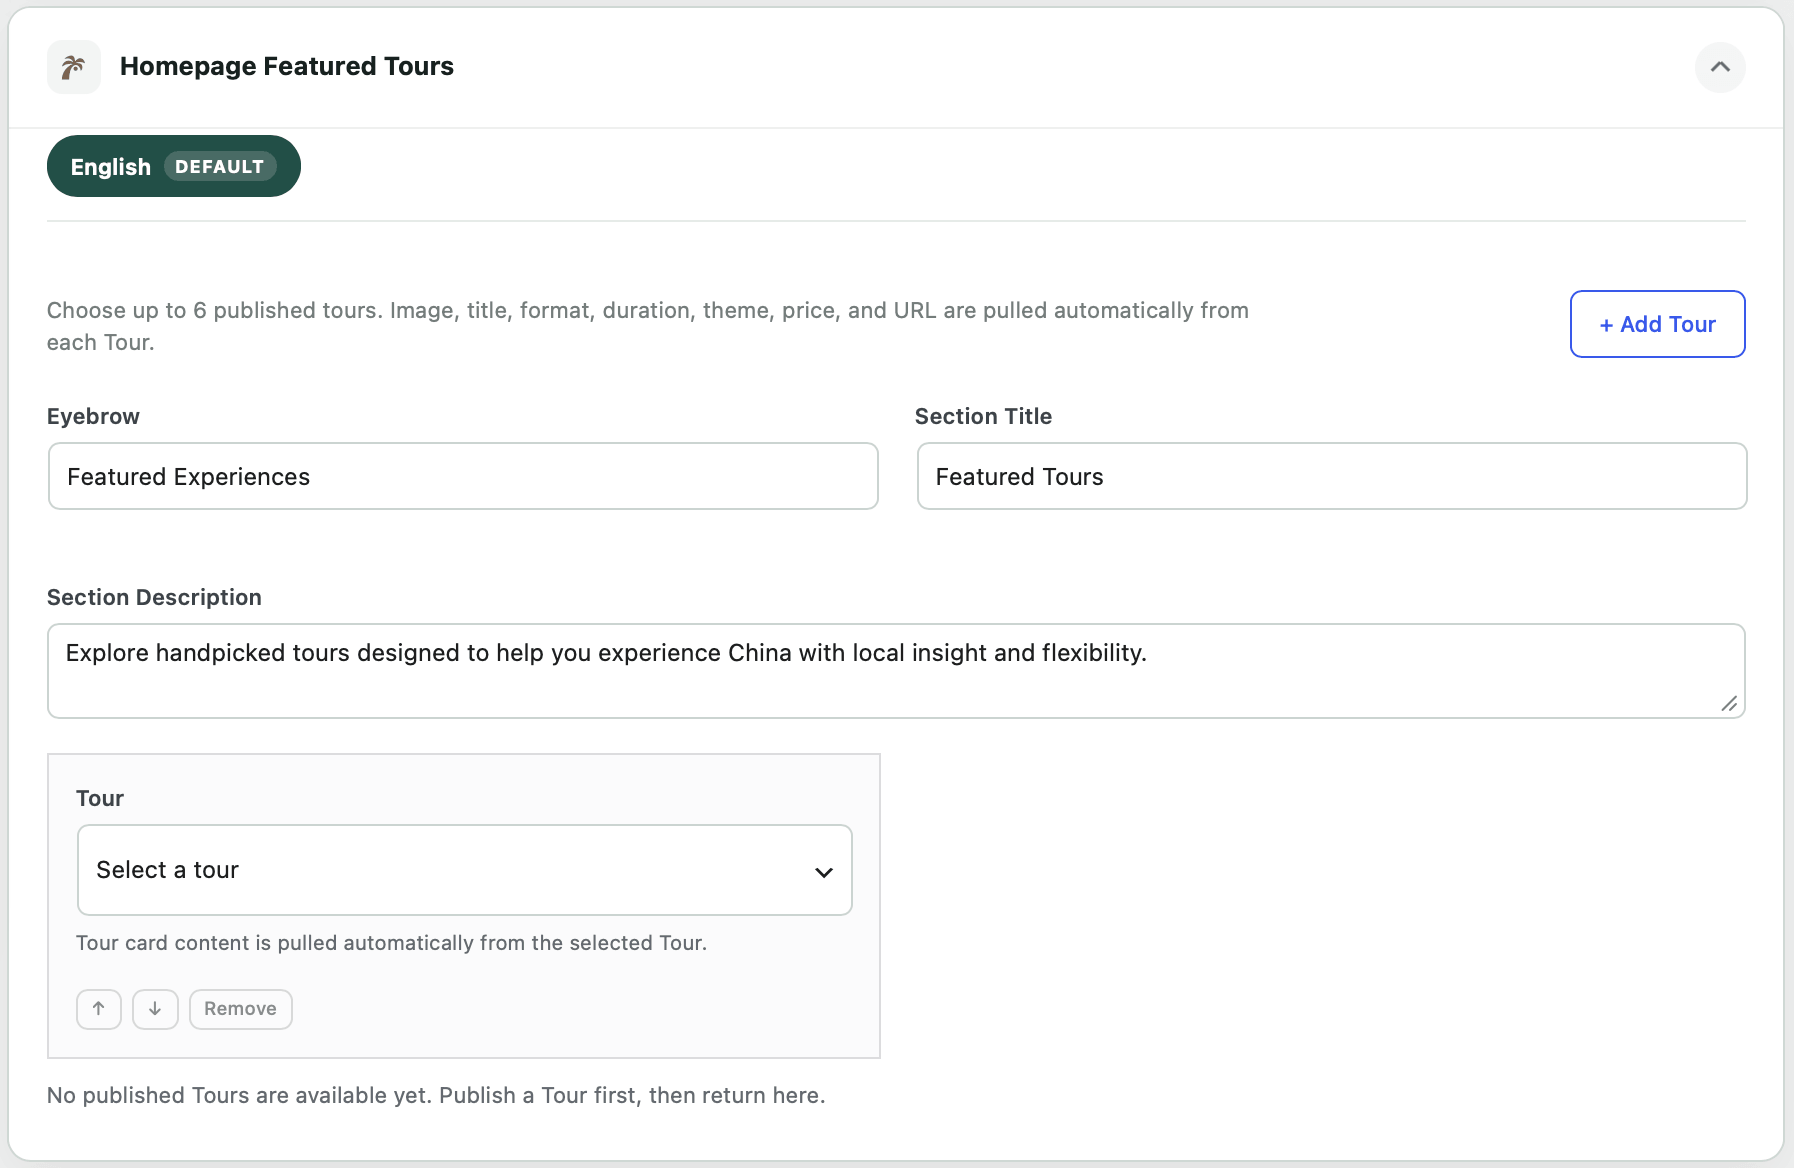
Homepage Featured Tours controls which tours are highlighted on your homepage. You can select published Tours, arrange their display order, and customize the heading and introduction for this section.
Set the Section Heading and Introduction
The Featured Tours section includes Eyebrow, Section Title, and Section Description fields for introducing your featured tours on the homepage.
Eyebrow
A short label displayed above the main section title, such as Featured Experiences.
Section Title
The main heading for the section, such as Featured Tours.
Section Description
Add a short introduction to help visitors understand the type of tours you are highlighting.
Eyebrow, Section Title, and Section Description control the introductory copy for this section. Keep the content concise so visitors can quickly move on to exploring individual Tours.
Select Featured Tours
Click + Add Tour to add another position to the Featured Tours section. TourVoz supports up to 6 published Tours in this section.
Use the Tour dropdown in each card to select the tour you want to display on the homepage.
Featured Tours is used to select Tours that have already been created and published. It is not used to create new Tours. If the Tour you need is not available in the dropdown, create and publish it under Tours first, then return here to select it.
Where Does the Tour Card Content Come From?
Once a Tour is selected, the information required for its homepage card is pulled automatically from that Tour. You do not need to enter the same information again in Featured Tours.
TourVoz automatically uses information such as the Tour image, title, format, duration, theme, price, and URL to build the featured card on the homepage.
If you need to change the image, title, price, duration, or other Tour information shown in Featured Tours, edit the corresponding Tour. The homepage will continue to use the updated Tour information.
Change the Featured Tour Order
Each Tour position includes up and down controls at the bottom. Use these buttons to change the order in which the Tours appear on the homepage.
Consider placing your most important, representative, or highest-priority Tours first.
Remove or Add Featured Tours
If a Tour no longer needs to appear in this homepage section, click Remove below its position.
To add another position, click + Add Tour and select another published Tour from the dropdown.
Remove only takes the Tour out of the homepage Featured Tours list. It does not delete the Tour itself or any of its page content.
Why Are No Tours Available to Select?
If the Tour dropdown contains no available options, or you see No published Tours are available yet, your website does not currently have a published Tour available for selection.
Go to Tours, create and publish a Tour, then return to Site Settings → Featured Tours and select it from the dropdown.
After selecting, arranging, and configuring your Featured Tours, click Save Site Settings at the bottom of the page.
Then open your homepage and check that the Tour images, titles, details, display order, and links appear as expected.
Why Travel With Us
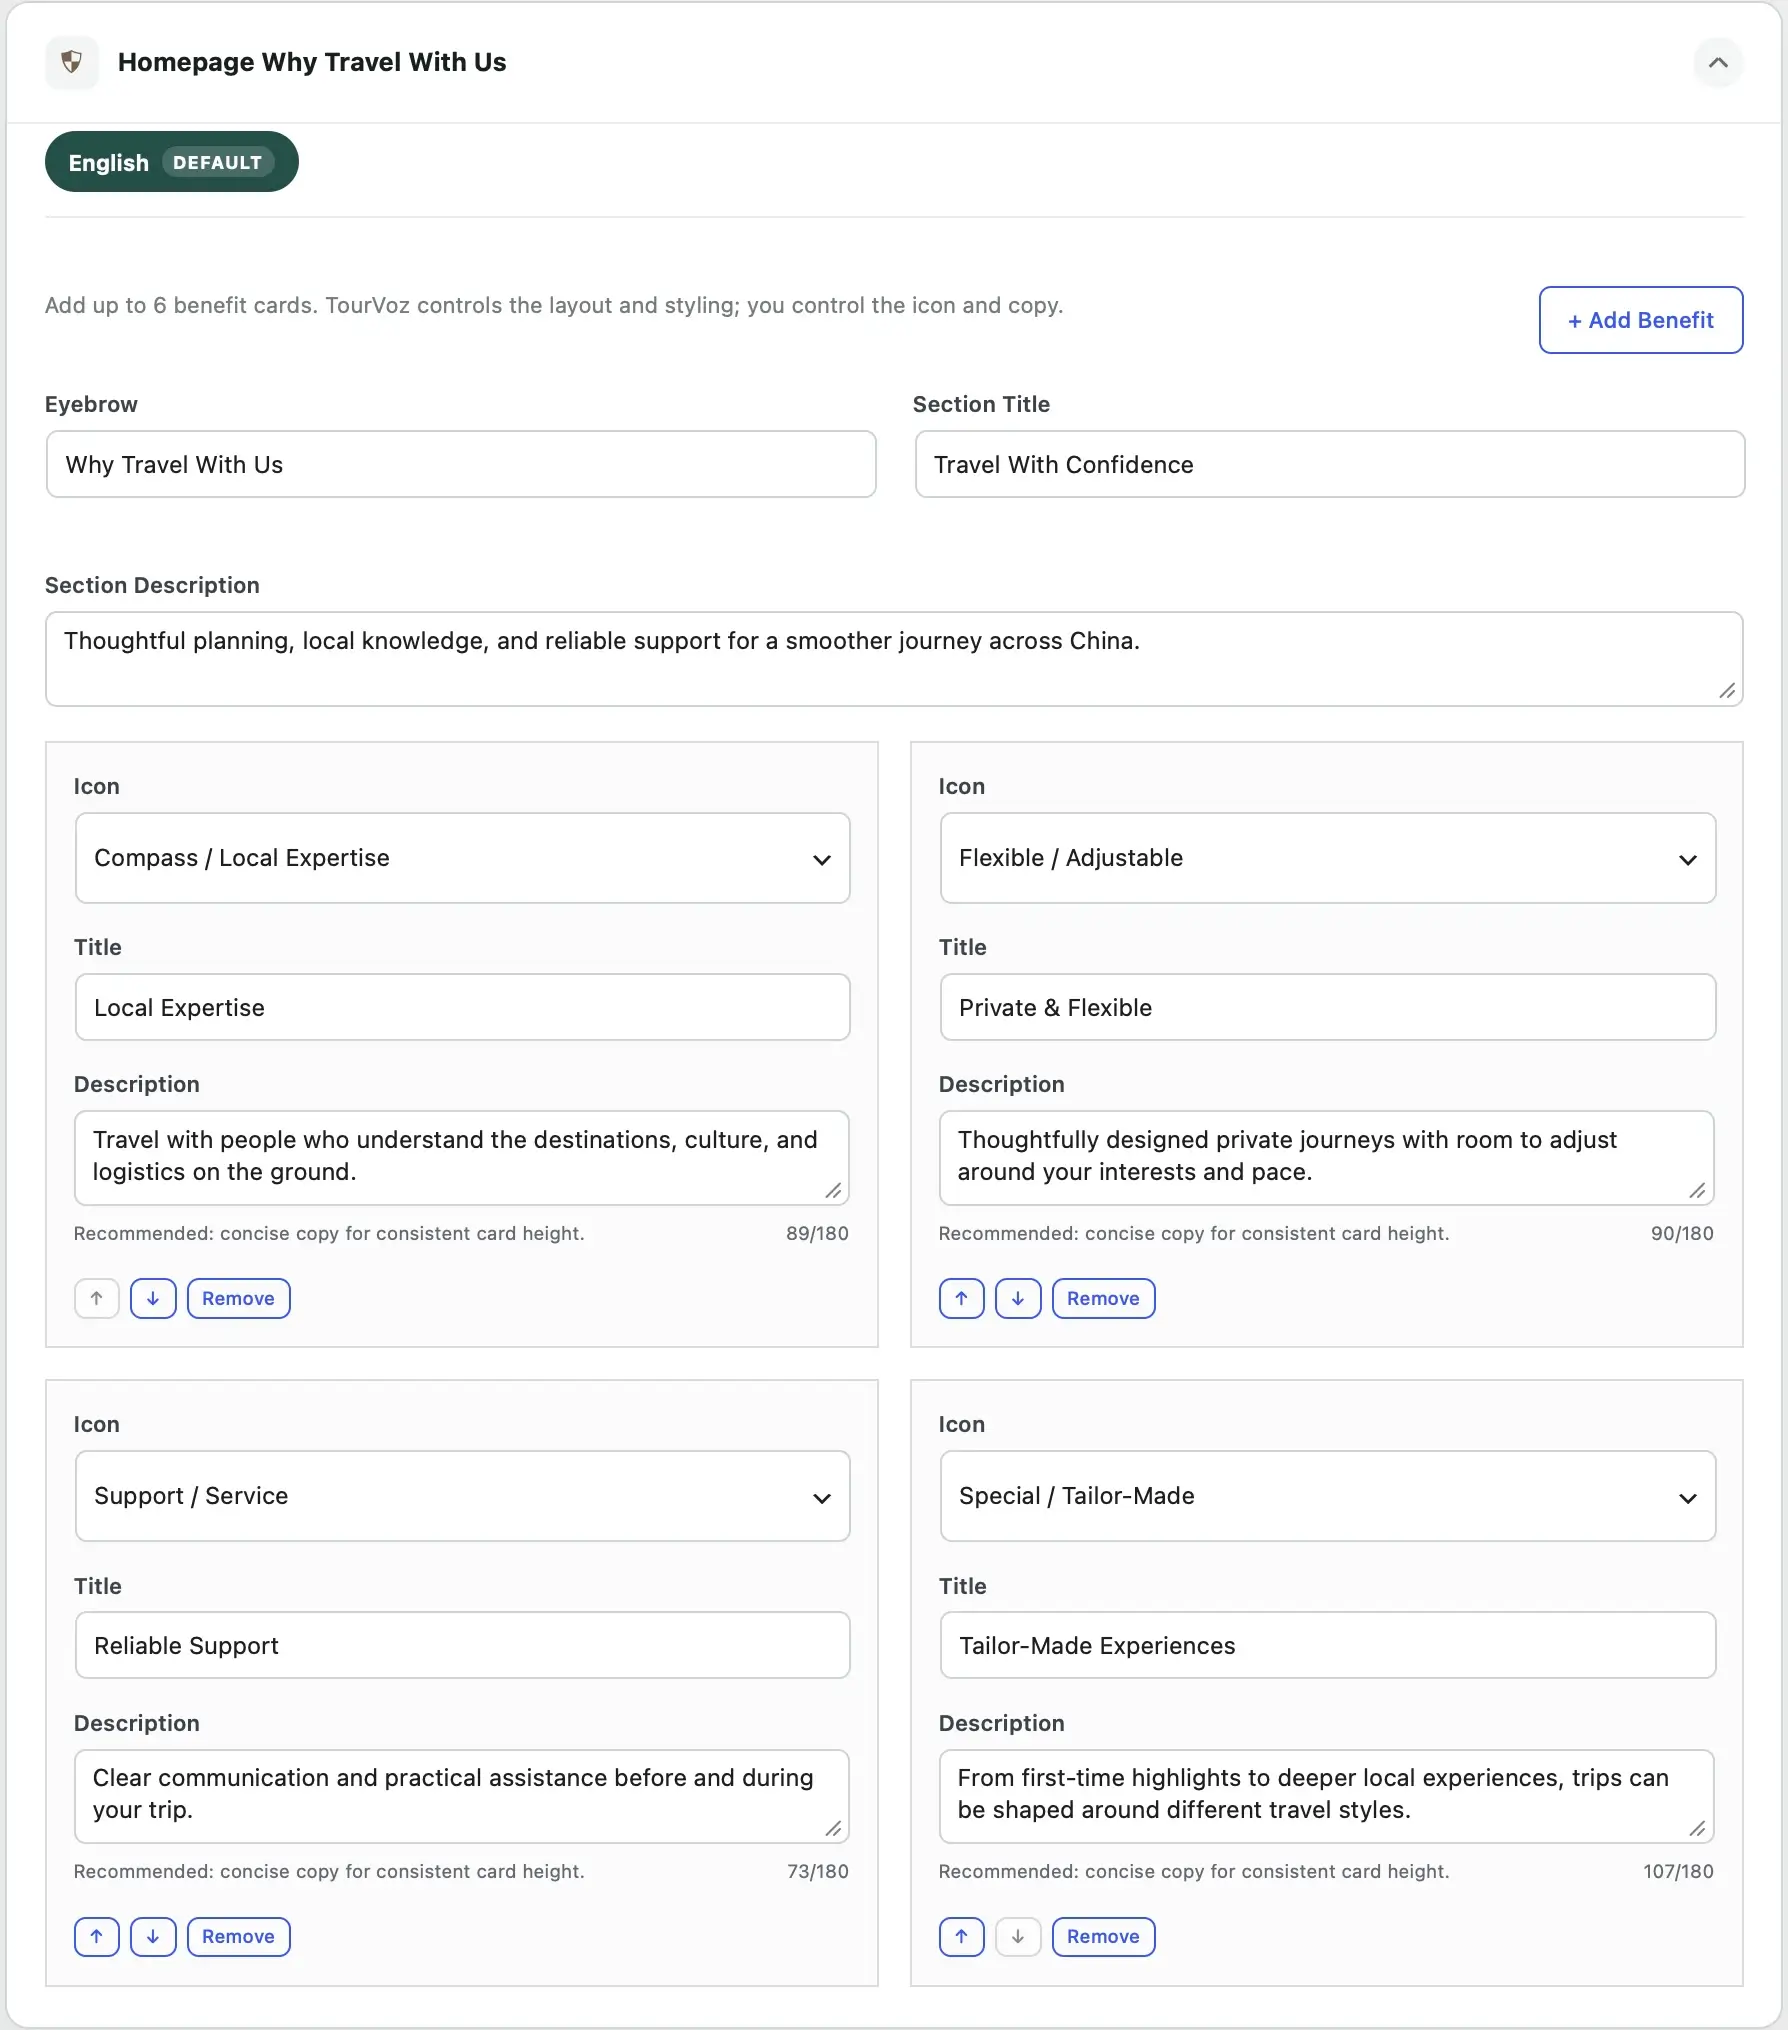
Why Travel With Us is used to manage the service benefits section on your homepage. You can customize the section heading and introduction, then use Benefit cards to highlight your brand strengths, service advantages, and reasons travelers may choose your business.
Set the Section Heading and Introduction
The Why Travel With Us section provides Eyebrow, Section Title, and Section Description fields for controlling the heading and introductory content of this section.
Eyebrow
A short label displayed above the main heading. For example, Why Travel With Us.
Section Title
The main heading of the section. For example, Travel With Confidence.
Section Description
A short introduction displayed below the heading to summarize your services and the travel experience you provide.
The purpose of Why Travel With Us is to help travelers quickly understand your key advantages. Keep the heading and description focused on the information that matters most.
Add and Set Up Benefit Cards
Each Benefit card represents one service advantage you want to highlight to travelers. TourVoz supports up to 6 Benefits in this section.
Click + Add Benefit in the upper-right corner to add a new Benefit card.
Each card can be configured with an Icon, Title, and Description.
Choose a Benefit Icon
Use the Icon dropdown in each Benefit card to select the icon that best represents that advantage.
TourVoz includes a selection of icons suitable for travel websites. Simply choose the icon that matches your content, and TourVoz will automatically handle its styling and presentation on the frontend.
Add a Title and Description
Use Title for a short name for the benefit, and use Description to explain what that advantage means for travelers.
For example, you can highlight Local Expertise, Private & Flexible, Reliable Support, or other strengths that are relevant to your travel business.
Instead of only describing your internal capabilities, explain what each advantage means for the traveler, such as deeper local experiences, more flexible private trips, or reliable support throughout their journey.
Keep Benefit Content Concise
Keep each Benefit card focused on one clear message, and try to maintain similar title and description lengths across the cards.
The Description field supports up to 180 characters. You do not need to use the full character limit. Short, clear descriptions usually work better on the homepage.
Reorder Benefit Cards
Each Benefit card includes up and down controls at the bottom. Use these controls to change the order in which the Benefit cards appear on the homepage.
Consider placing your most important or distinctive advantages first, especially those you want travelers to notice immediately.
Add or Remove Benefits
If a Benefit card is no longer needed, click Remove at the bottom of that card.
To add another Benefit, click + Add Benefit in the upper-right corner. You can add up to 6 Benefits.
If you currently have only three or four meaningful service advantages, keeping the section focused is usually better than adding repetitive or generic content just to fill every available position.
After setting the section content, Benefit cards, and display order, click Save Site Settings at the bottom of the page.
Then open your homepage and check that the heading, description, icons, Benefit content, and display order appear as expected.
Homepage SEO
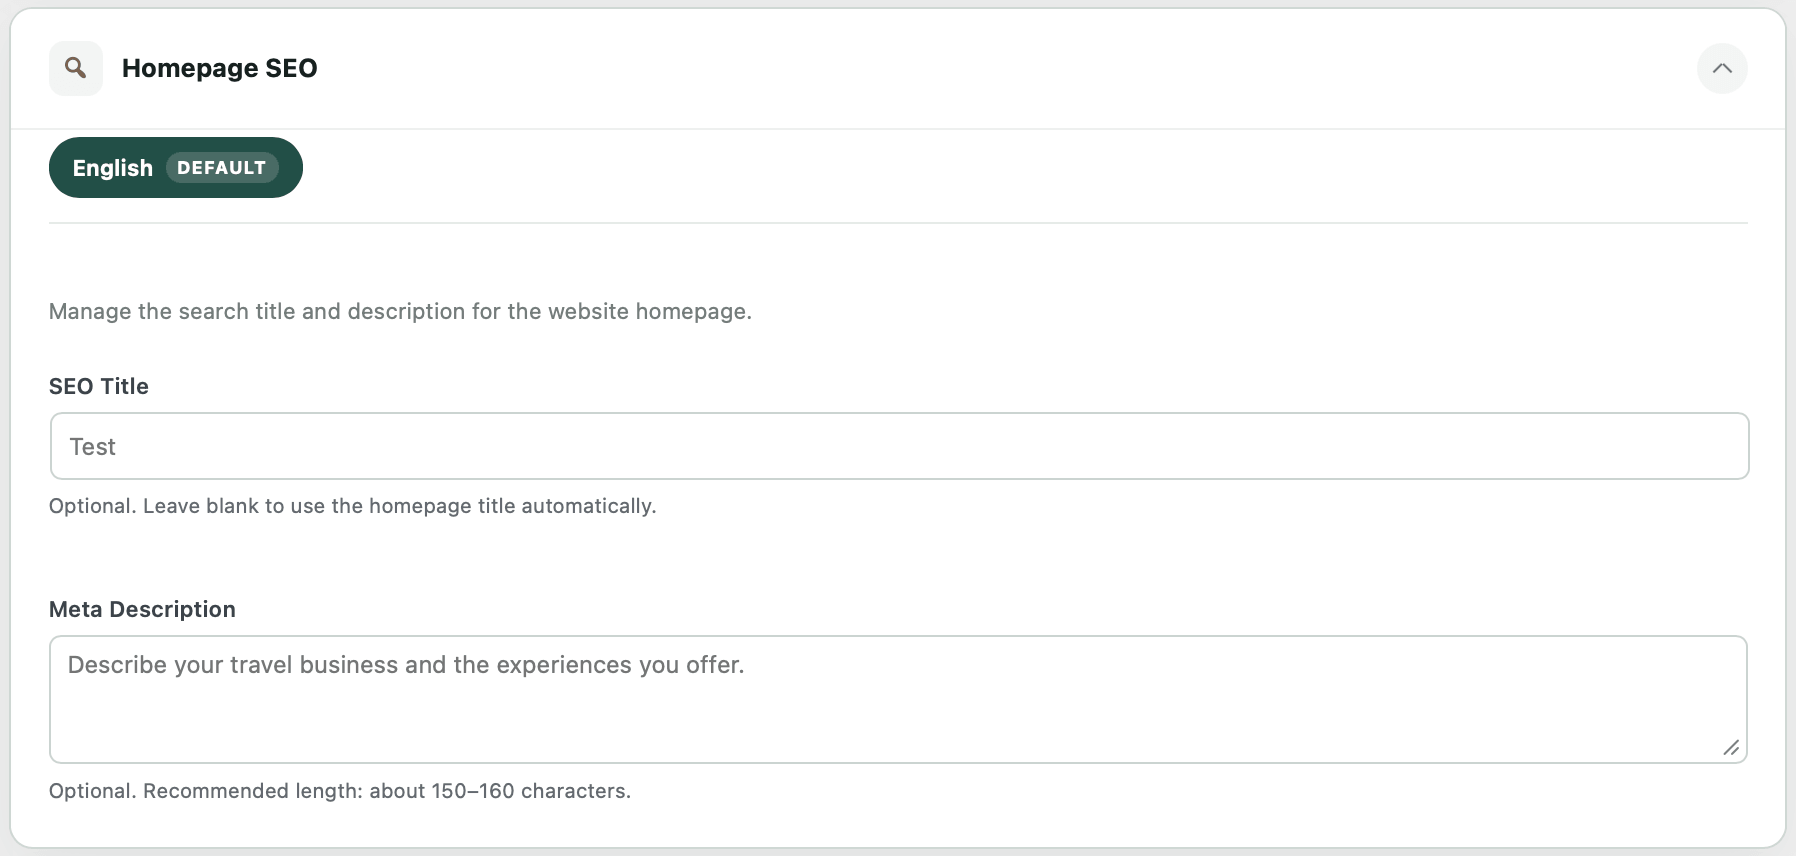
Homepage SEO is used to manage the search title and description for your website homepage. This information helps search engines understand the page and may appear in search results such as Google.
Set the SEO Title
SEO Title controls the search title for your homepage. Keep it clear and concise, and use it to describe your main travel business, destination, or service where appropriate.
For example, if your business focuses on private tours in Beijing, the title can clearly communicate the destination and core service instead of using only your brand name.
If you leave SEO Title blank, TourVoz will automatically use the homepage title. You do not need to enter a title simply to complete the field.
Write the Meta Description
Meta Description provides a short summary of your travel business and the experiences or services you offer.
Use natural language to describe your main destinations, types of tours, and key service strengths so search users can quickly understand what your website offers.
The recommended length is about 150–160 characters. Meta Description is also optional.
The SEO Title and Meta Description in Homepage SEO are primarily used for search engine information. To change the main heading and introduction shown in the homepage Hero, use the Homepage Hero settings instead.
After completing the Homepage SEO settings, click Save Site Settings at the bottom of the page.
Search engines may need time to recrawl your website after an update, so the title and description shown in search results may not change immediately.
About Page
About Page is used to manage the main content of your website's About page. You can set the page heading, introduction, brand story, and image, as well as manage the SEO Title and Meta Description for the page.
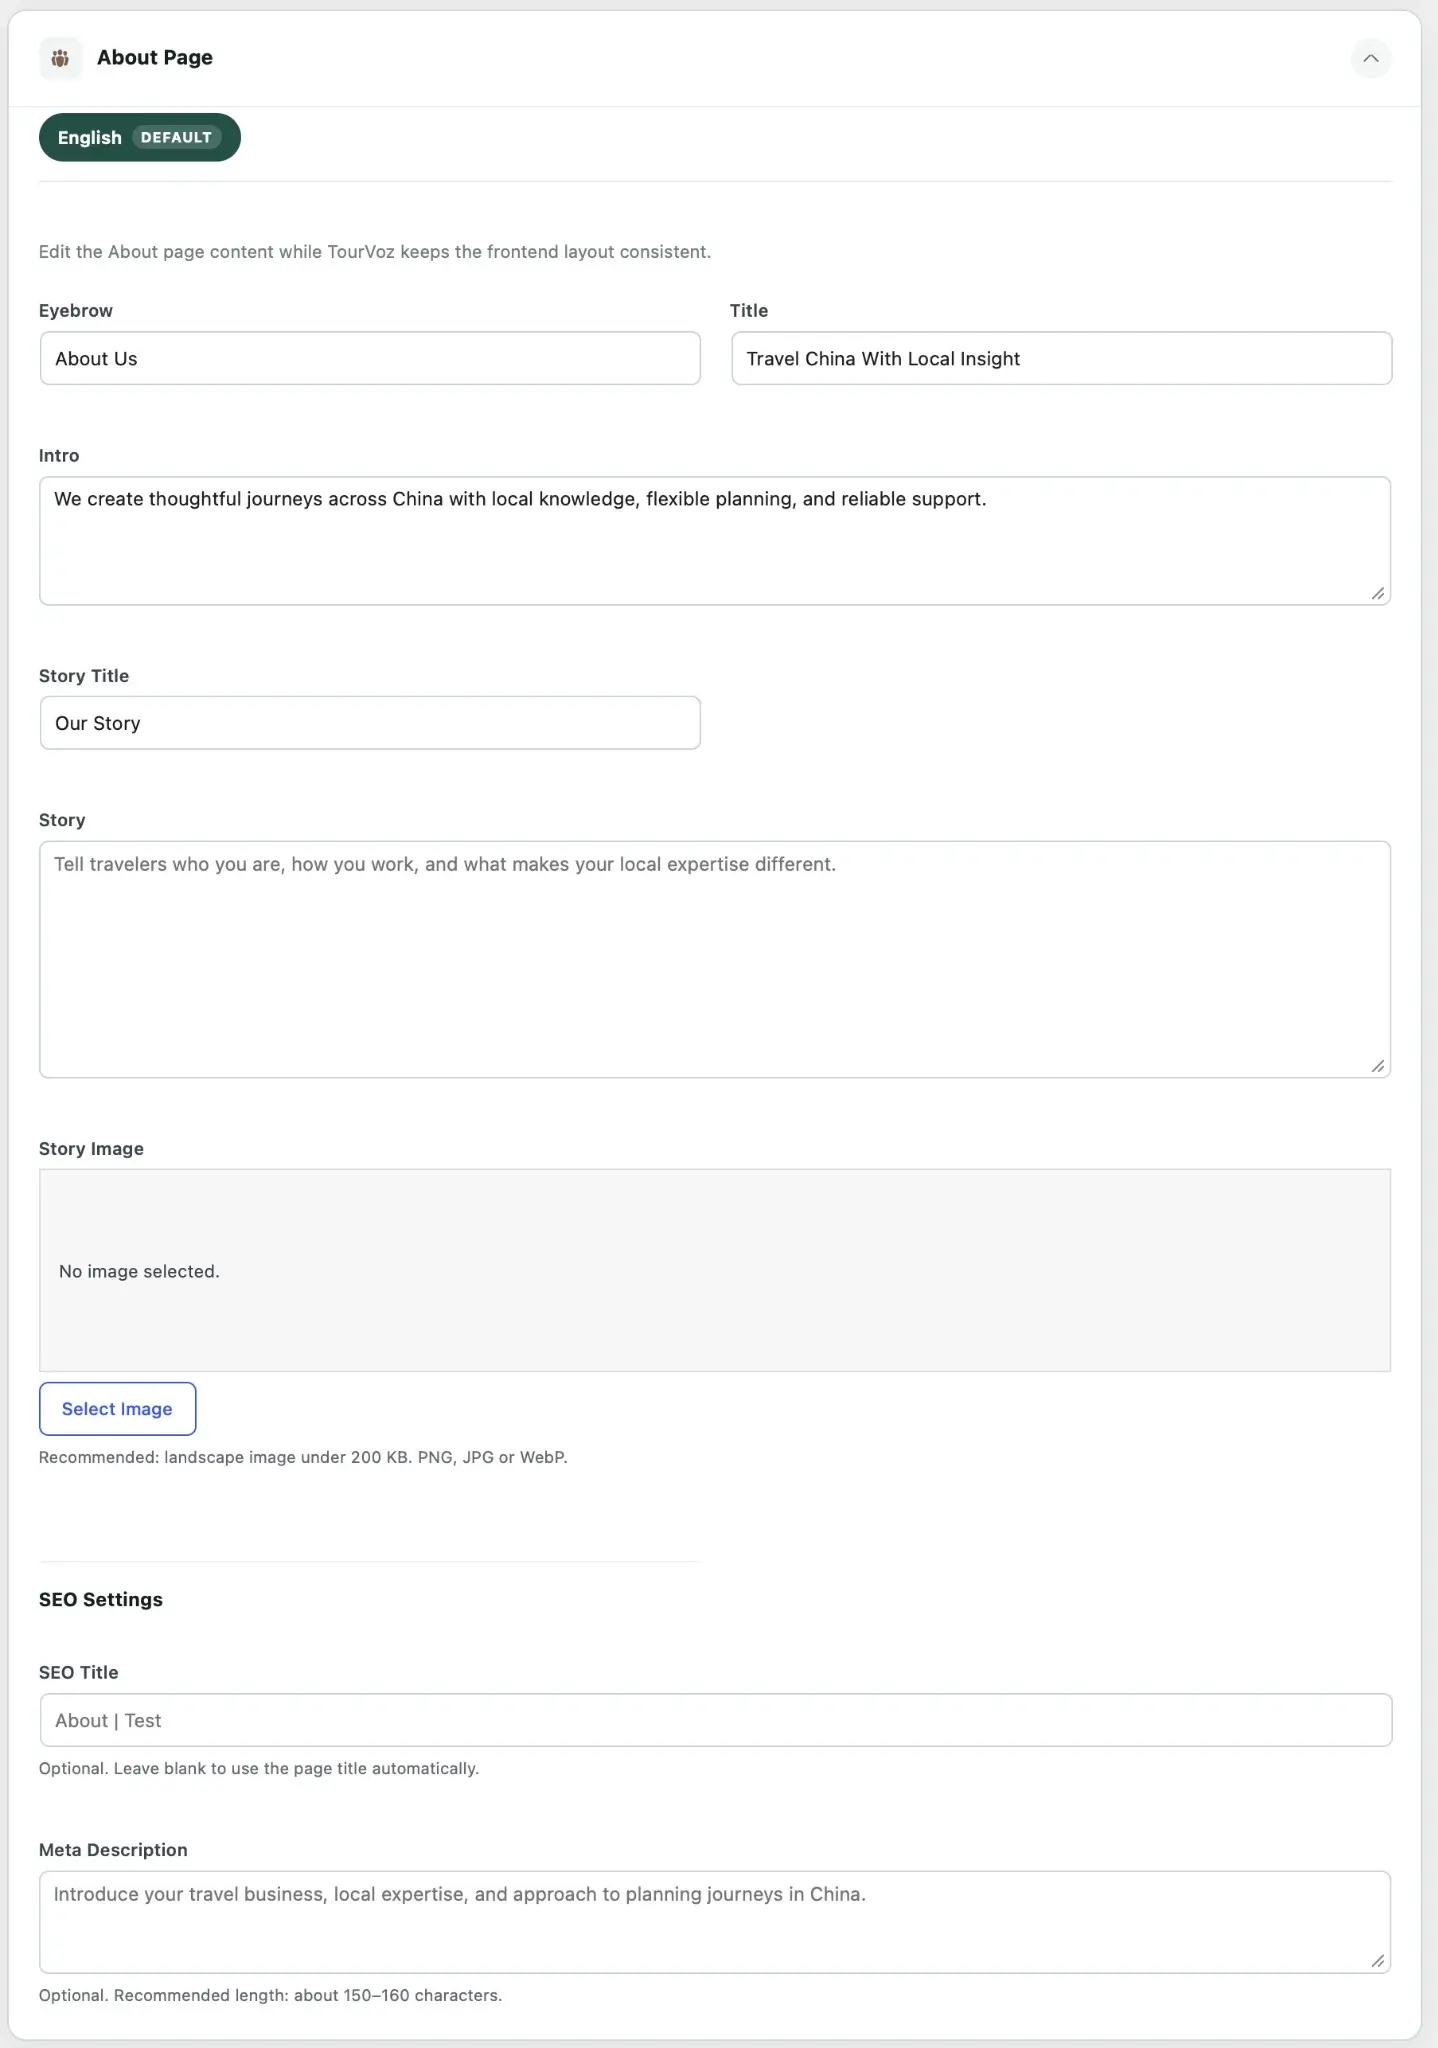
Set the Page Heading and Introduction
The top of the About Page settings includes Eyebrow, Title, and Intro for managing the main heading area of the page.
Eyebrow
A short label displayed near the main page heading. For example, About Us.
Title
The main heading of your About page. Use a concise statement that reflects your brand, travel philosophy, or positioning.
Intro
A short introduction to your travel business, the way you work, or the type of travel experience you provide.
Tell Your Story
Story Title sets the heading for your story section, such as Our Story.
Use the Story field to introduce your team, business background, approach to travel planning, and local expertise.
Your About page can do more than introduce your company. Use it to explain who is behind the business, how you work, and why your team understands the destinations and experiences you offer.
Upload a Story Image
Click Select Image to upload or choose an image for the story section.
A landscape image is recommended. Whenever possible, use an authentic photo that represents your team, local experiences, service, or brand.
Keep the image file under 200 KB where possible. PNG, JPG, and WebP formats are supported. Smaller optimized images help reduce page loading time.
Set the About Page SEO
The SEO Settings section at the bottom of the page lets you manage the search title and description specifically for the About page.
SEO Title
Set the search title for the About page. If left blank, TourVoz will automatically use the page title.
Meta Description
Write a short summary of your travel business, local expertise, and approach to serving travelers. The recommended length is about 150–160 characters.
After completing the About Page content, image, and SEO settings, click Save Site Settings at the bottom of the page.
Then open the About page on your website and check that the heading, introduction, story, image, and overall layout appear as expected.
Contact Page
Contact Page is used to manage the main content of your website's Contact page. You can set the page heading, introduction, contact section content, as well as the SEO Title and Meta Description for the page.
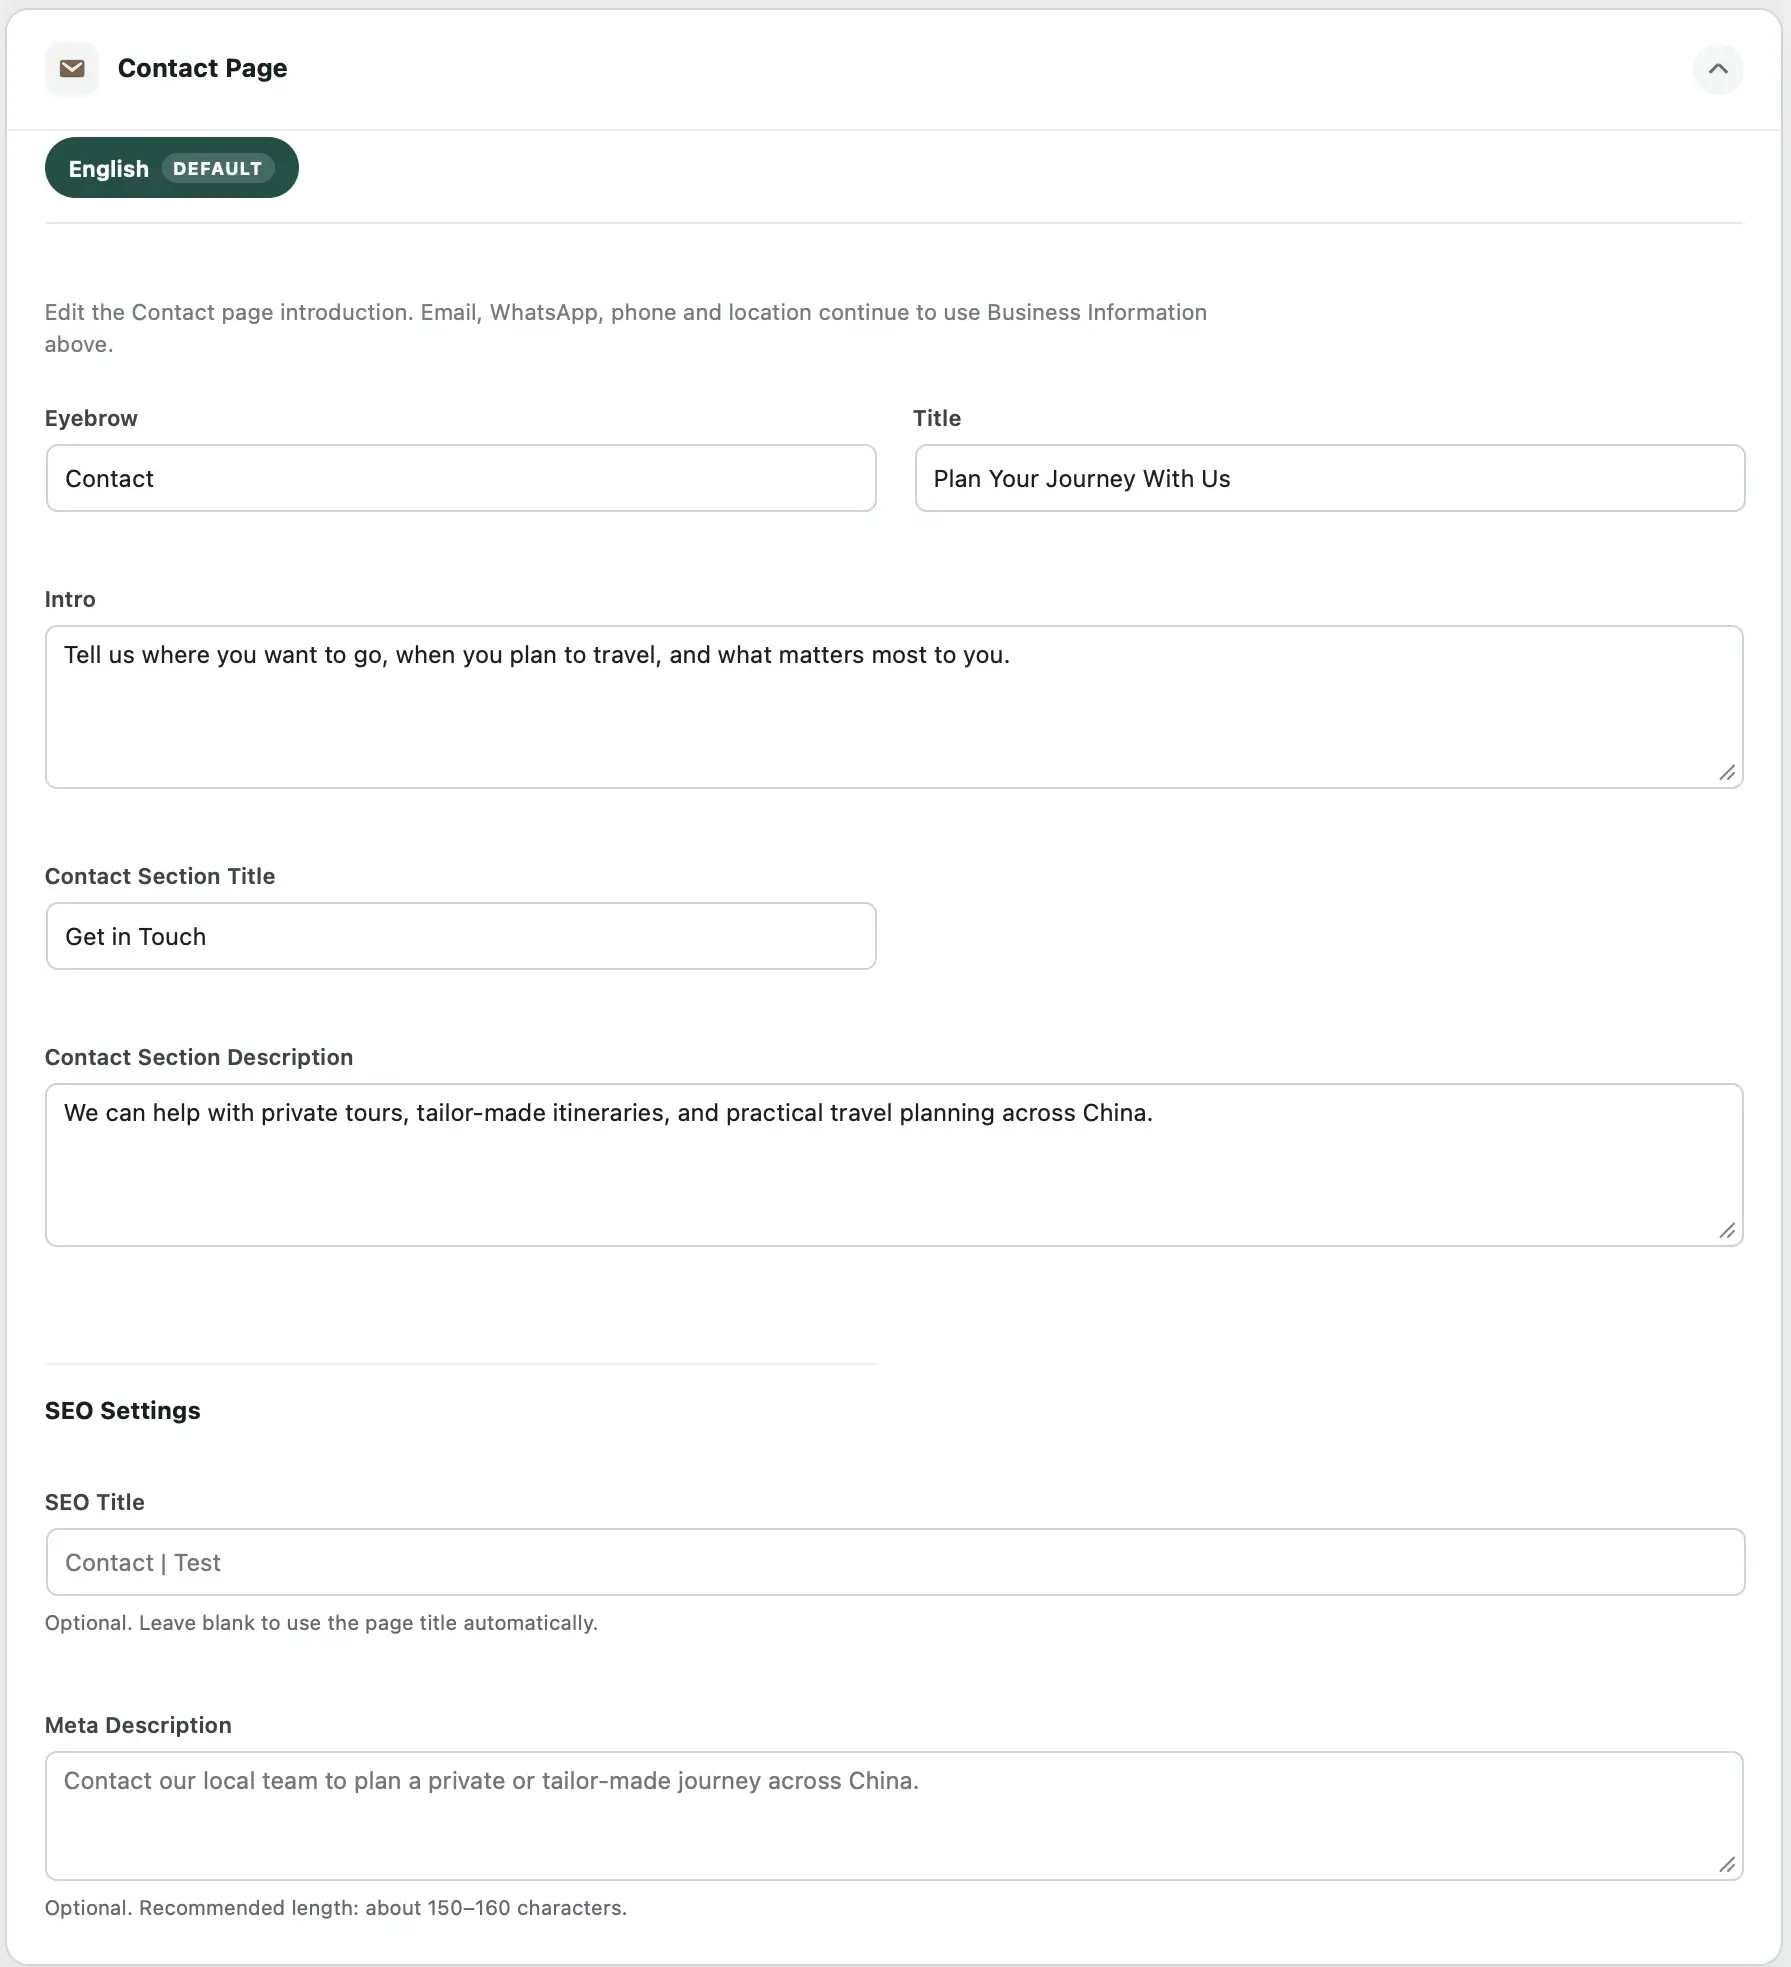
Set the Page Heading and Introduction
The top of the Contact Page settings includes Eyebrow, Title, and Intro for managing the main content at the top of the page.
Eyebrow
A short label displayed near the main page heading. For example, Contact.
Title
The main heading of your Contact page. Use a clear, welcoming message that encourages travelers to get in touch with your team.
Intro
A short introduction explaining what travelers can contact you about, such as destinations, travel dates, private tours, or tailor-made journeys.
Set the Contact Section Content
Contact Section Title sets the heading for the contact information section, such as Get in Touch.
Contact Section Description lets you briefly explain the services you provide and the types of travel requests visitors can discuss with your team.
Contact Page only controls the page content. Email, WhatsApp, phone, and location continue to use the details entered in Business Information.
To update these contact details, return to Business Information in Site Settings.
Set the Contact Page SEO
The SEO Settings section at the bottom of the page lets you manage the search title and description specifically for the Contact page.
SEO Title
Set the search title for the Contact page. If left blank, TourVoz will automatically use the page title.
Meta Description
Briefly explain how travelers can contact your team and summarize the main travel services or inquiries you support. The recommended length is about 150–160 characters.
After completing the Contact Page content and SEO settings, click Save Site Settings at the bottom of the page.
Then open the Contact page on your website and check that the page content and your Email, WhatsApp, phone, and location details appear correctly.
Destinations Hub
Destinations Hub is used to manage the introductory content and SEO information for the main Destinations page. You can set the Eyebrow, Title, Description, SEO Title, and Meta Description here.
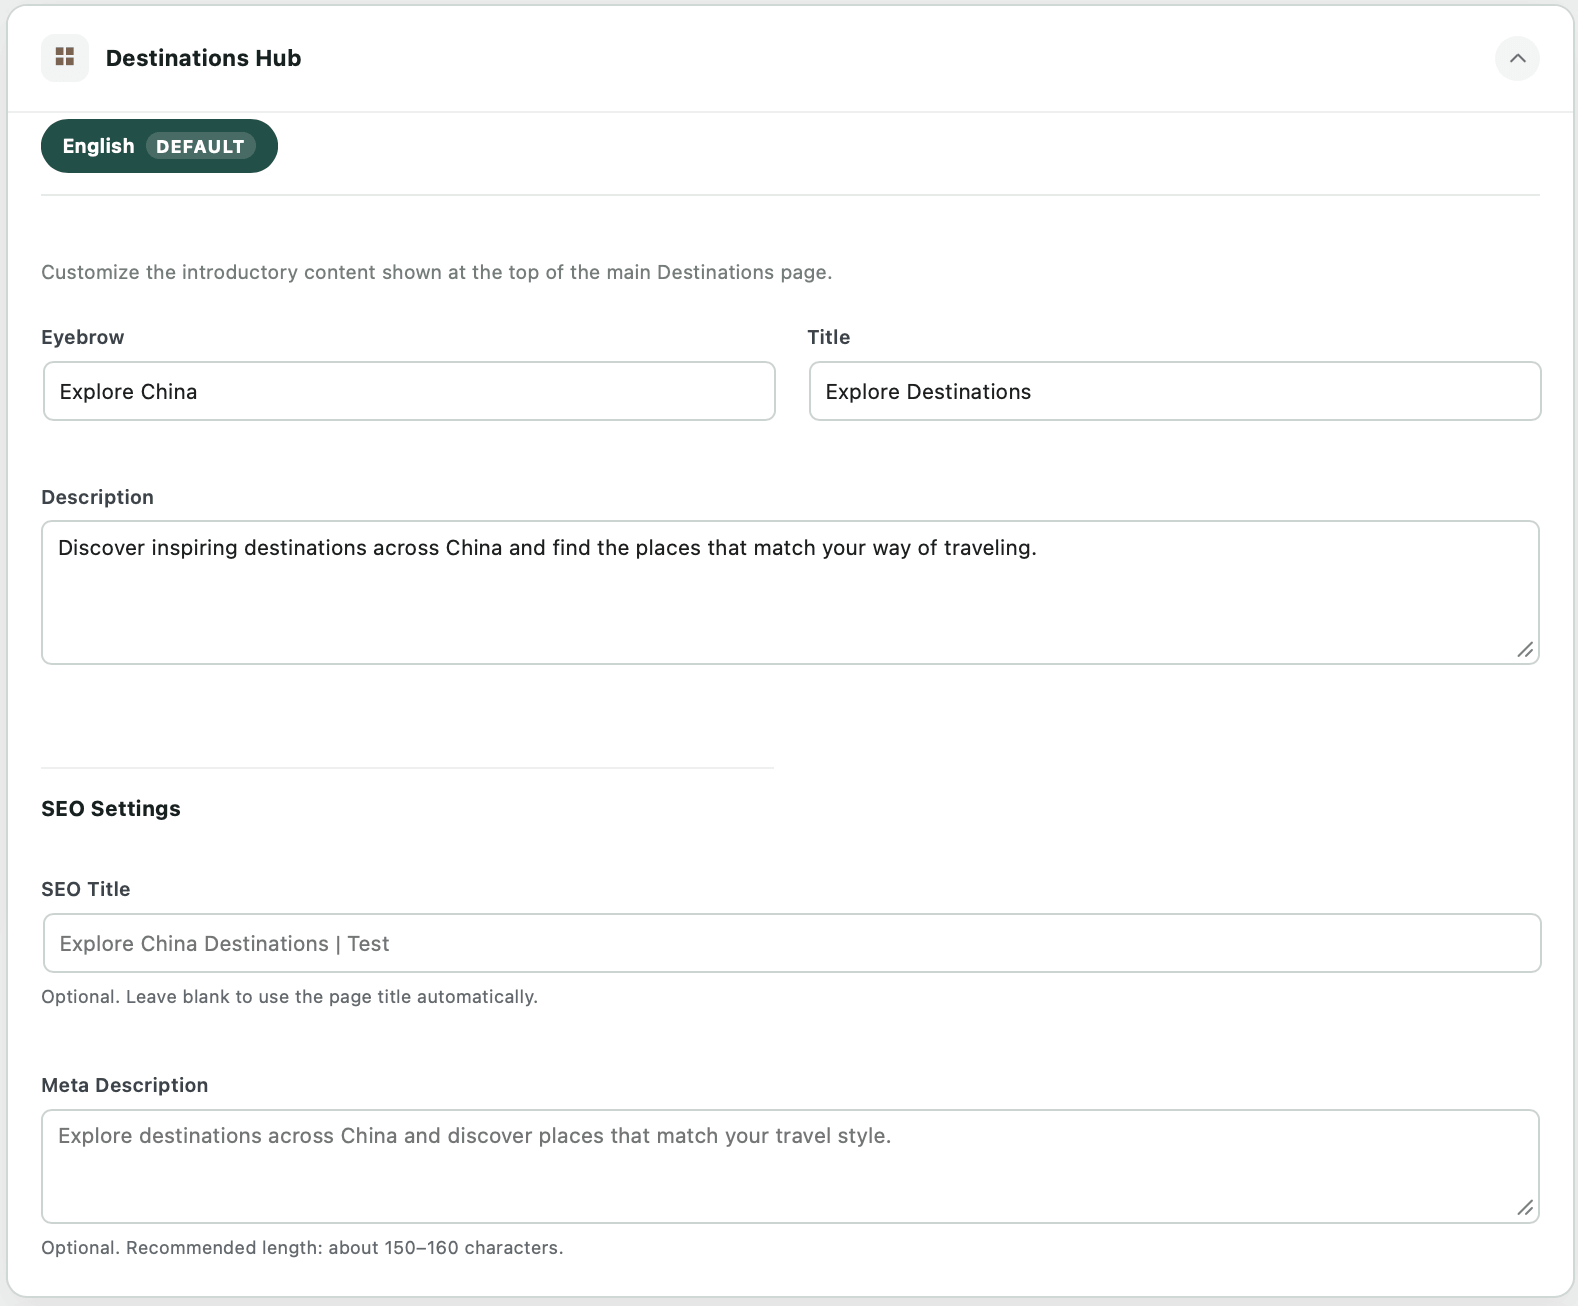
Set the Destinations Page Introduction
Destinations Hub provides Eyebrow, Title, and Description fields for managing the introductory content at the top of the main Destinations page.
Eyebrow
A short label displayed near the main page heading. For example, Explore China.
Title
The main heading of the Destinations page. For example, Explore Destinations.
Description
A short introduction explaining what destinations travelers can explore on this page and helping them discover places that match their travel interests.
Homepage → Destinations controls which destinations are featured on your homepage and the order in which they appear.
Destinations Hub controls the introductory content and SEO information for the main Destinations page. These settings affect different areas of your website.
Set the Destinations Hub SEO
The SEO Settings section at the bottom of the page lets you manage the search title and description for the main Destinations page.
SEO Title
Set the search title for the Destinations page. If left blank, TourVoz will automatically use the page title.
Meta Description
Briefly describe the destinations your website covers and what travelers can explore on this page. The recommended length is about 150–160 characters.
Destinations Hub manages the introduction and SEO information for the main Destinations page. To create, edit, or manage individual destinations, go to Destinations in your dashboard.
After completing the Destinations Hub content and SEO settings, click Save Site Settings at the bottom of the page.
Then open the Destinations page on your website and check that the heading, description, and overall presentation appear as expected.
Tours Archive
Tours Archive is used to manage the introductory content and SEO information for the main Tours archive. You can set the Eyebrow, Title, Description, SEO Title, and Meta Description here.
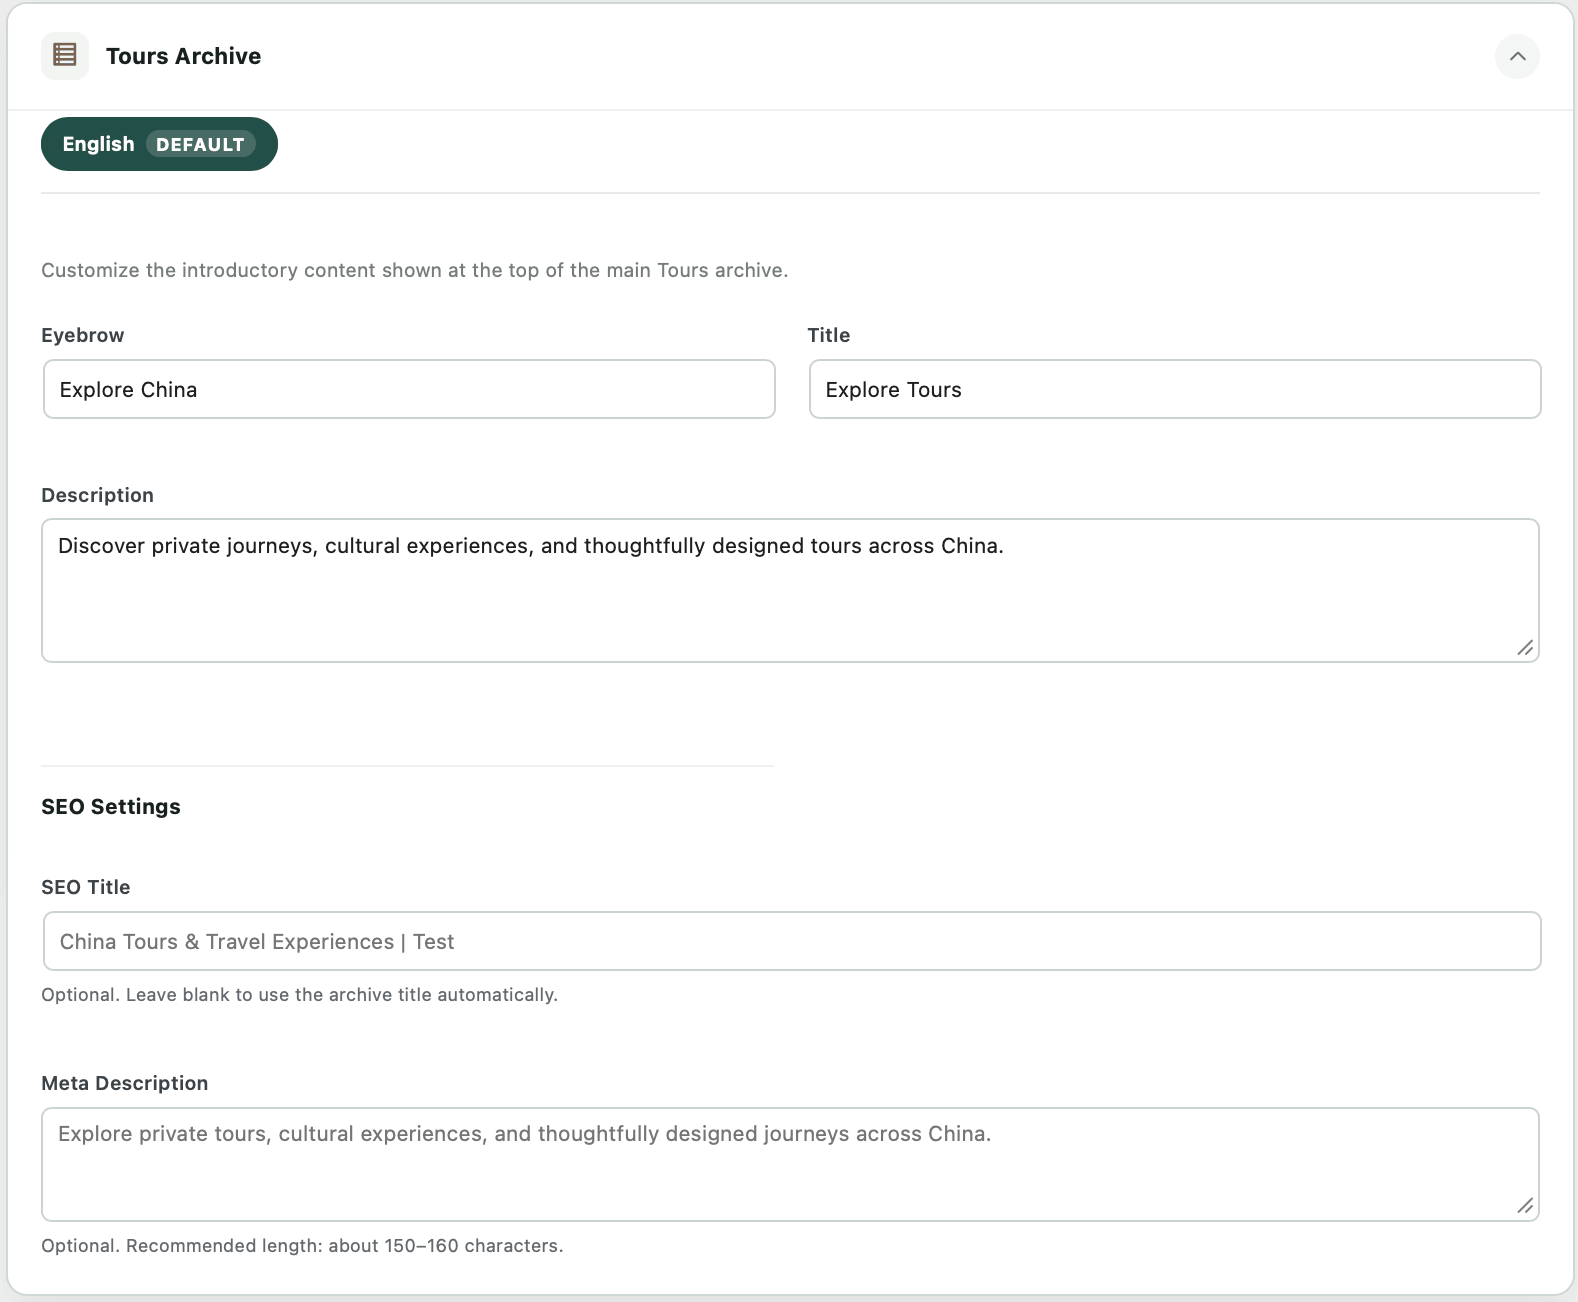
Set the Tours Archive Introduction
Tours Archive provides Eyebrow, Title, and Description fields for managing the introductory content at the top of the main Tours archive.
Eyebrow
A short label displayed near the main page heading. For example, Explore China.
Title
The main heading of the Tours archive. For example, Explore Tours.
Description
A short introduction summarizing the tours and travel experiences available on your website and helping travelers understand what they can explore on this page.
Homepage → Featured Tours controls which Tours are featured on your homepage and the order in which they appear.
Tours Archive controls the introductory content and SEO information for the main Tours archive. These settings affect different areas of your website.
Set the Tours Archive SEO
The SEO Settings section at the bottom lets you manage the search title and description for the main Tours archive.
SEO Title
Set the search title for the Tours archive. If left blank, TourVoz will automatically use the archive title.
Meta Description
Briefly summarize the tours, travel experiences, and key services available on your website. The recommended length is about 150–160 characters.
Tours Archive only manages the introduction and SEO information for the main Tours archive. To create, edit, or manage individual Tours, go to Tours in your dashboard.
After completing the Tours Archive content and SEO settings, click Save Site Settings at the bottom of the page.
Then open the Tours page on your website and check that the heading, description, and overall presentation appear as expected.
Blog Archive
Blog Archive is used to manage the introductory content and SEO information for the main Blog archive. You can set the Eyebrow, Title, Description, SEO Title, and Meta Description here.
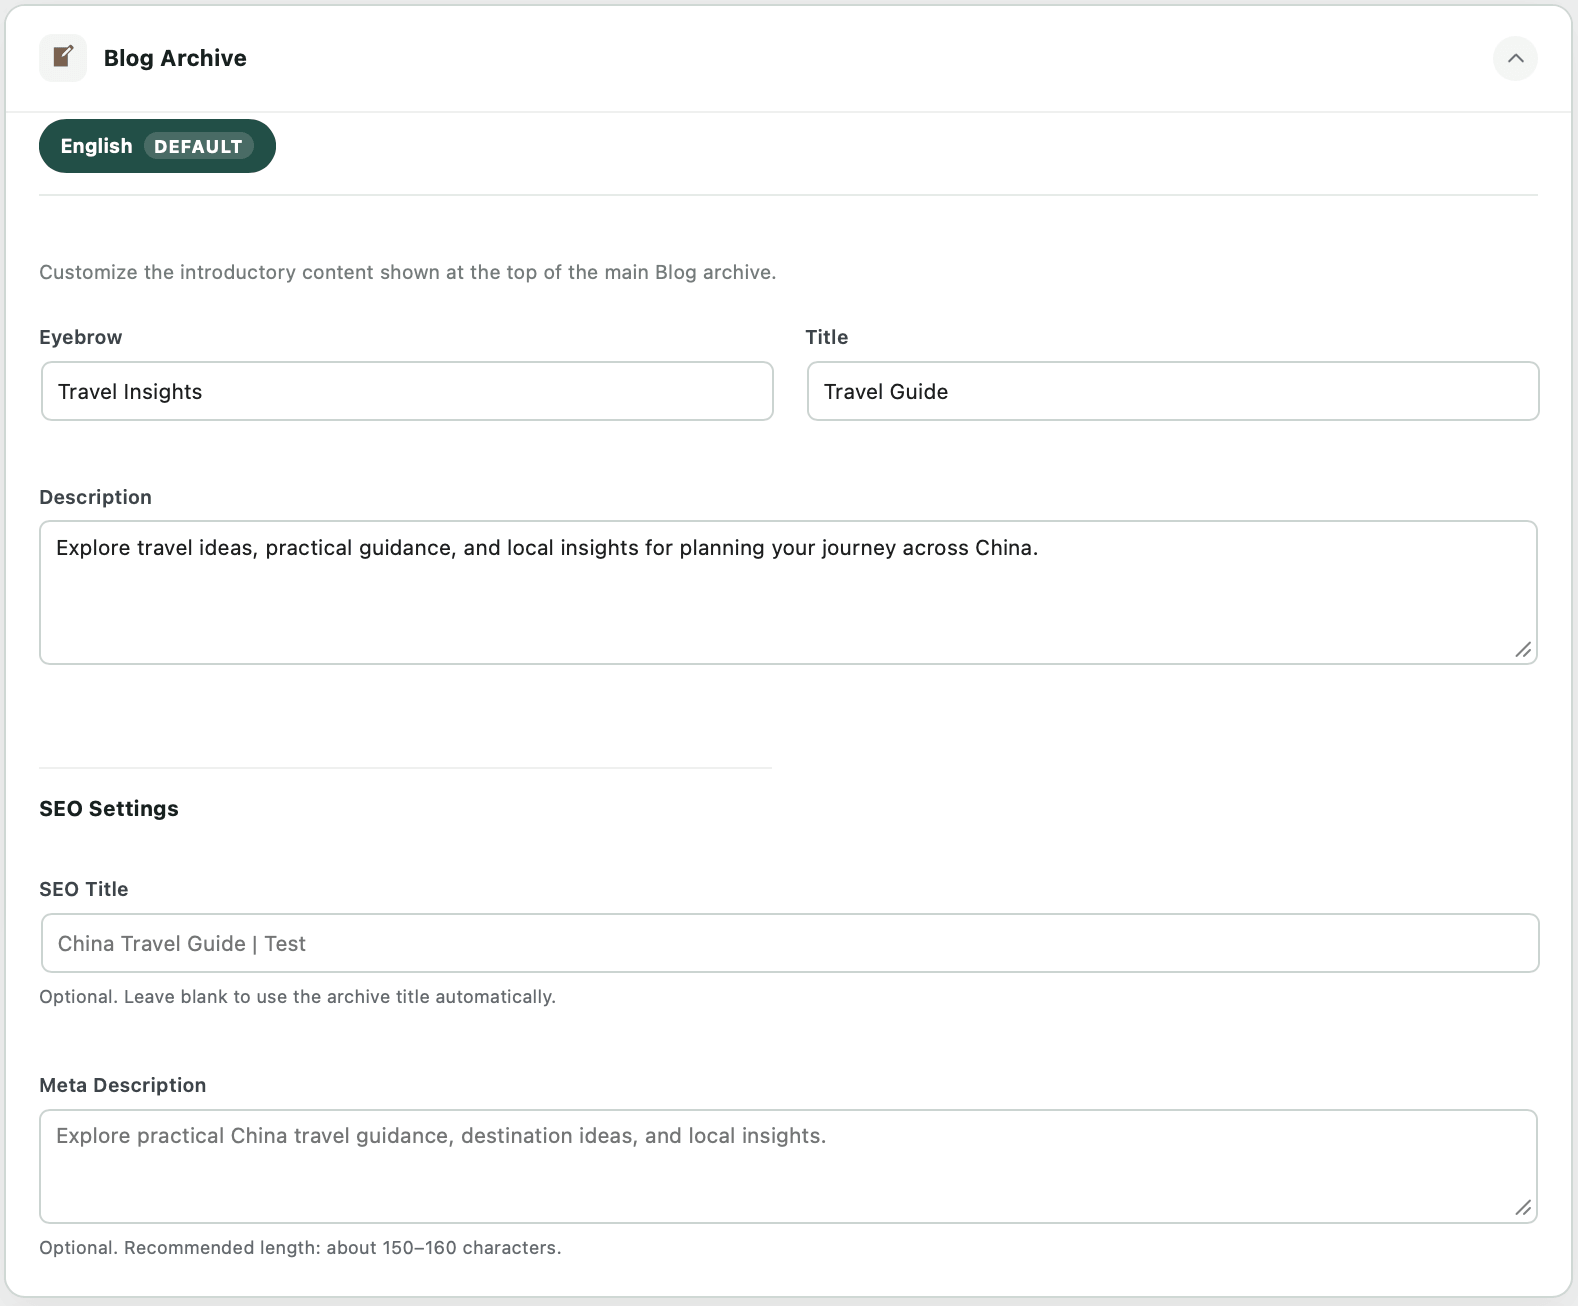
Set the Blog Archive Introduction
Blog Archive provides Eyebrow, Title, and Description fields for managing the introductory content at the top of the main Blog archive.
Eyebrow
A short label displayed near the main page heading. For example, Travel Insights.
Title
The main heading of the Blog archive. For example, Travel Guide.
Description
A short introduction explaining what travelers can find here, such as travel ideas, practical guides, destination inspiration, and local insights.
Set the Blog Archive SEO
The SEO Settings section at the bottom lets you manage the search title and description for the main Blog archive.
SEO Title
Set the search title for the Blog archive. If left blank, TourVoz will automatically use the archive title.
Meta Description
Briefly summarize the travel guides, destination ideas, and local insights available in your Blog. The recommended length is about 150–160 characters.
Blog Archive only manages the introduction and SEO information for the main Blog archive. To create, edit, or manage individual posts, go to Blog in your dashboard.
After completing the Blog Archive content and SEO settings, click Save Site Settings at the bottom of the page.
Then open the Blog page on your website and check that the heading, description, and overall presentation appear as expected.
Legal Pages
Legal Pages is used to manage the content of the fixed Privacy Policy and Terms pages on your website. You can enter or update the content here while TourVoz keeps the frontend typography and layout consistent.
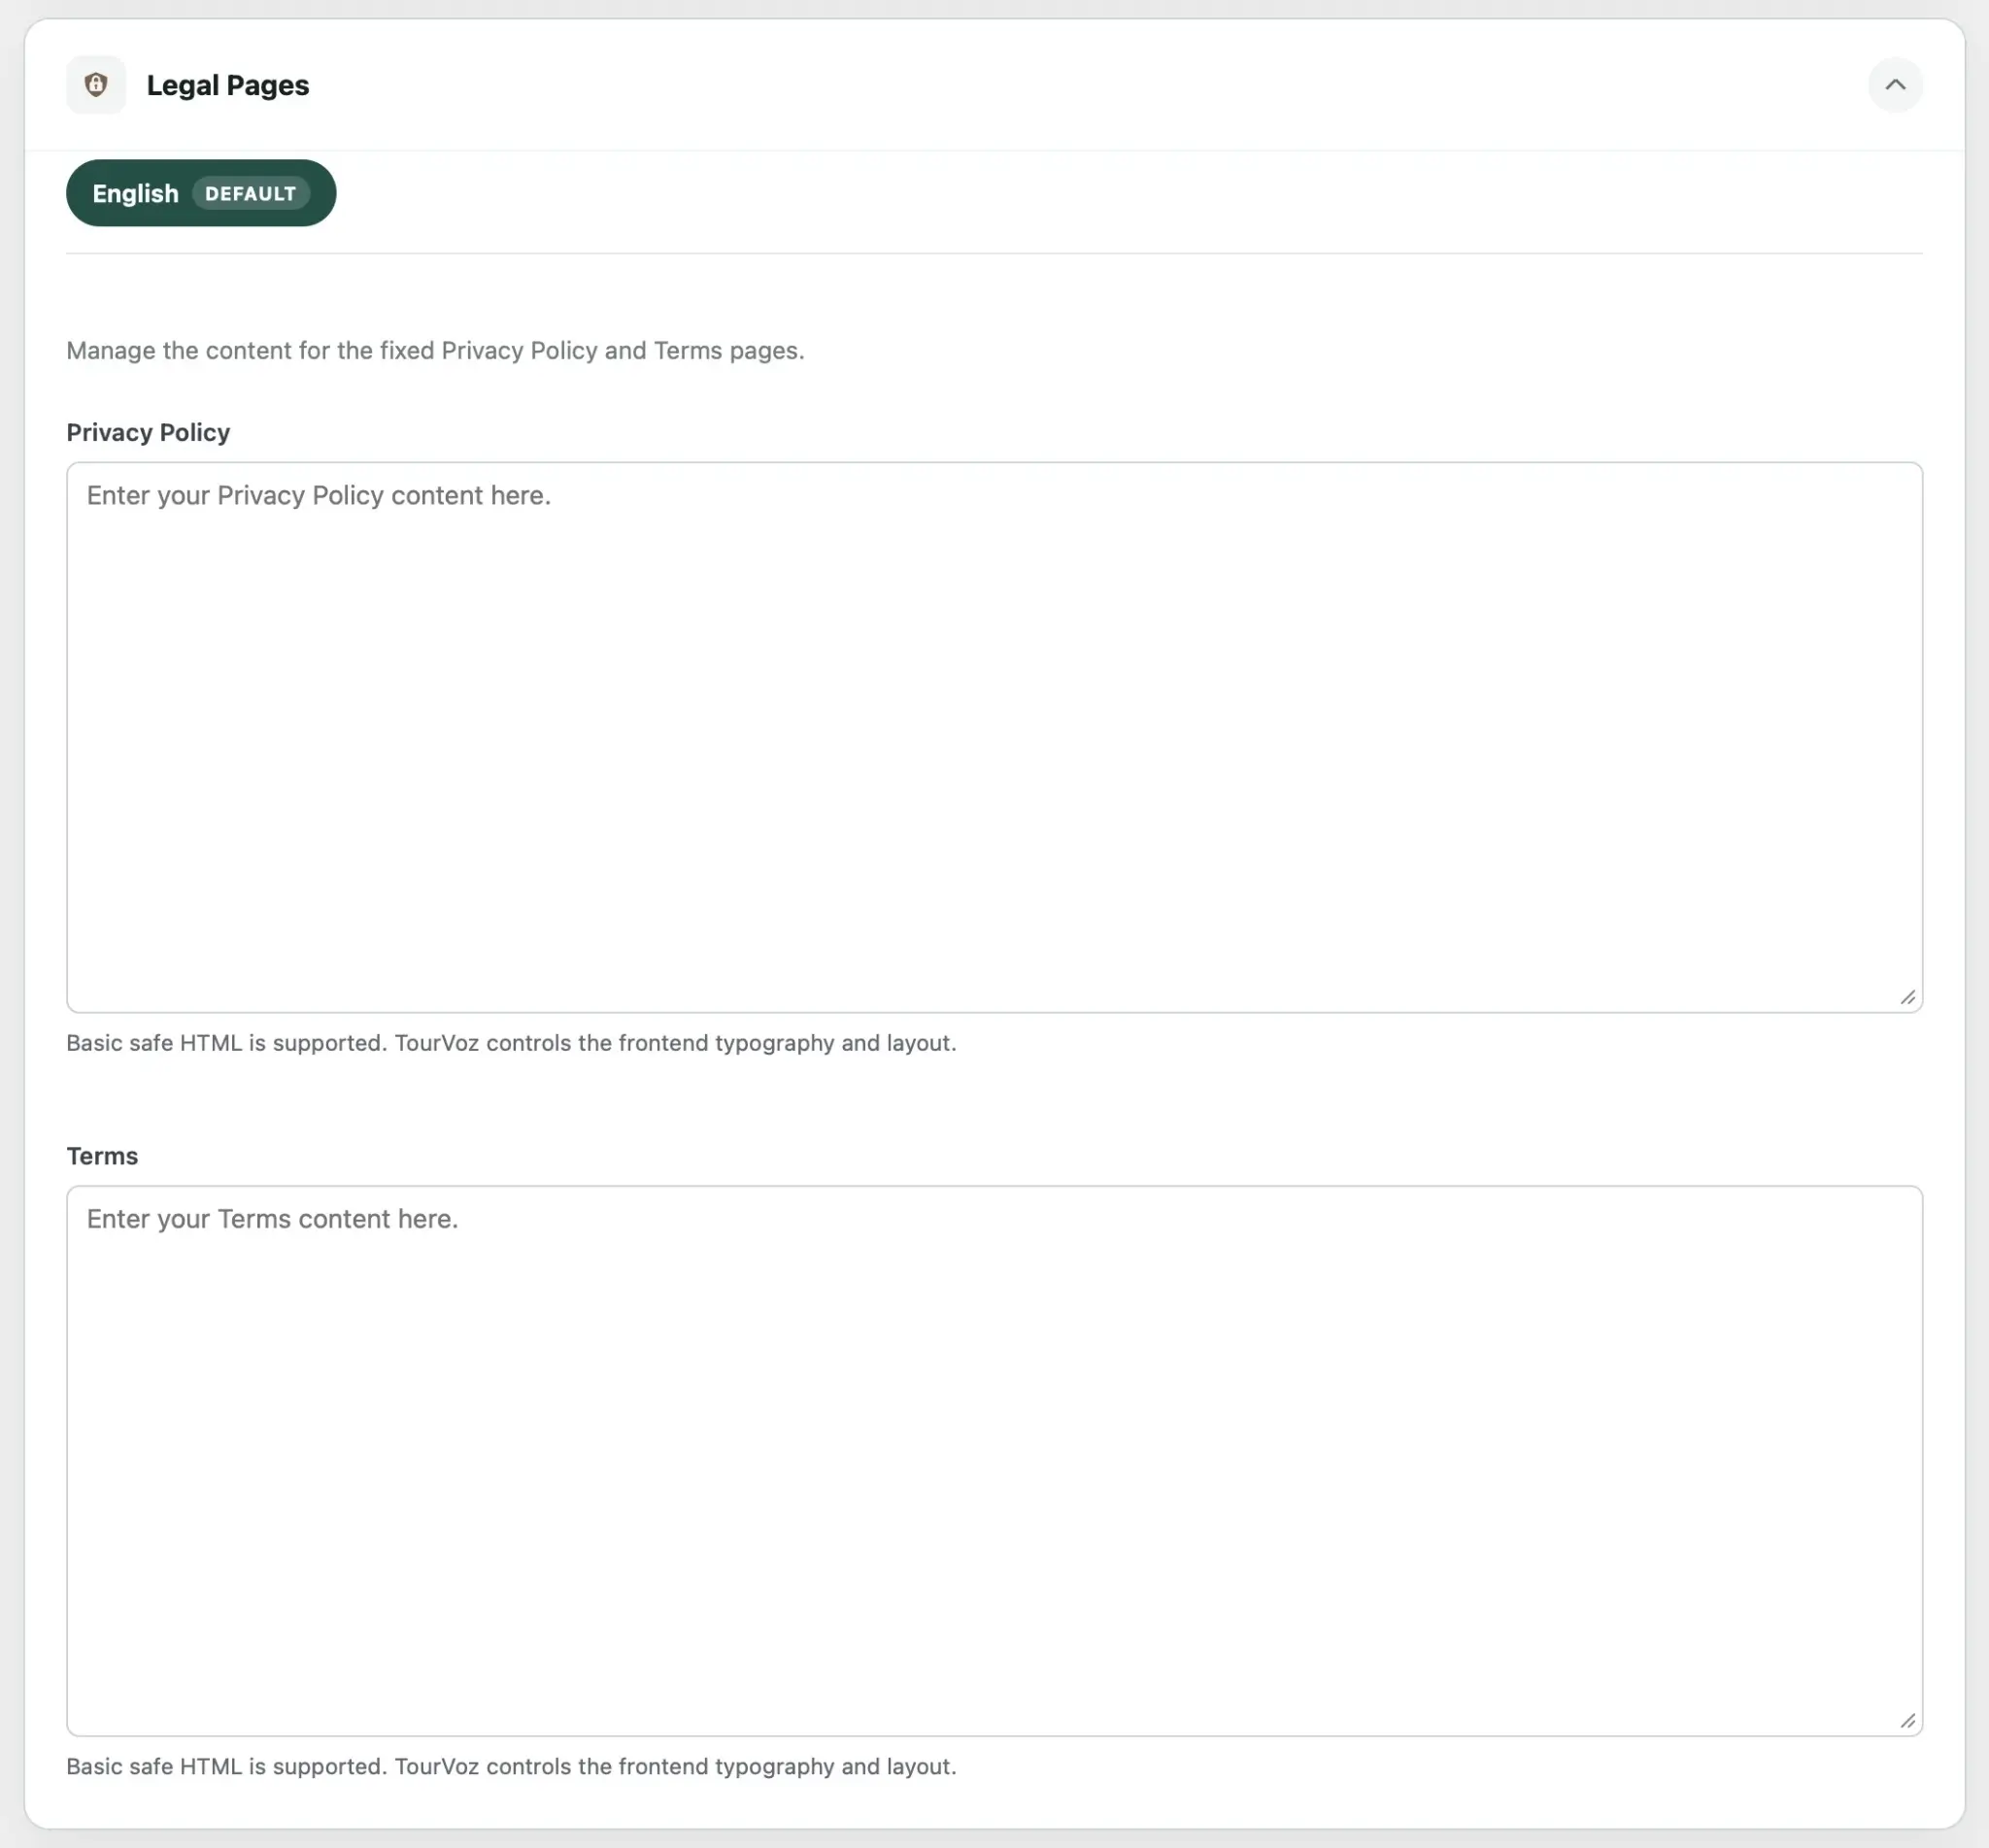
Add Your Privacy Policy
Use the Privacy Policy field to enter the privacy policy content for your website. This content is displayed on the fixed Privacy Policy page provided by TourVoz.
Prepare the content according to how your business collects, uses, and handles visitor information, and update it when your business practices or applicable requirements change.
Add Your Terms
Use the Terms field to enter the terms content for your website. This content is displayed on the fixed Terms page provided by TourVoz.
Prepare the content according to your actual business, services, and applicable requirements, and update it when necessary.
The Privacy Policy and Terms fields support Basic safe HTML for organizing essential content structure. TourVoz controls the frontend typography and overall page layout.
TourVoz provides the fixed pages and content management tools, but legal and compliance requirements can vary by country, region, and business model. Prepare your Privacy Policy and Terms according to your own business, and seek appropriately qualified professional advice when necessary.
After completing the Privacy Policy and Terms content, click Save Site Settings at the bottom of the page.
Then open the Privacy Policy and Terms pages on your website and check that the content, paragraphs, and overall presentation appear as expected.
Footer
Footer is used to manage the content displayed in your website footer. You can configure the brand description, contact information, footer menus, social links, Footer CTA, and bottom links here.
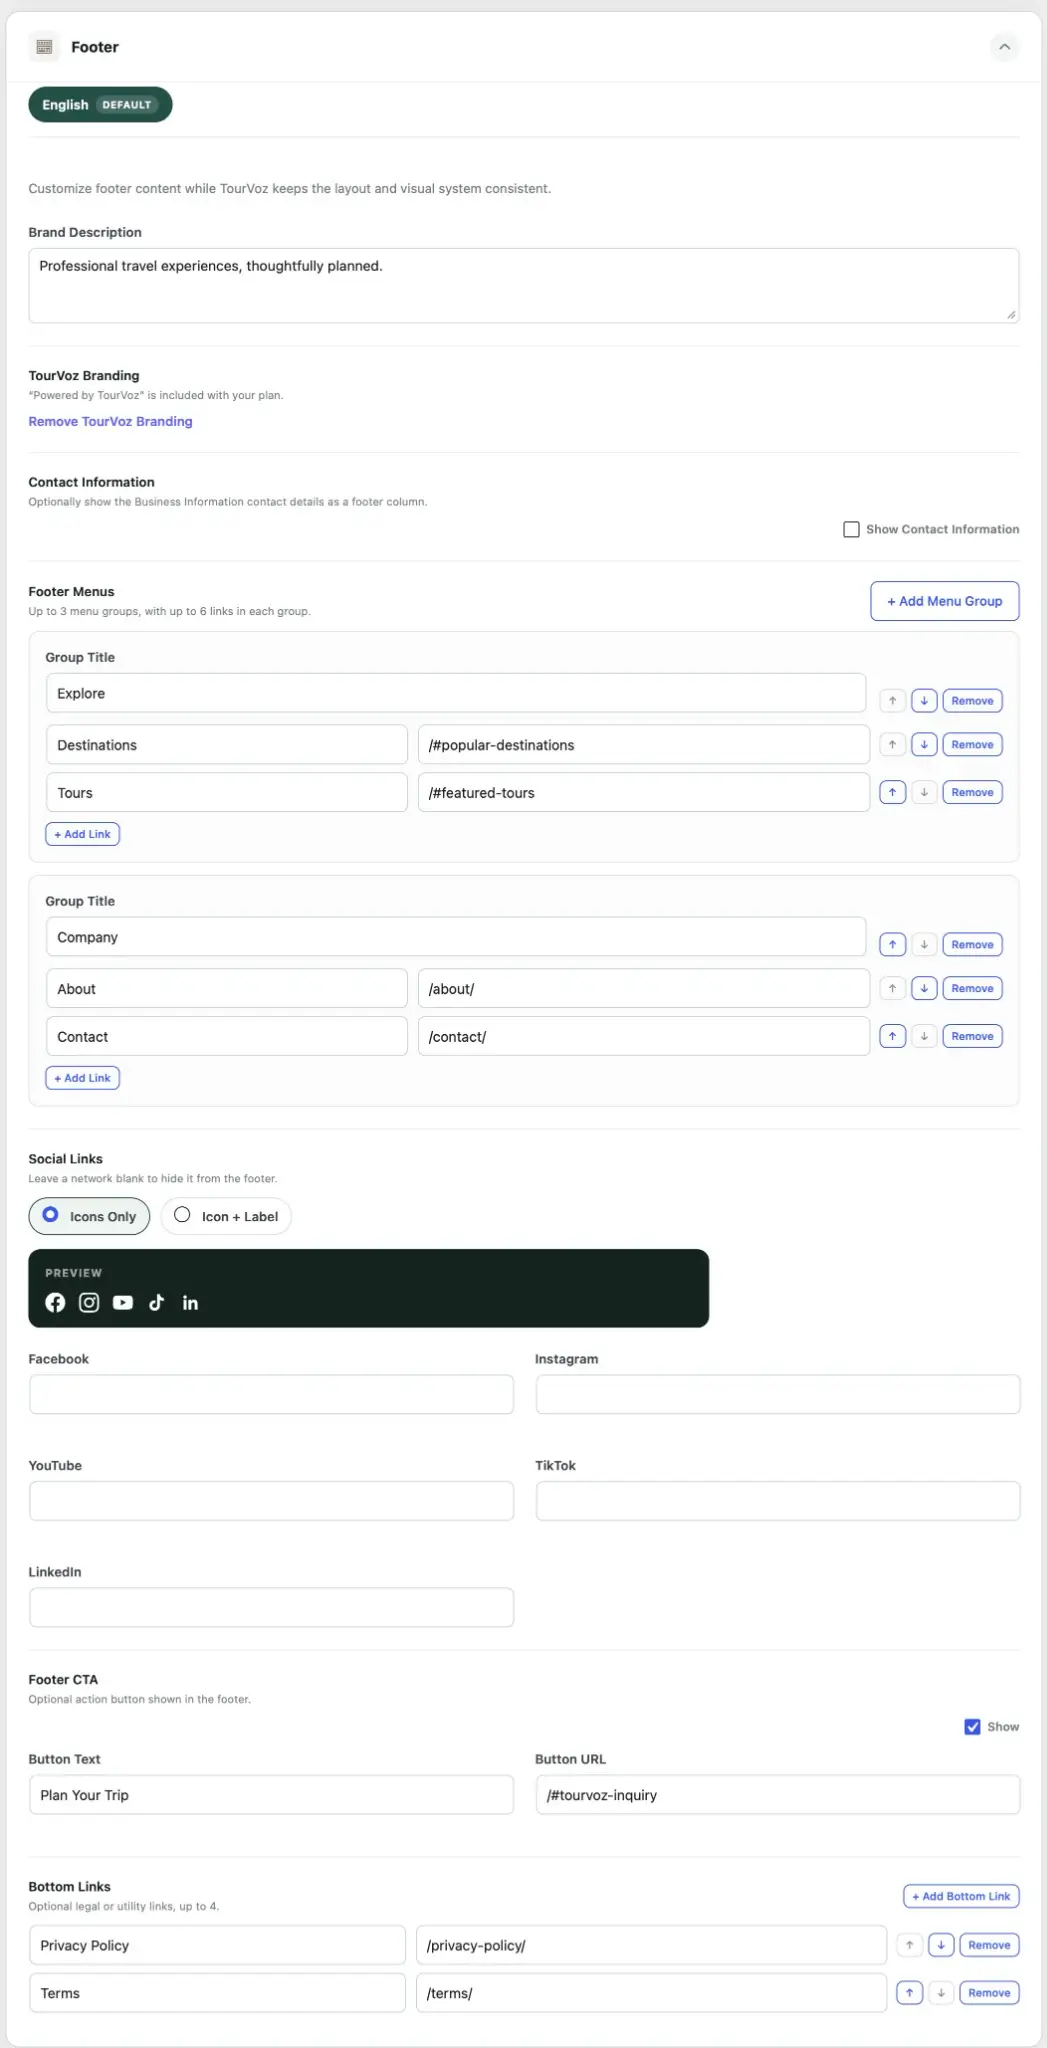
Set the Brand Description
Brand Description controls the short brand introduction displayed in your website footer.
Keep it concise and use it to summarize your travel business or service positioning without repeating your full About page story.
TourVoz Branding
Your footer may include Powered by TourVoz branding. The available branding options or upgrade path are shown according to your current plan.
If Remove TourVoz Branding appears in your settings, follow the plan or upgrade information provided there.
Show Contact Information
Enable Show Contact Information to display your business contact details in the footer.
Email, WhatsApp, phone, and location are not managed separately in the Footer settings. The footer uses the details entered in Business Information.
To update these details, return to Business Information in Site Settings.
Set Up Footer Menus
Footer Menus lets you create navigation groups for your website footer. Each group has its own Group Title and a list of link labels and URLs.
You can create up to 3 menu groups, with up to 6 links in each group.
Click + Add Menu Group to create another group, or + Add Link to add a link to the current group.
Use the up and down controls beside a group or link to change its display order. Click Remove to remove it.
Footer menu links can point to website pages or relevant sections of your website. After saving, test each link on the frontend to make sure it opens the intended destination.
Add Social Links
Social Links lets you display links to your social profiles in the footer. The available fields include Facebook, Instagram, YouTube, TikTok, and LinkedIn.
Choose Icons Only or Icon + Label to control how the social links are displayed.
Leave a network field blank if you do not want that platform to appear in the footer.
Enter the full URL for each social profile or page, then test the links from the frontend after saving.
Set the Footer CTA
Footer CTA adds an optional action button to the website footer.
Enable Show, then use Button Text to set the button label and Button URL to define where the button should lead.
For example, you can use the button for Plan Your Trip, an inquiry page, or another primary conversion action.
Set Bottom Links
Bottom Links is used for legal or utility links displayed at the bottom of the footer. You can add up to 4 links.
For example, you can add Privacy Policy and Terms with their corresponding URLs.
Click + Add Bottom Link to add another link, use the up and down controls to change the order, or click Remove to remove a link.
Legal Pages controls the content of your Privacy Policy and Terms pages, while Bottom Links controls how links to those pages appear in the footer.
After completing the Footer settings, click Save Site Settings at the bottom of the page.
Then check the footer on your website and test the menus, contact details, social links, CTA, and bottom links to make sure everything works as expected.
Inquiry CTA
Inquiry CTA controls the inquiry call-to-action content used across your website. You can use the TourVoz default content or customize the CTA to match your brand and business.
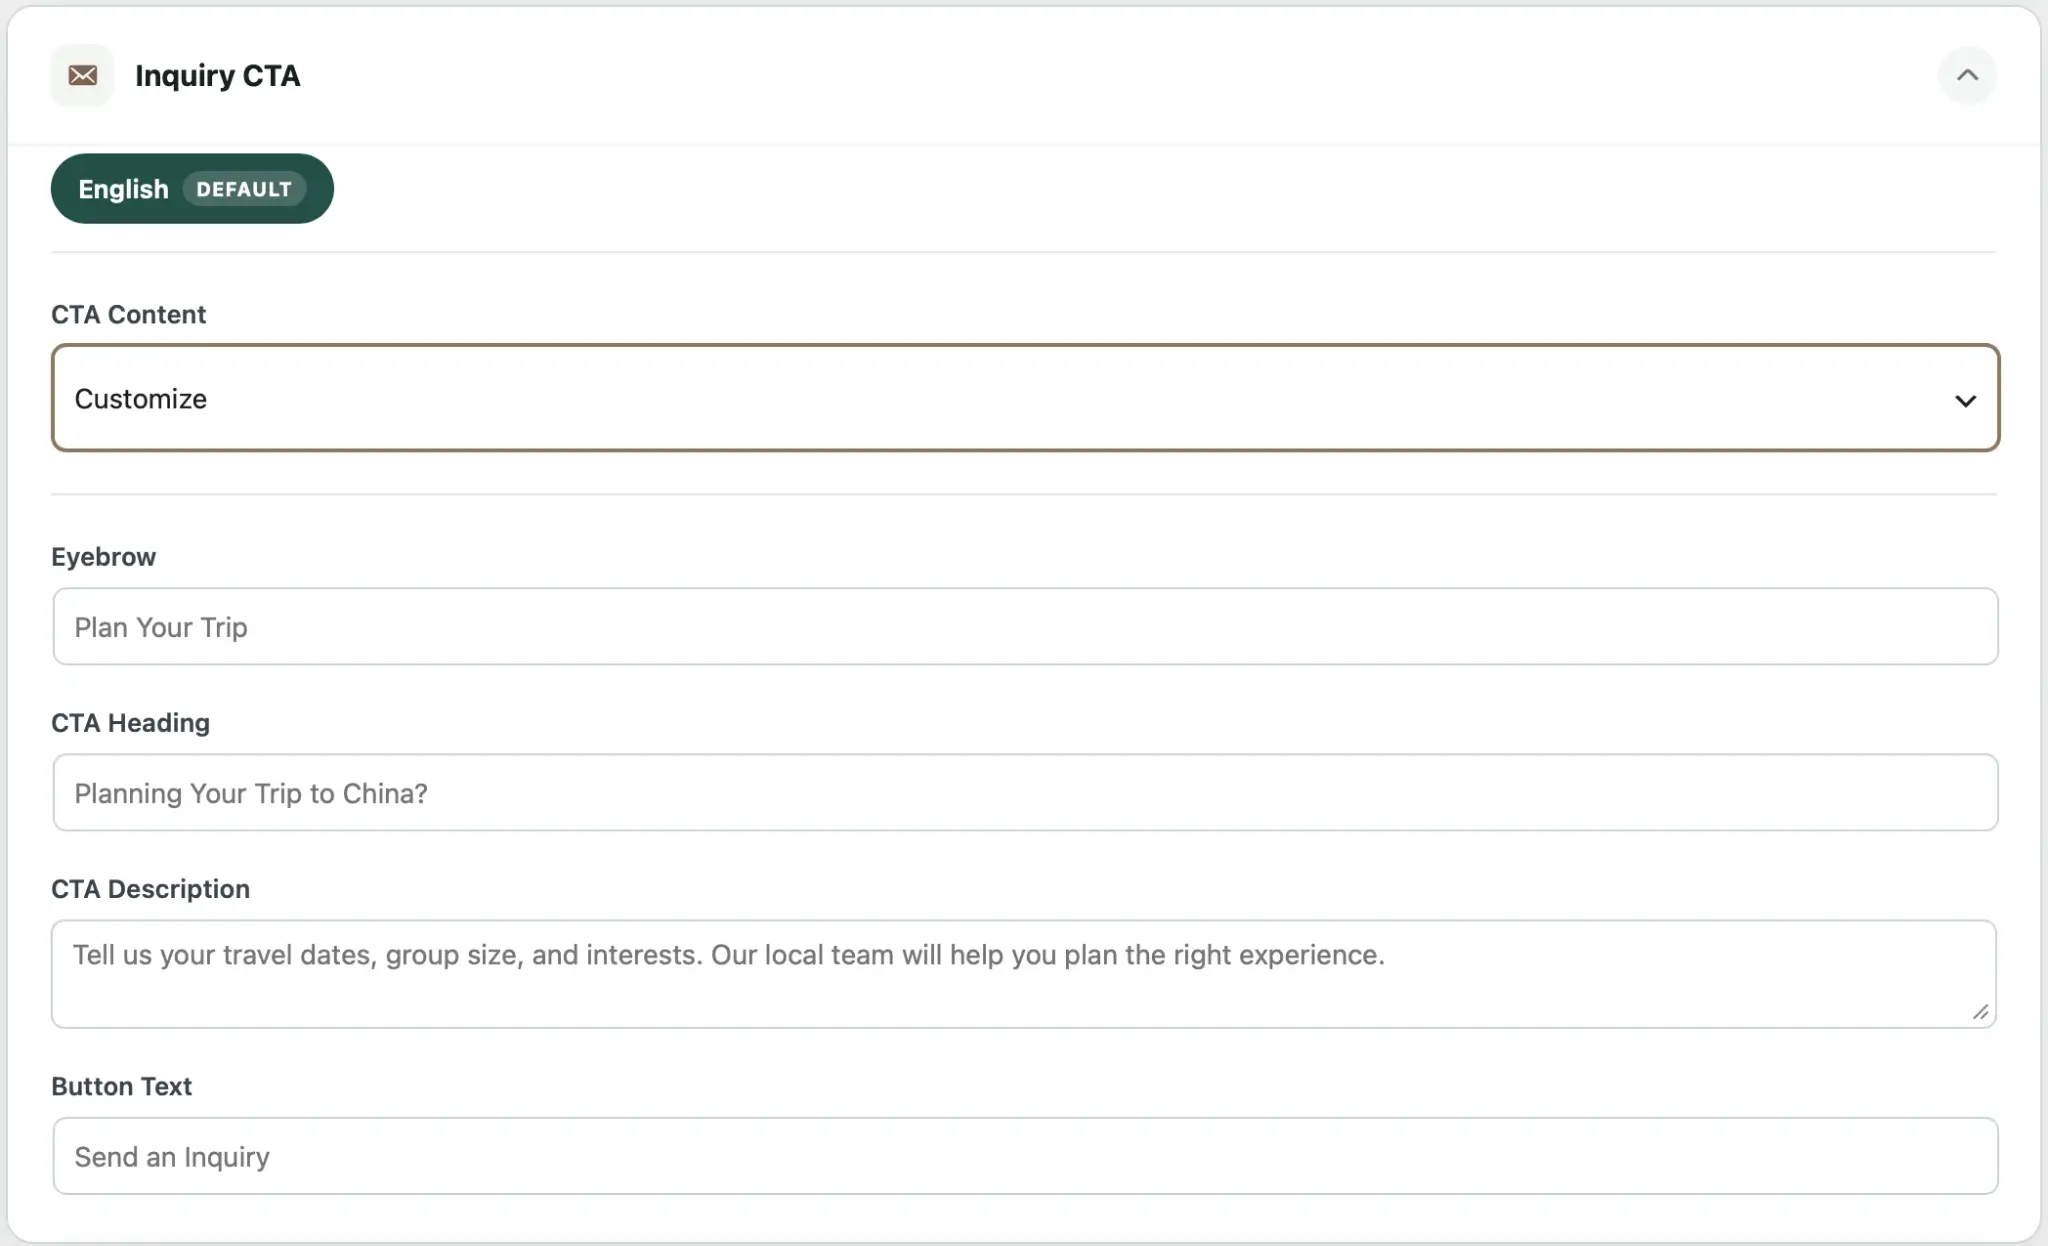
Choose the CTA Content
Under CTA Content, you can choose between the default TourVoz content and your own customized inquiry CTA.
Use TourVoz Default
Use the default Inquiry CTA content provided by TourVoz. Choose this option if you do not need custom CTA copy yet.
Customize
Use your own CTA copy. Once selected, you can edit the Eyebrow, CTA Heading, CTA Description, and Button Text.
Customize the Inquiry CTA
After selecting Customize, the content fields for the Inquiry CTA will appear below.
Eyebrow is the short introductory label displayed near the main CTA heading, such as Plan Your Trip.
CTA Heading is the main CTA headline and should clearly tell travelers what they can do next.
CTA Description provides additional context for the inquiry, such as travel dates, group size, interests, or other trip requirements.
Button Text controls the text displayed on the CTA button, such as Send an Inquiry.
The purpose of the Inquiry CTA is to guide interested travelers toward the next step. Use a clear heading and action-oriented button text instead of repeating your full product or company introduction.
Inquiry CTA controls the inquiry call-to-action content used across the website, while Footer CTA controls the separate action button displayed in the footer.
These settings are independent and can be configured separately according to your website's conversion flow.
After completing the Inquiry CTA settings, click Save Site Settings at the bottom of the page.
Then open your website and check that the CTA heading, description, and button text appear as expected.
Create a Tour
Tours are the core travel products in TourVoz. Each tour can include pricing, itinerary, destinations, travel themes, traveler types, and SEO information.
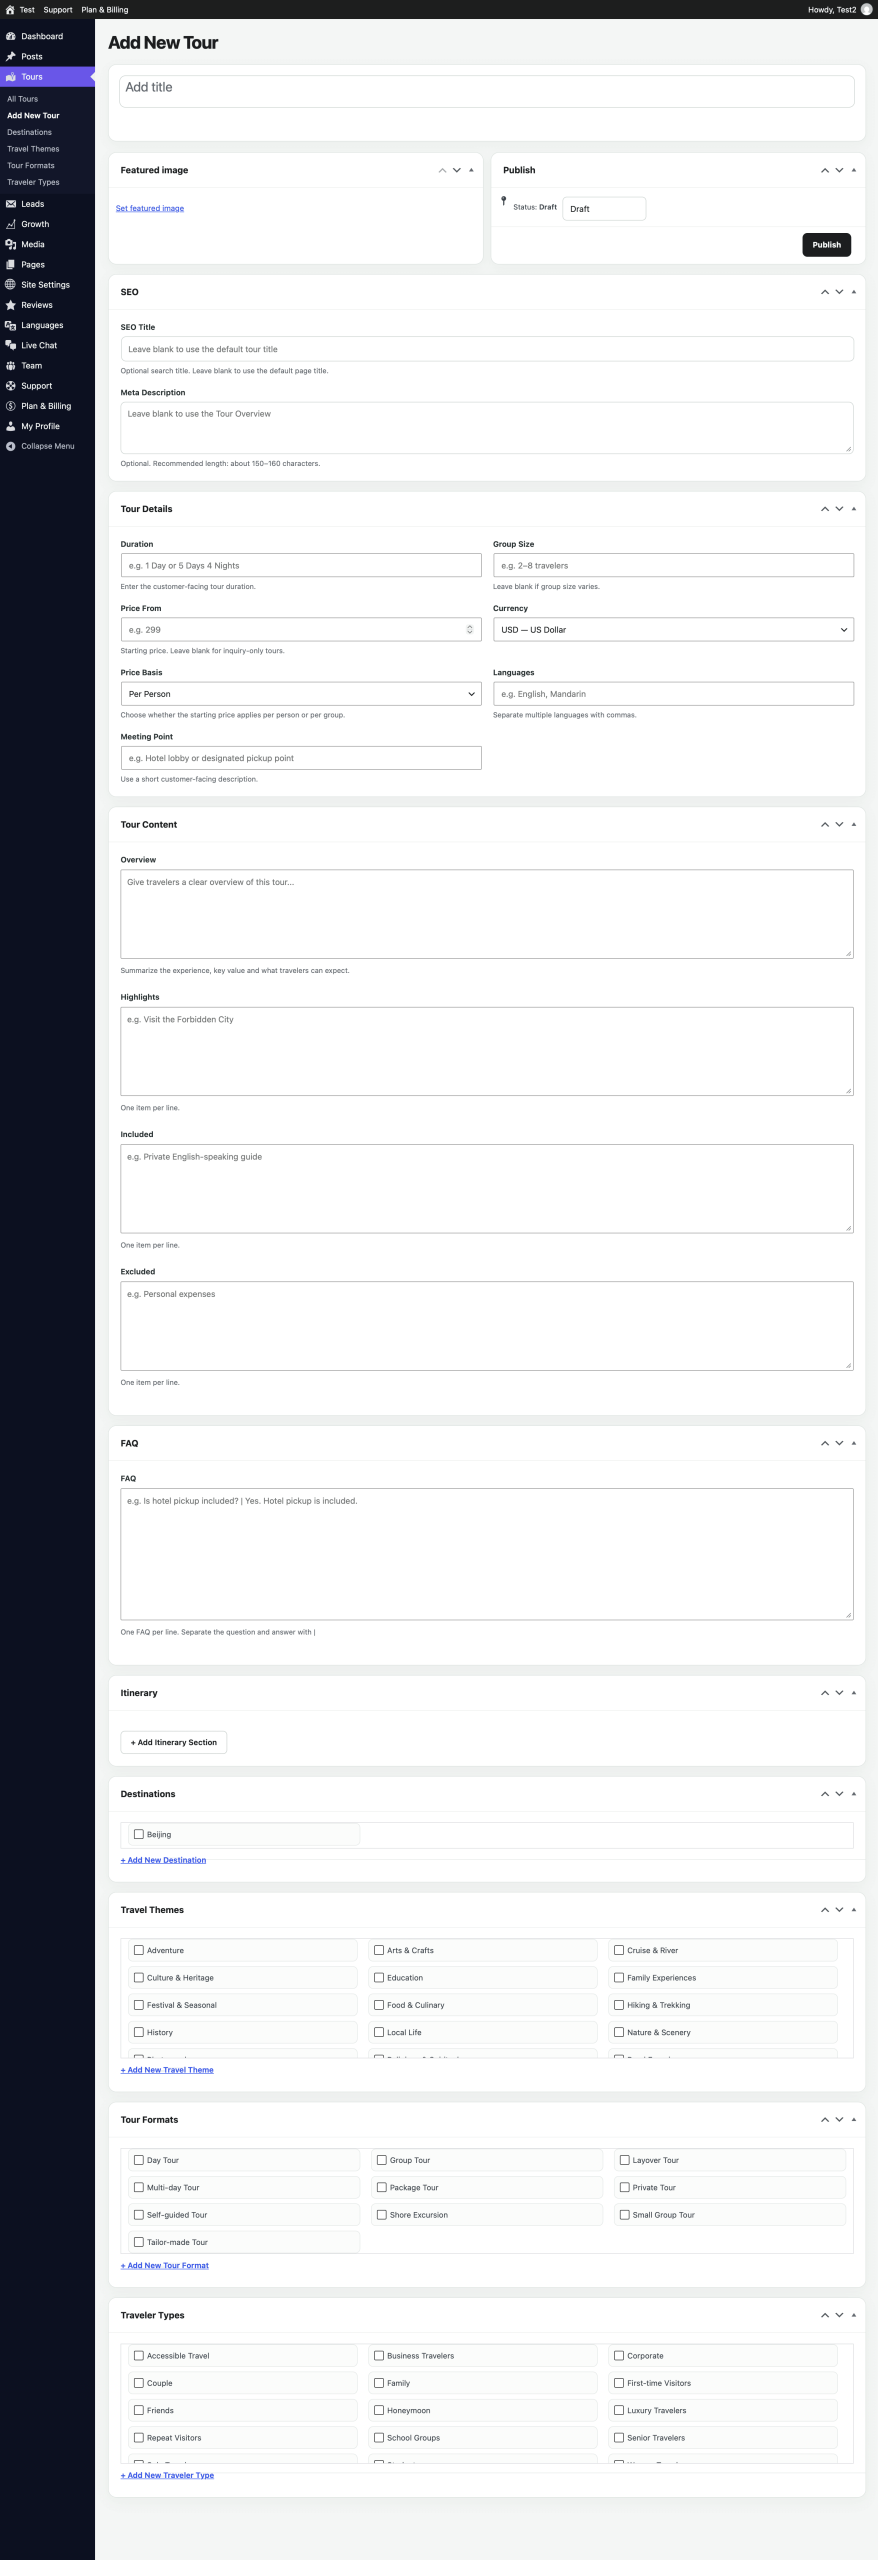
Open Add New Tour
After signing in to your TourVoz dashboard, go to Tours → Add New Tour from the left-hand menu.
At the top of the page, enter the name of your tour in the Add title field.
Understand the Tour Editor
A complete Tour is made up of several sections. You can work through them from top to bottom:
- Featured Image: Set the main image for the tour.
- SEO: Set the title and description used for search results.
- Tour Details: Add duration, group size, pricing, languages, meeting point, and other basic information.
- Tour Content: Add the overview, highlights, included items, and excluded items.
- FAQ: Add common questions travelers may have.
- Itinerary: Build the detailed itinerary for the tour.
- Destinations: Connect the tour with relevant destinations.
- Travel Themes: Select the themes that describe the experience.
- Tour Formats: Select the format of the tour.
- Traveler Types: Select the types of travelers the tour is suitable for.
You Do Not Need to Complete Everything at Once
When creating a tour for the first time, you can start with the title, featured image, basic details, and main content, then continue with the FAQ, itinerary, and classifications.
Having the tour name, main image, price, duration, itinerary, and key highlights ready will make the setup process much easier.
Save and Publish the Tour
Use the Publish section at the top of the page to manage the tour status. Keep the tour as a Draft while you are still working on it, then click Publish when the content is ready.
Check the tour title, images, pricing, content, and classifications before making the tour available on your website.
Manage Destinations
Destinations organize the places covered by your travel products and provide dedicated destination content for travelers.
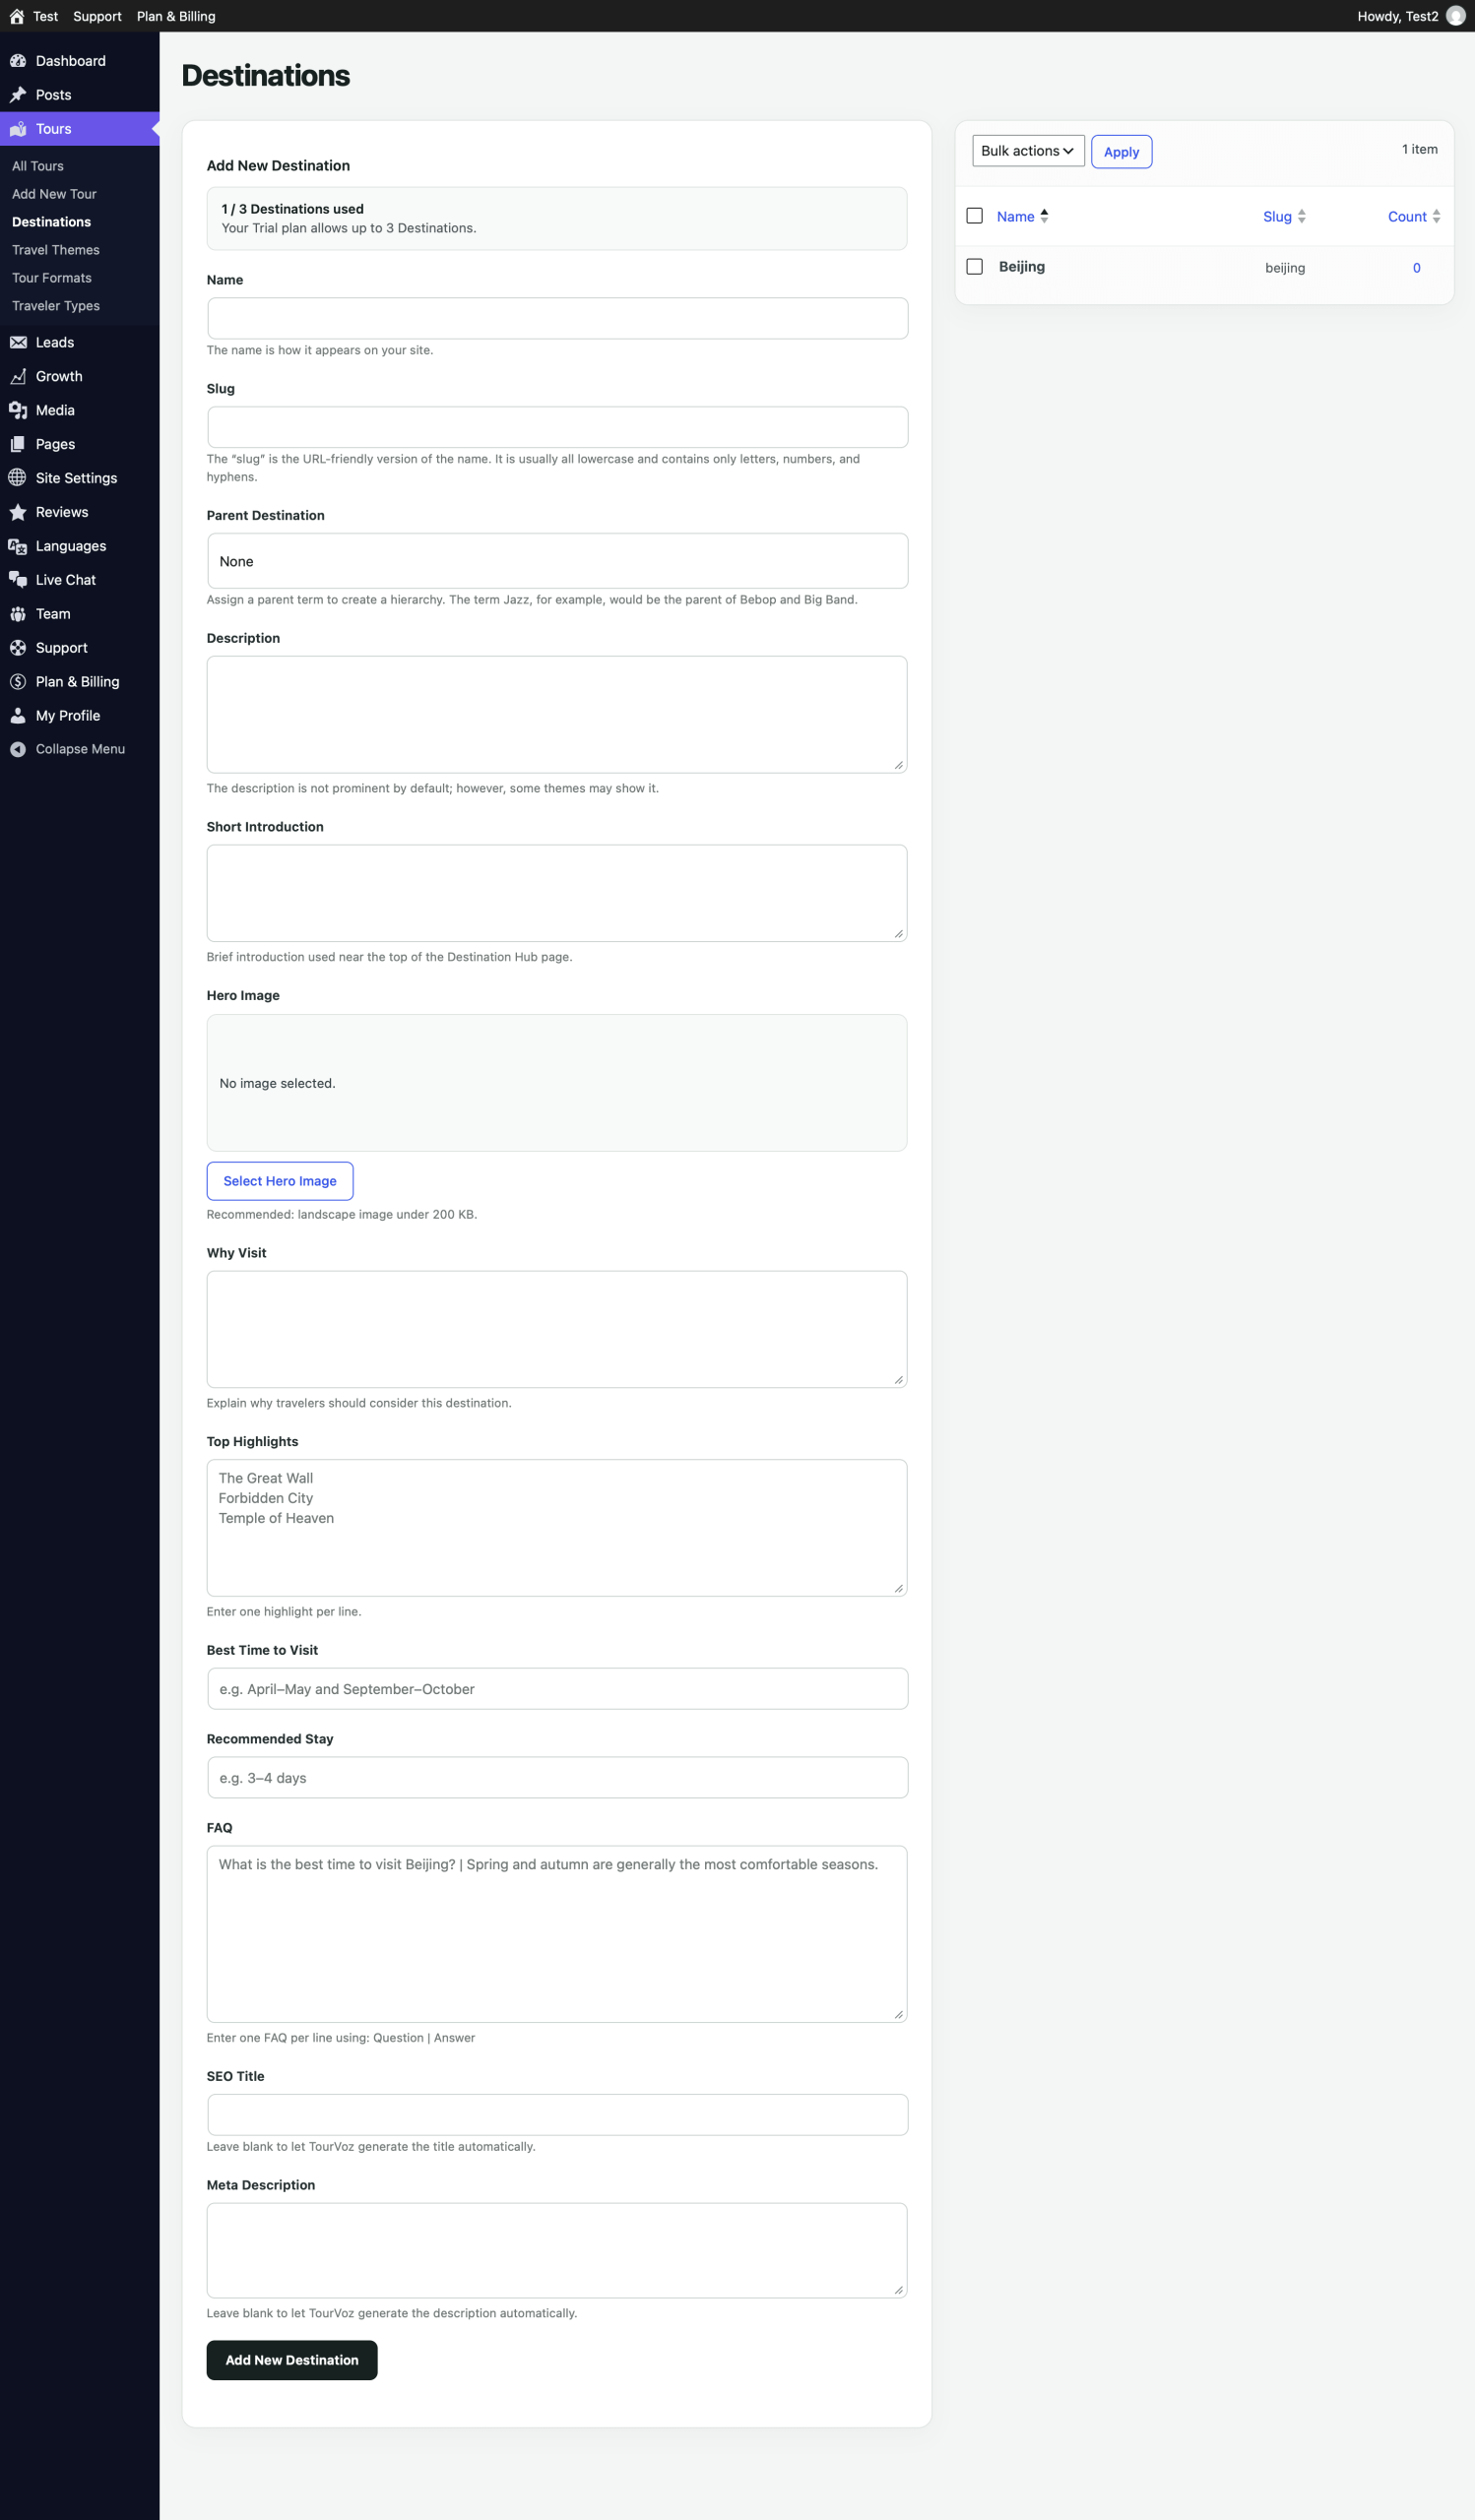
Create a Destination
Go to Tours → Destinations and use Add New Destination on the left.
Enter the destination name.
Enter the URL-friendly name, preferably using lowercase letters and hyphens.
Select a parent only when you need a destination hierarchy; otherwise leave it as None.
Enter a general description.
Add Destination Content
Add a short introduction.
Set the main destination image.
Explain the main reasons to visit this destination.
Add key attractions or experiences, one per line.
Add the recommended travel period.
Add a suggested length of stay.
FAQ & SEO
FAQ
Enter one FAQ per line and separate the question and answer with |.
SEO Title
Enter a custom search title when needed; leave it blank to use the system default.
Meta Description
Enter a custom search description when needed; leave it blank to use the system default.
Save and Manage Destinations
Click Add New Destination when the information is ready. The Destination will then appear in the list on the right.
Count shows how many Tours are currently assigned to that Destination.
Travel Themes
Travel Themes classify Tours by travel experience and interest, such as Culture & Heritage, Food & Culinary, Family Experiences, or Nature & Scenery.
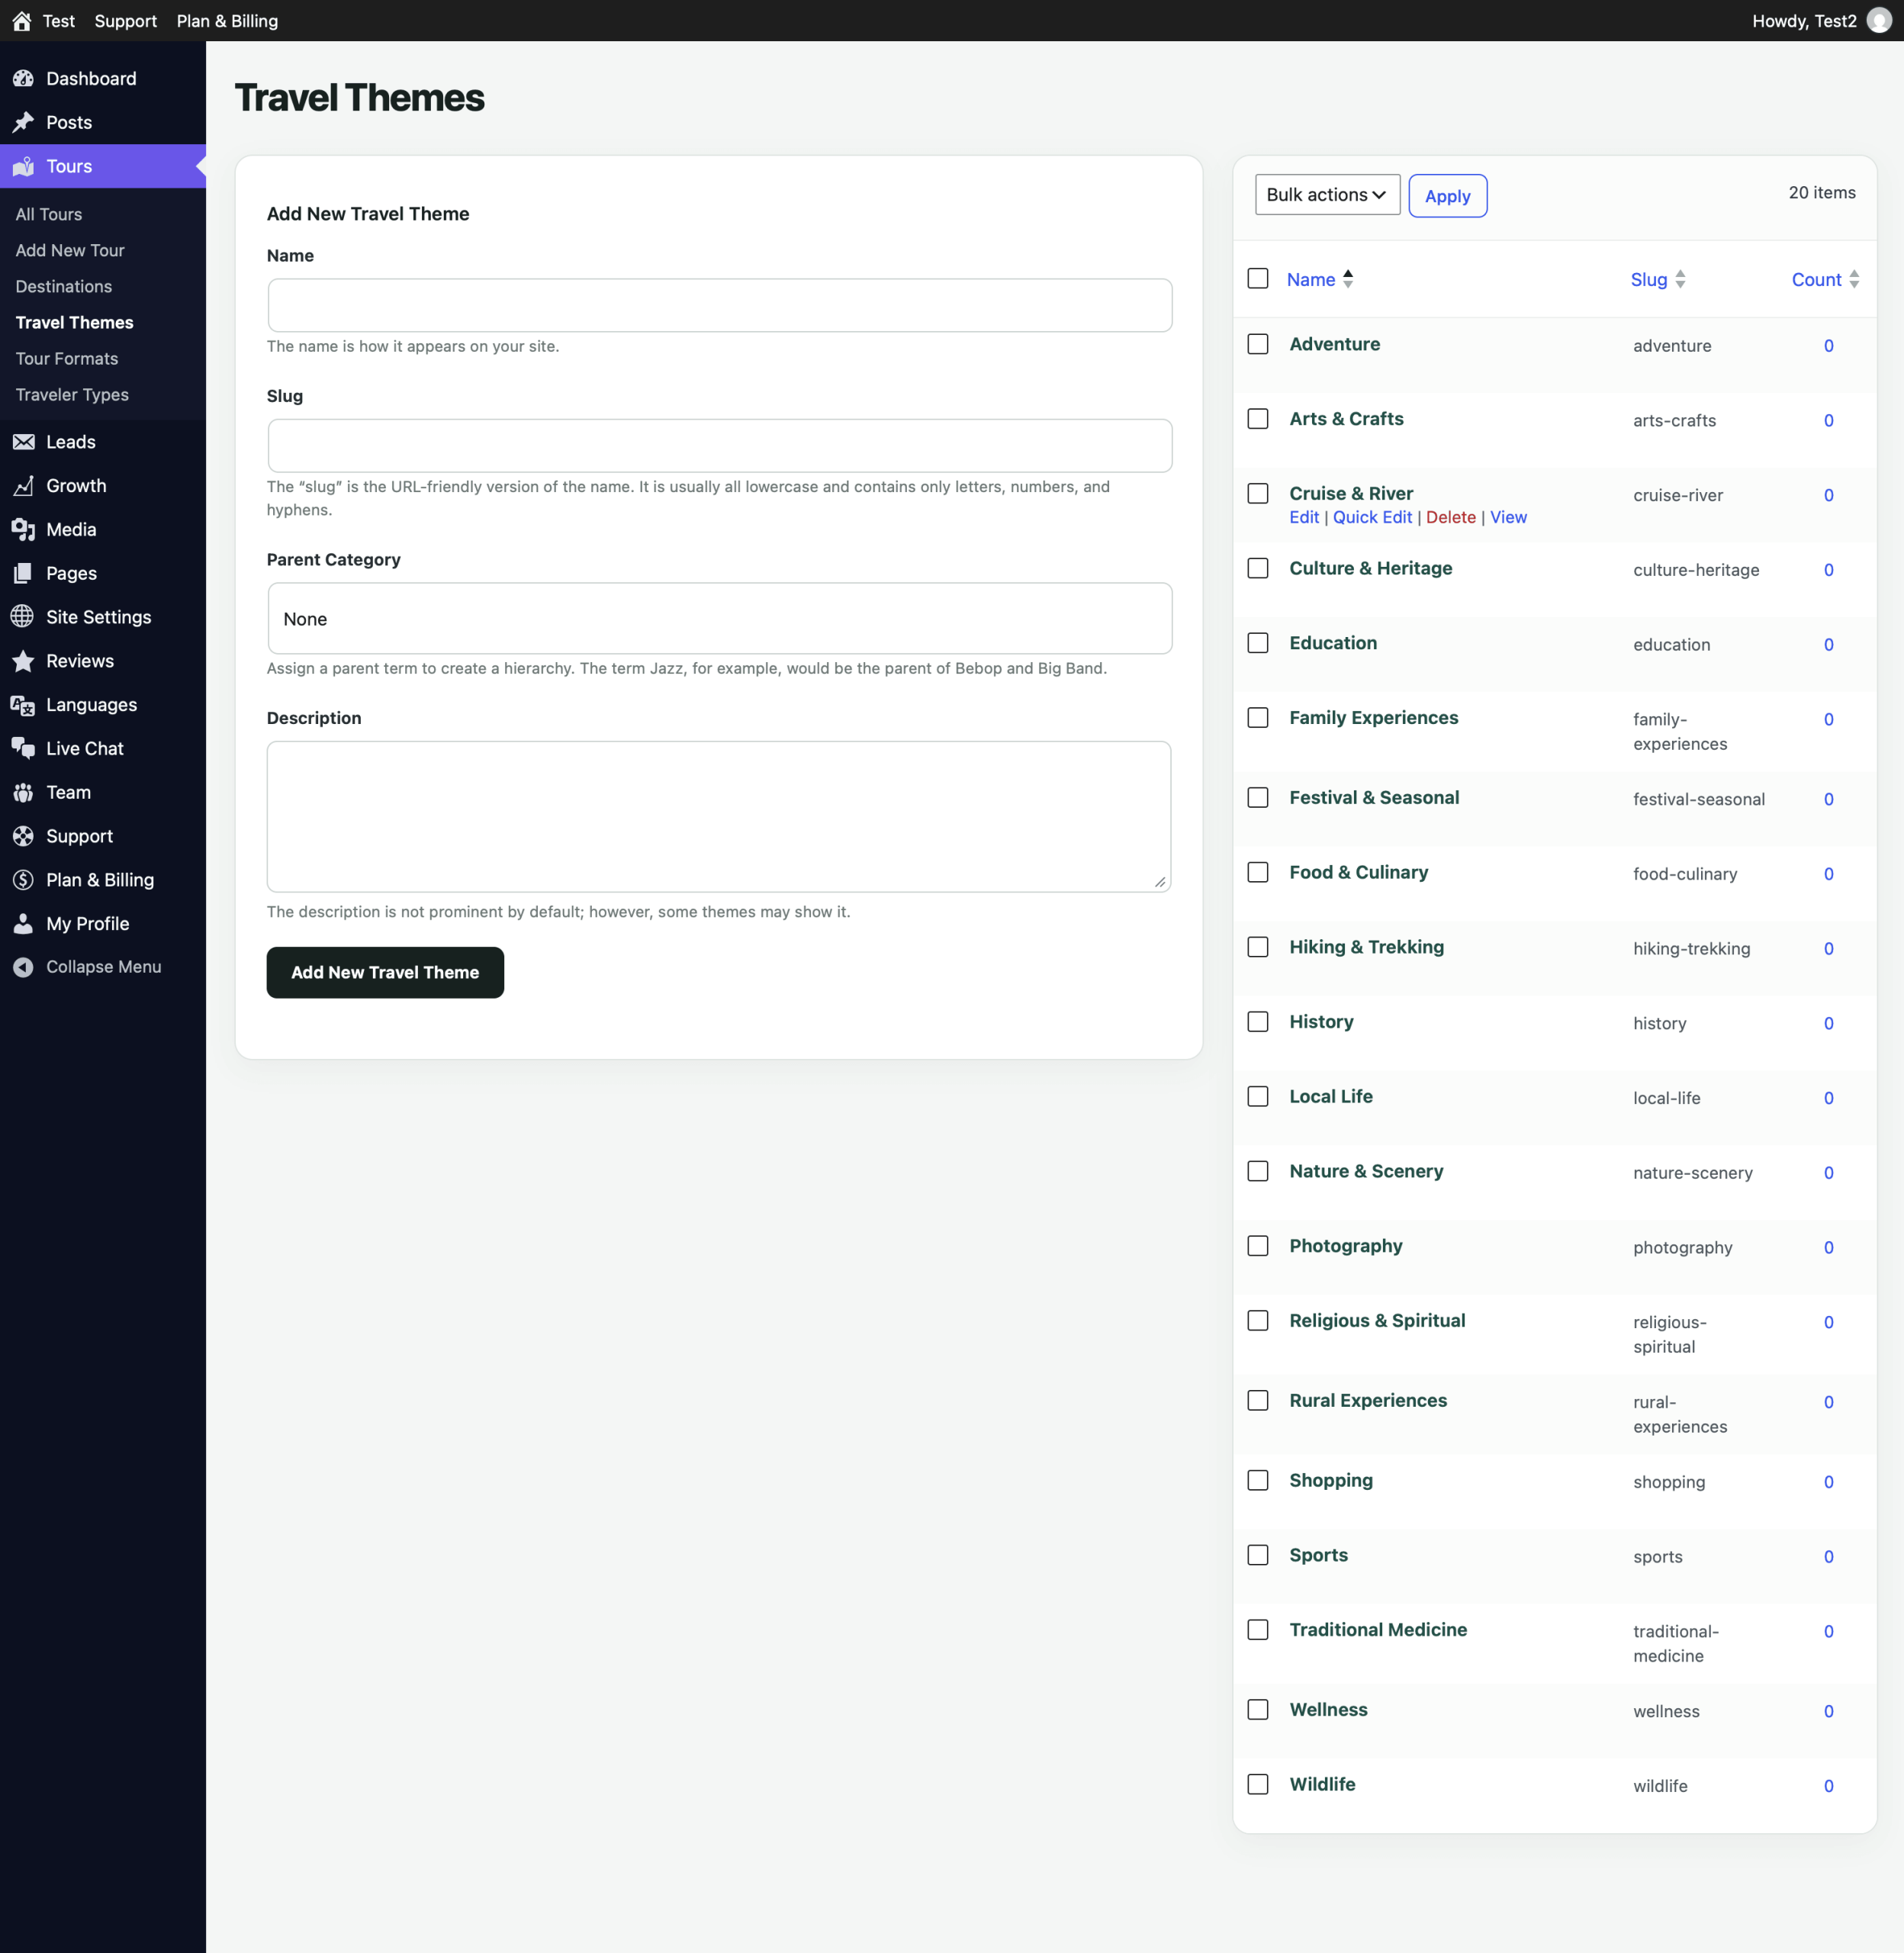
Create a Travel Theme
Go to Tours → Travel Themes. If the existing themes do not cover a travel product, use Add New Travel Theme on the left to create another theme.
TourVoz includes a set of common travel themes. Add a new one only when you need a genuinely different classification, so your theme list does not become repetitive.
Complete the Theme Fields
Enter the travel theme name, such as Photography or Rural Experiences.
Enter the URL- and system-friendly name, preferably using lowercase letters and hyphens.
Select a parent category only when you need a theme hierarchy; otherwise leave it as None.
Add an optional description for the travel theme.
Click Add New Travel Theme when the information is ready.
Manage Existing Travel Themes
The list on the right shows each theme's Name, Slug, and Count. Count indicates how many Tours are currently assigned to that theme.
Hover over a theme name to access Edit, Quick Edit, Delete, and View. Use Bulk actions at the top when you need to manage multiple items.
If a theme is already used by Tours, review those Tours before deleting the theme so their classifications can be adjusted if necessary.
Select Travel Themes in a Tour
When creating or editing a Tour, use the Travel Themes section to select the themes that match the experience. A Tour can use one or more relevant themes when appropriate.
After a new Travel Theme is saved, it becomes available in the Travel Themes section of the Tour editor.
Tour Formats
Tour Formats describe how a Tour is structured or delivered, such as Private Tour, Day Tour, Multi-day Tour, Small Group Tour, or Shore Excursion.
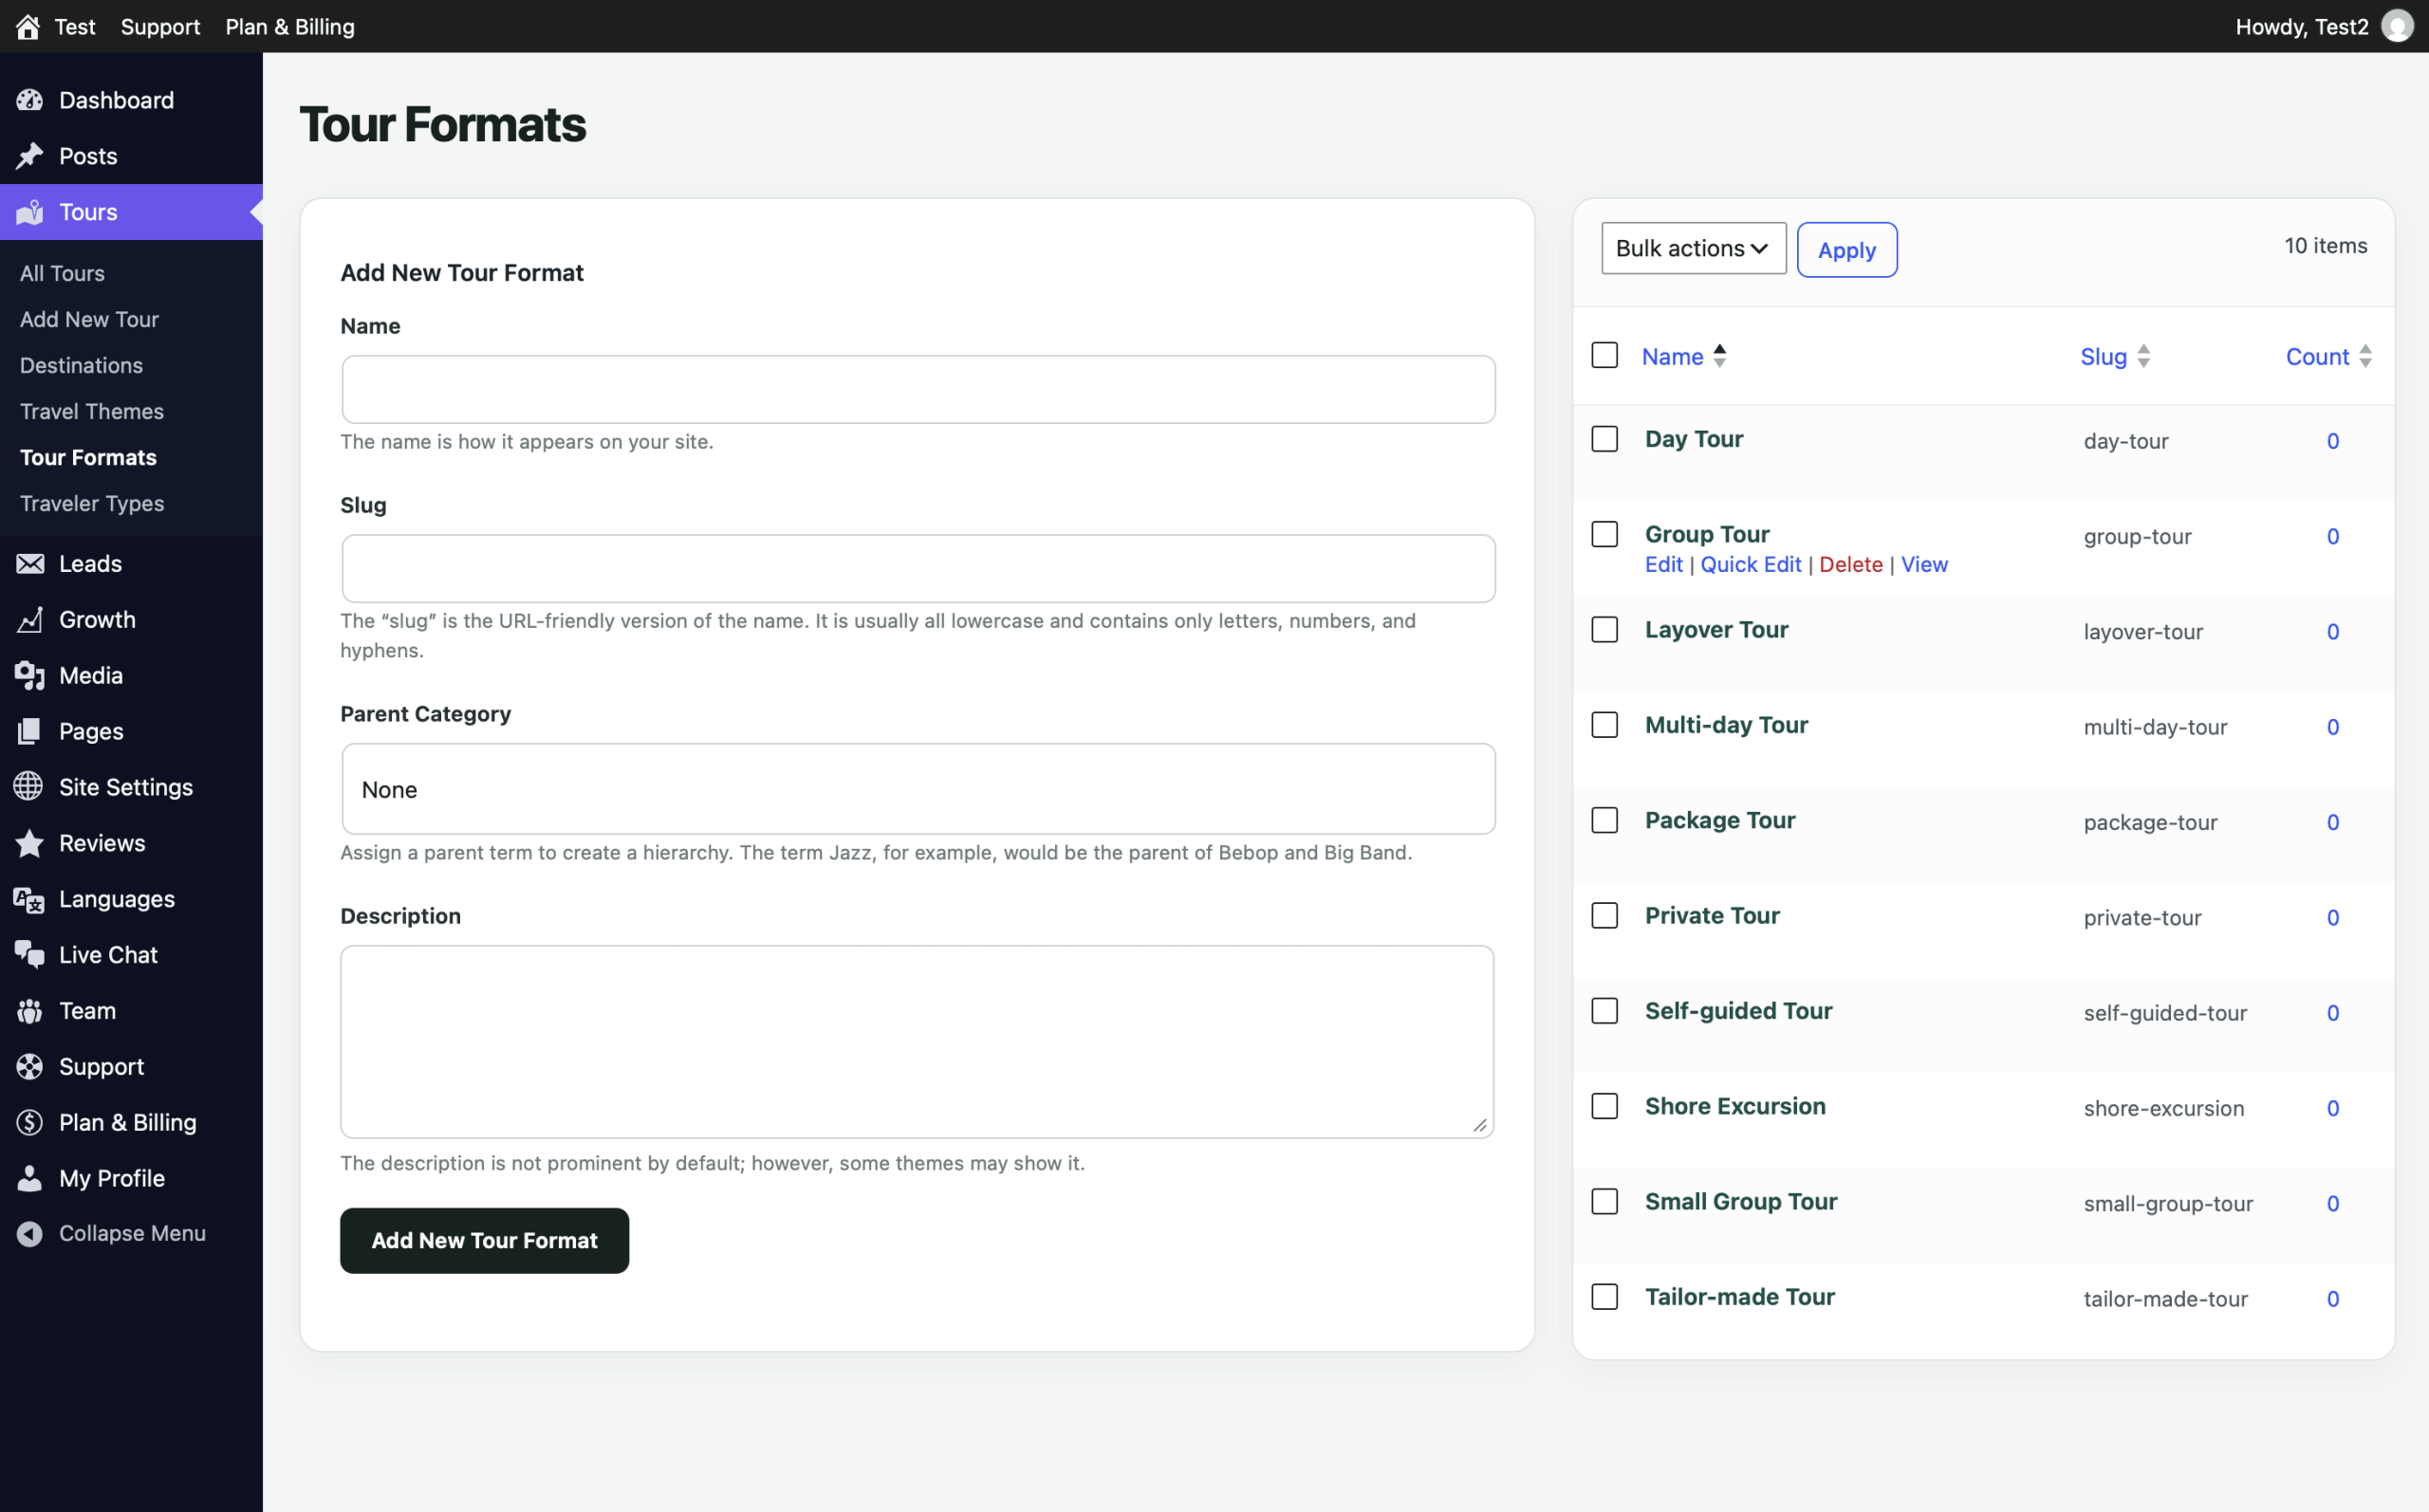
Create a Tour Format
Go to Tours → Tour Formats. TourVoz includes common formats by default. If none of them accurately describes a product, use Add New Tour Format on the left to create another one.
Tour Formats describe the structure or delivery of a product, such as Private Tour, Group Tour, or Day Tour. Travel interests and experience themes belong under Travel Themes instead.
Complete the Tour Format Fields
Enter the format name, such as Private Tour or Shore Excursion.
Enter the URL- and system-friendly name, preferably using lowercase letters and hyphens.
Select a parent category only when you need a hierarchy; otherwise leave it as None.
Add an optional description for the Tour Format.
Click Add New Tour Format when the information is ready.
Manage Existing Tour Formats
The list on the right shows each format's Name, Slug, and Count. Count indicates how many Tours are currently assigned to that Tour Format.
Hover over a format name to access Edit, Quick Edit, Delete, and View. Use Bulk actions when you need to manage multiple items.
If an existing option such as Private Tour, Group Tour, or Multi-day Tour already fits the product, use it instead of creating a near-duplicate. Consistent classifications make Tours easier to manage.
Select a Tour Format in a Tour
When creating or editing a Tour, use the Tour Formats section to select the option that matches the product. Newly created Tour Formats will also become available there.
You can continue classifying the Tour with Destinations, Travel Themes, and Traveler Types to keep its information clear and consistent.
Traveler Types
Traveler Types indicate which audiences a Tour is suited for, such as Family, Couple, Solo Traveler, Senior Travelers, or Business Travelers.
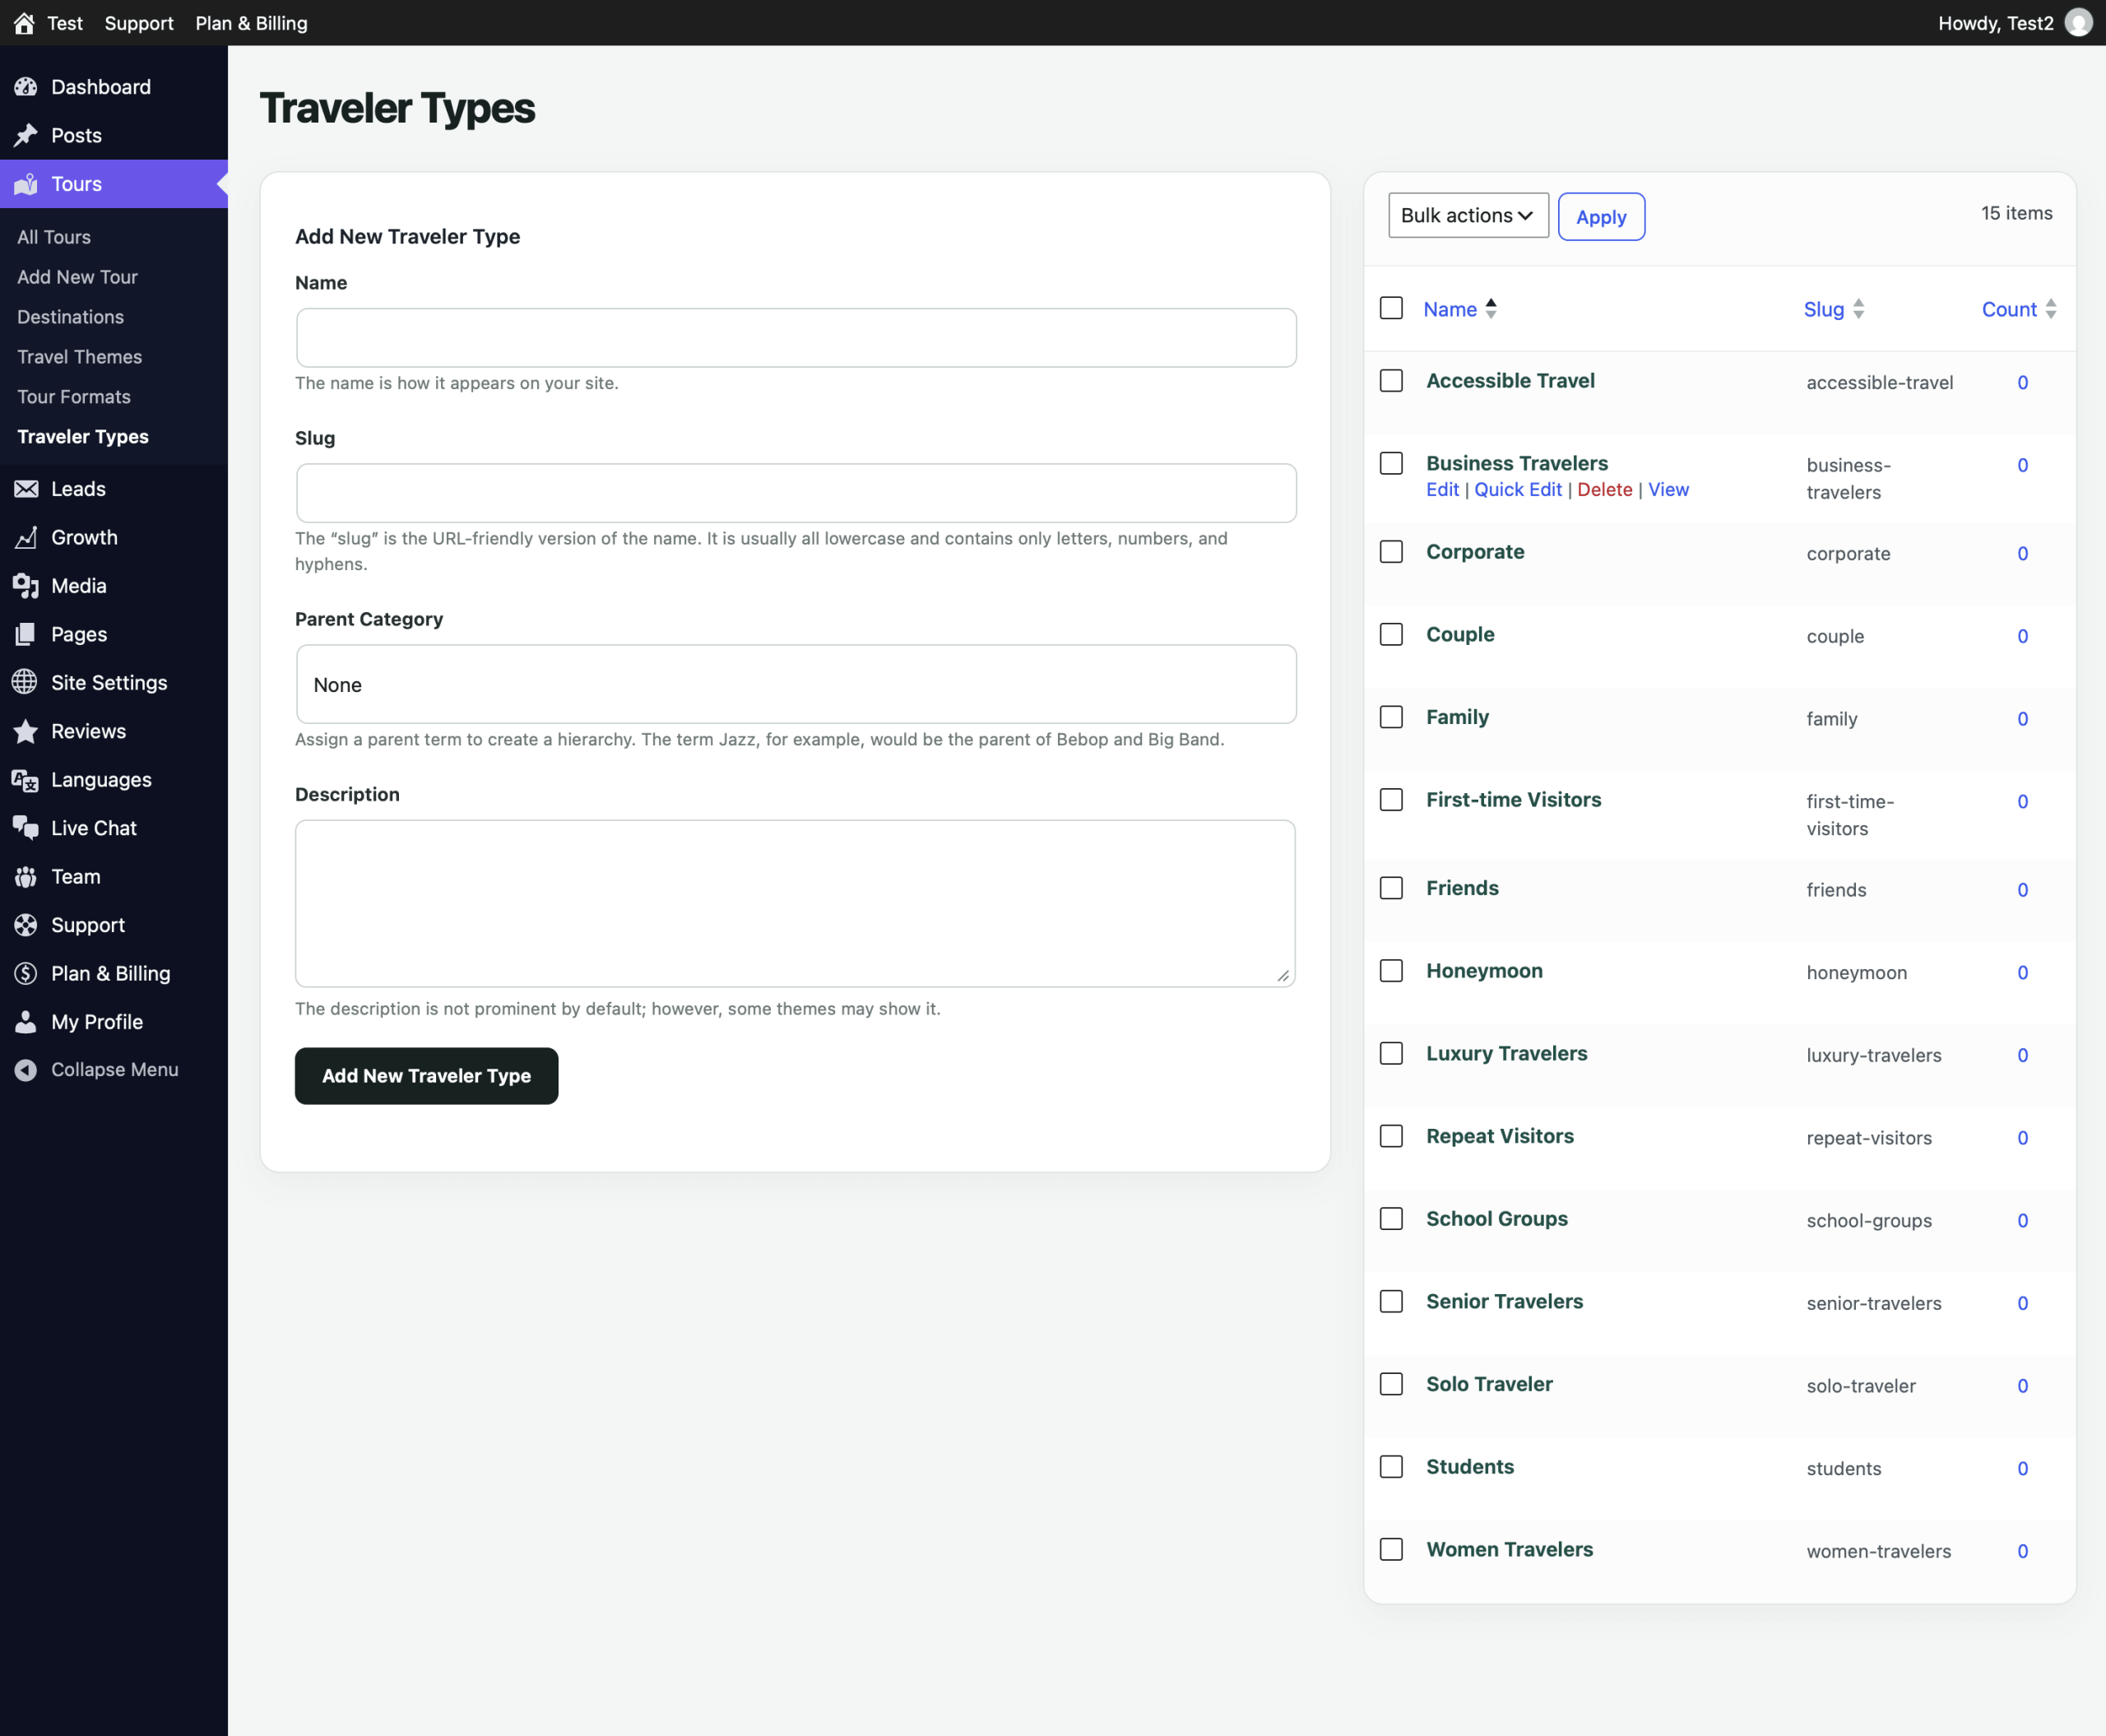
Create a Traveler Type
Go to Tours → Traveler Types. TourVoz includes common traveler types by default. If a product is designed for a more specific audience, use Add New Traveler Type on the left to create another type.
Examples include Family, Couple, Solo Traveler, and Senior Travelers. Use Tour Formats for the product format and Travel Themes for interests or experience themes.
Complete the Traveler Type Fields
Enter the traveler type name, such as Family or First-time Visitors.
Enter the URL- and system-friendly name, preferably using lowercase letters and hyphens.
Select a parent category only when you need a hierarchy; otherwise leave it as None.
Add an optional description for the Traveler Type.
Click Add New Traveler Type when the information is ready.
Manage Existing Traveler Types
The list on the right shows each type's Name, Slug, and Count. Count indicates how many Tours are currently assigned to that Traveler Type.
Hover over a type name to access Edit, Quick Edit, Delete, and View. Use Bulk actions when you need to manage multiple items.
Use existing types when they already fit. Add a new type only when the current options do not accurately describe the intended traveler audience.
Select Traveler Types in a Tour
When creating or editing a Tour, use the Traveler Types section to select the audiences that fit the product. You can select one or more types when appropriate.
After a new Traveler Type is saved, it becomes available in the Traveler Types section of the Tour editor.
Media Library
Media Library provides a central place to view and manage images and other media used across your website, and to upload new media files.
Media Library Overview
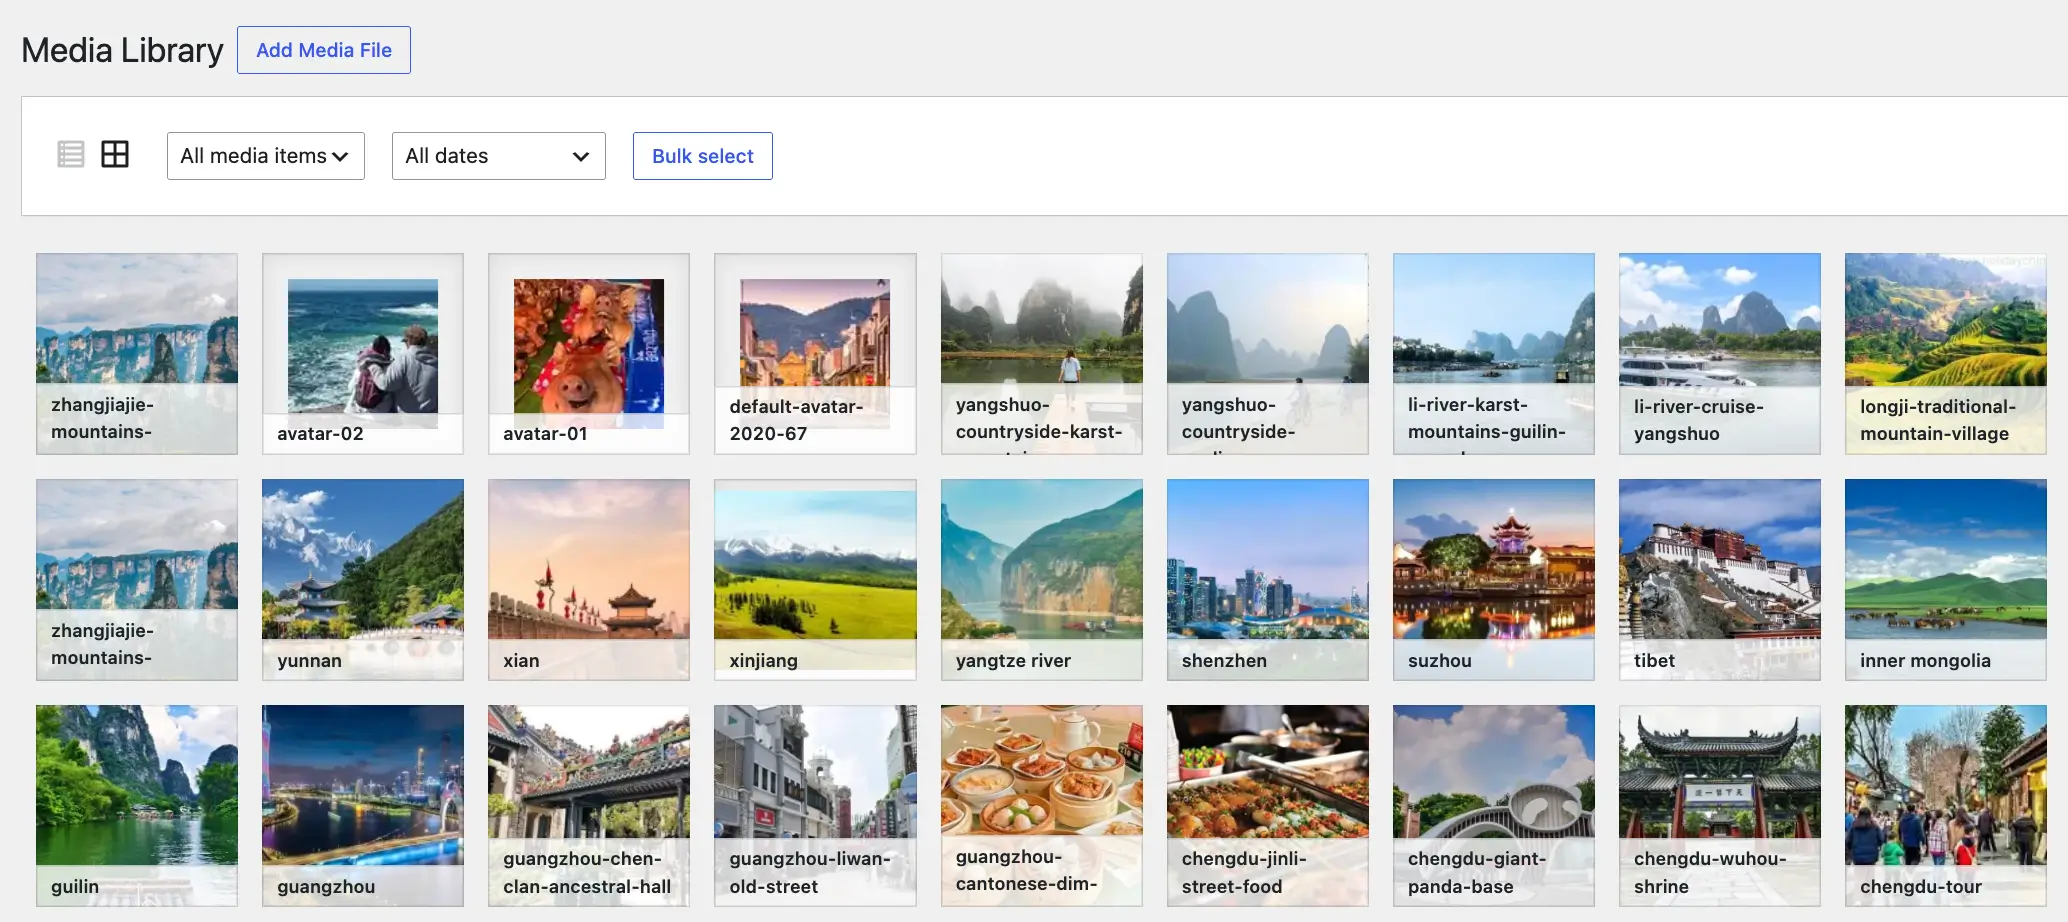
Go to Media → Library to view media that has already been uploaded to your website. You can browse the library in grid or list view.
Upload Media Files
To add new media, click Add Media File at the top of Media Library or open Media → Add Media File from the dashboard menu.
After upload, the new media file becomes available in Media Library for use across your website content.
Before uploading, use file names that describe the image or media content instead of generic default names. This makes files easier to identify and manage later.
Find and Manage Media
The controls at the top of Media Library help you browse and filter files as your media collection grows.
Switch between list and grid layouts for browsing media.
Filter the Library by media type.
Filter media by upload date.
Enter bulk-selection mode for supported actions on multiple media items.
Media files here may already be used by Tours, Destinations, Pages, or other website content. Before changing existing assets, check whether they are still in use.
Pages
Pages lets you create additional custom pages for your website. Content is assembled with structured Sections, while TourVoz controls the frontend layout and styling.
Pages vs. System Pages
Site Settings → System Pages is used to manage the core website pages already provided by TourVoz, such as About, Contact, Destinations Hub, Tours, Blog, and Legal pages.
Pages is for additional custom pages outside those core system pages. When you need a separate content page, create it from Pages → Add Page.
If you need to change an existing About, Contact, or other System Page, manage it in Site Settings instead of creating another page with the same purpose.
Create a Page
Go to Pages → Add Page. Start by entering the page title and set a Featured image when the page needs one.
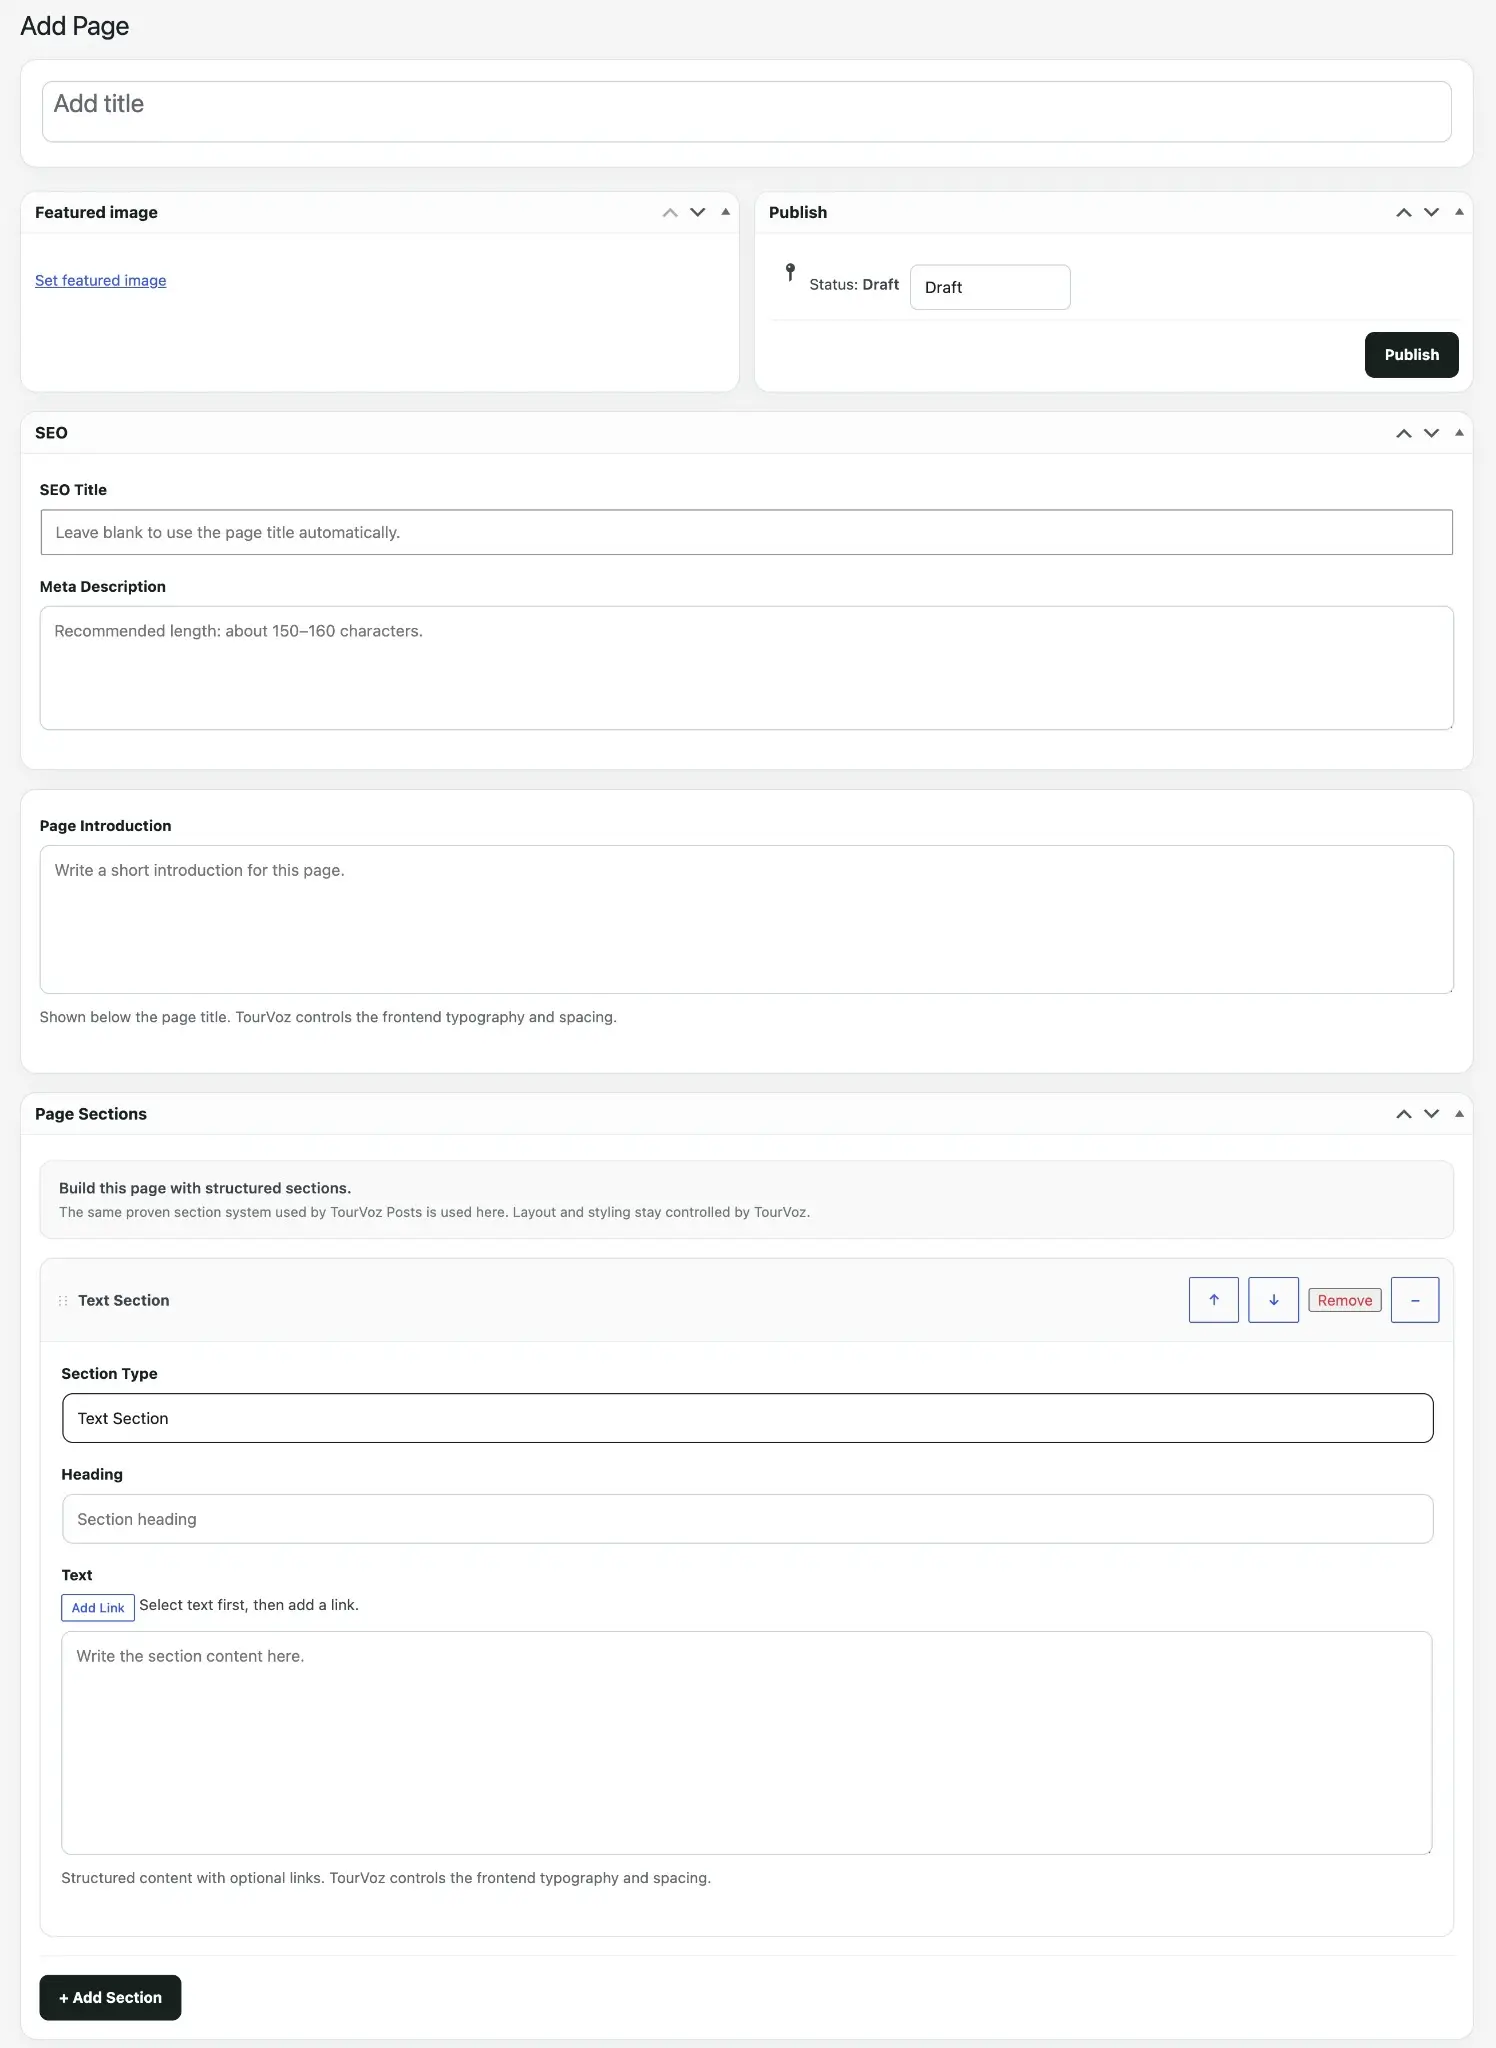
A new page starts in Draft status, so you can keep it unpublished until the content is ready.
Set SEO and Page Introduction
Set the page SEO title. Leave it blank to use the Page Title automatically.
Add the page description for search results. The editor recommends approximately 150–160 characters.
Add a short introduction for the page. It is shown below the page title, with frontend typography and spacing controlled by TourVoz.
Build Content with Page Sections
The main page content is assembled through Page Sections. Click + Add Section to add another content block, then choose the Section Type that matches the content.
You do not need to design the typography, spacing, or layout of each block manually. You provide the content and arrange the Sections; TourVoz handles their consistent frontend presentation.
Decide what each part of the page needs to communicate, then select the appropriate Section Type instead of adding repetitive blocks simply to make the page longer.
Available Section Types
Page Sections currently provides the following structured content types:
For headings and body text. Select text first and use Add Link when you need to add a link.
For sections that combine an image with supporting text.
For standalone image content.
For organizing multiple points as a list.
For presenting quoted content.
For organizing frequently asked questions and answers.
Arrange Sections and Publish
Each Section includes controls for ordering and management. Use the up and down buttons to change its position, Remove to delete an unwanted Section, and the collapse control to make longer pages easier to manage.
After reviewing the page content, SEO settings, and Sections, click Publish to publish the page.
Pages focuses on content structure and order, while TourVoz controls the frontend typography, spacing, and overall presentation.
Leads
Leads brings traveler inquiries submitted through your website into one place so you can keep track of incoming travel requests.
Leads Overview
Go to Leads → All Leads to view traveler inquiries received through your website. The top of the page shows your current plan and the number of Leads currently recorded.
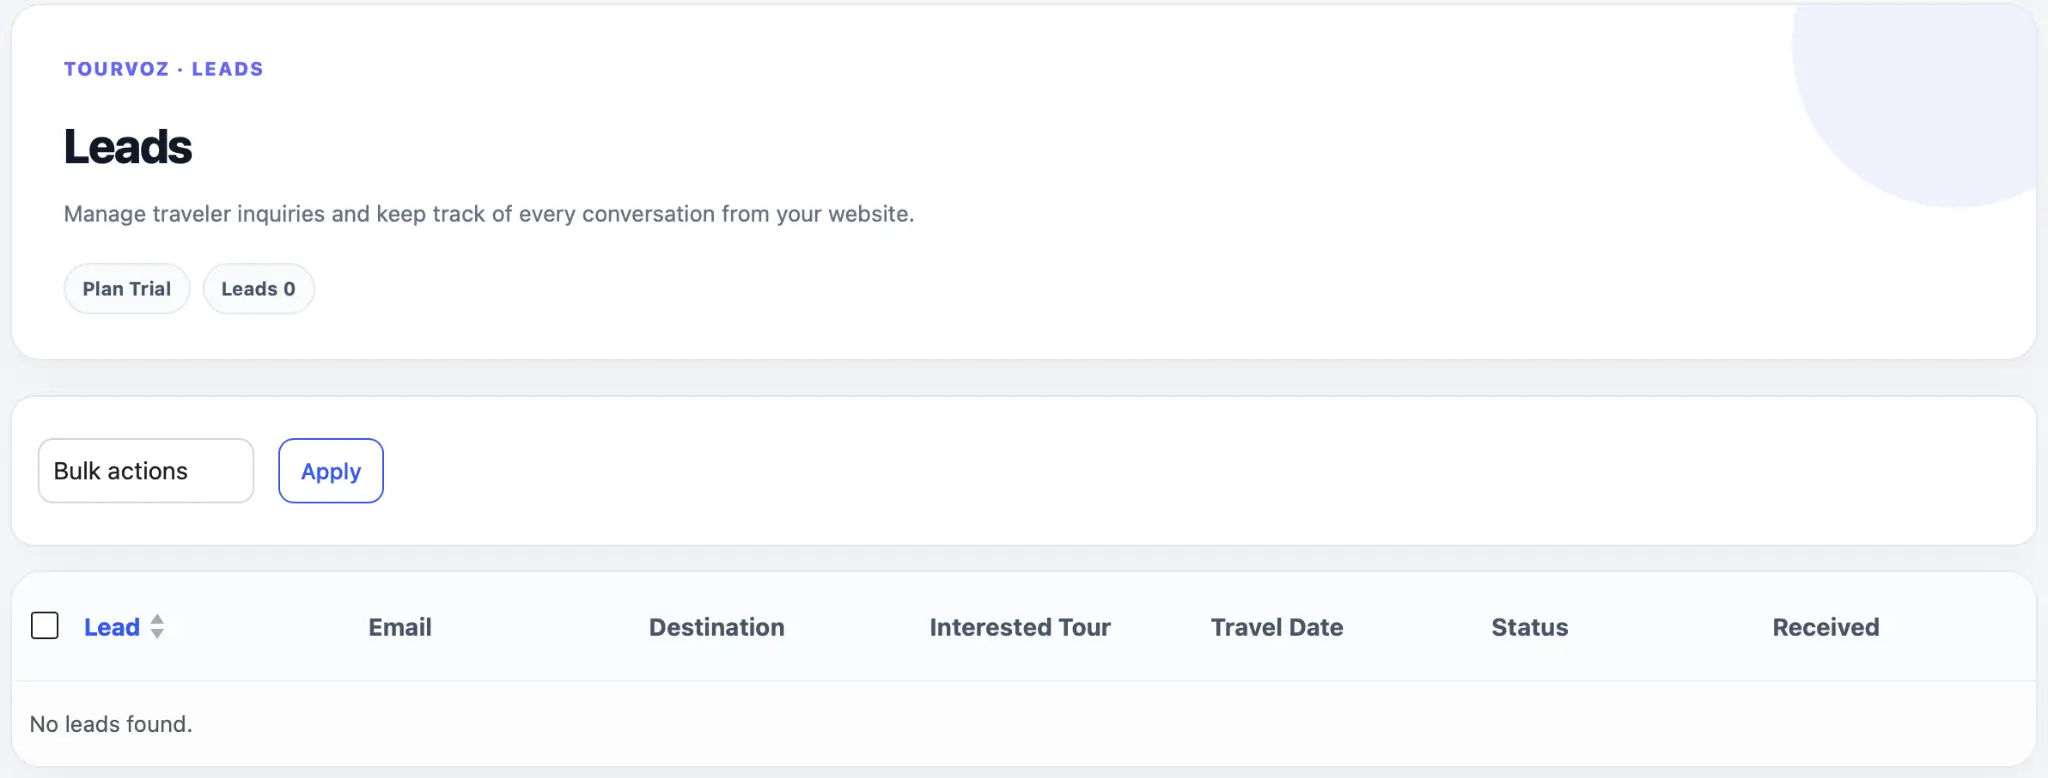
If your website has not received any traveler inquiries yet, the list displays No leads found..
View Traveler Inquiries
The Leads table organizes the main inquiry information into columns so you can quickly review each travel request.
The inquiry record.
The contact email submitted by the traveler.
The destination the traveler is interested in.
The Tour the traveler is interested in.
The travel date information submitted with the inquiry.
The current status of the inquiry.
When the inquiry was received.
Inquiry Status and List Management
The Status column shows the current state of each Lead, helping you distinguish records as you work through incoming inquiries.
The page also provides Bulk actions and Apply for supported actions on selected Leads.
As more inquiries arrive, use Status together with Received to keep track of their current state and when they were submitted.
Form Settings
Go to Leads → Form Settings to manage the customer-facing content displayed above the inquiry form. These settings change the introductory copy above the form; they do not change the inquiry form fields themselves.
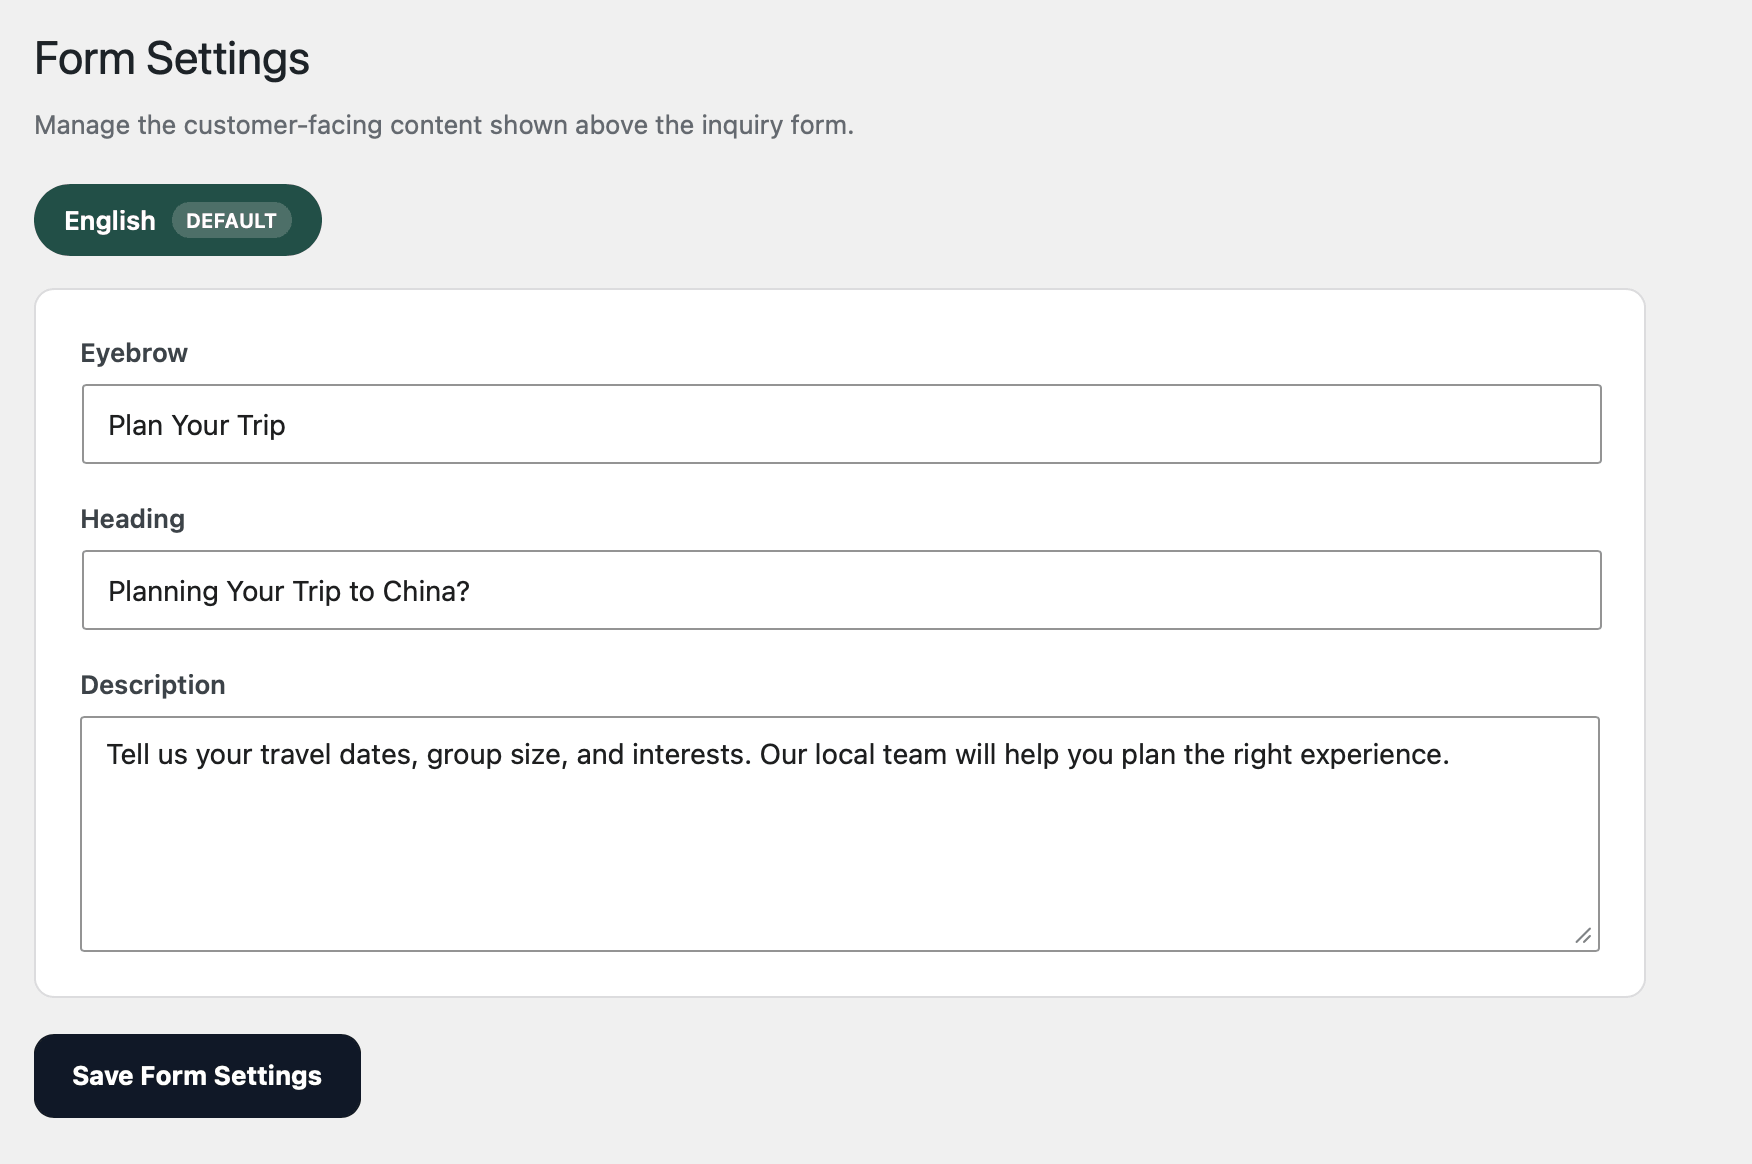
Set the short label shown above the main heading, such as Plan Your Trip.
Set the main heading for the inquiry section.
Add supporting copy that guides travelers to provide information such as travel dates, group size, and interests.
Click Save Form Settings when your changes are ready.
The language currently being edited is shown at the top of the page. Confirm the language before changing the corresponding inquiry-form introduction.
Growth
Growth helps you understand where website inquiries come from and which pages or Tours actually generate Leads, giving you a lead-attribution view of website performance.
Growth Overview
Open Growth from the dashboard to view Lead Attribution data. The page summarizes inquiry-related information such as lead sources, lead-generating pages, countries, and devices.
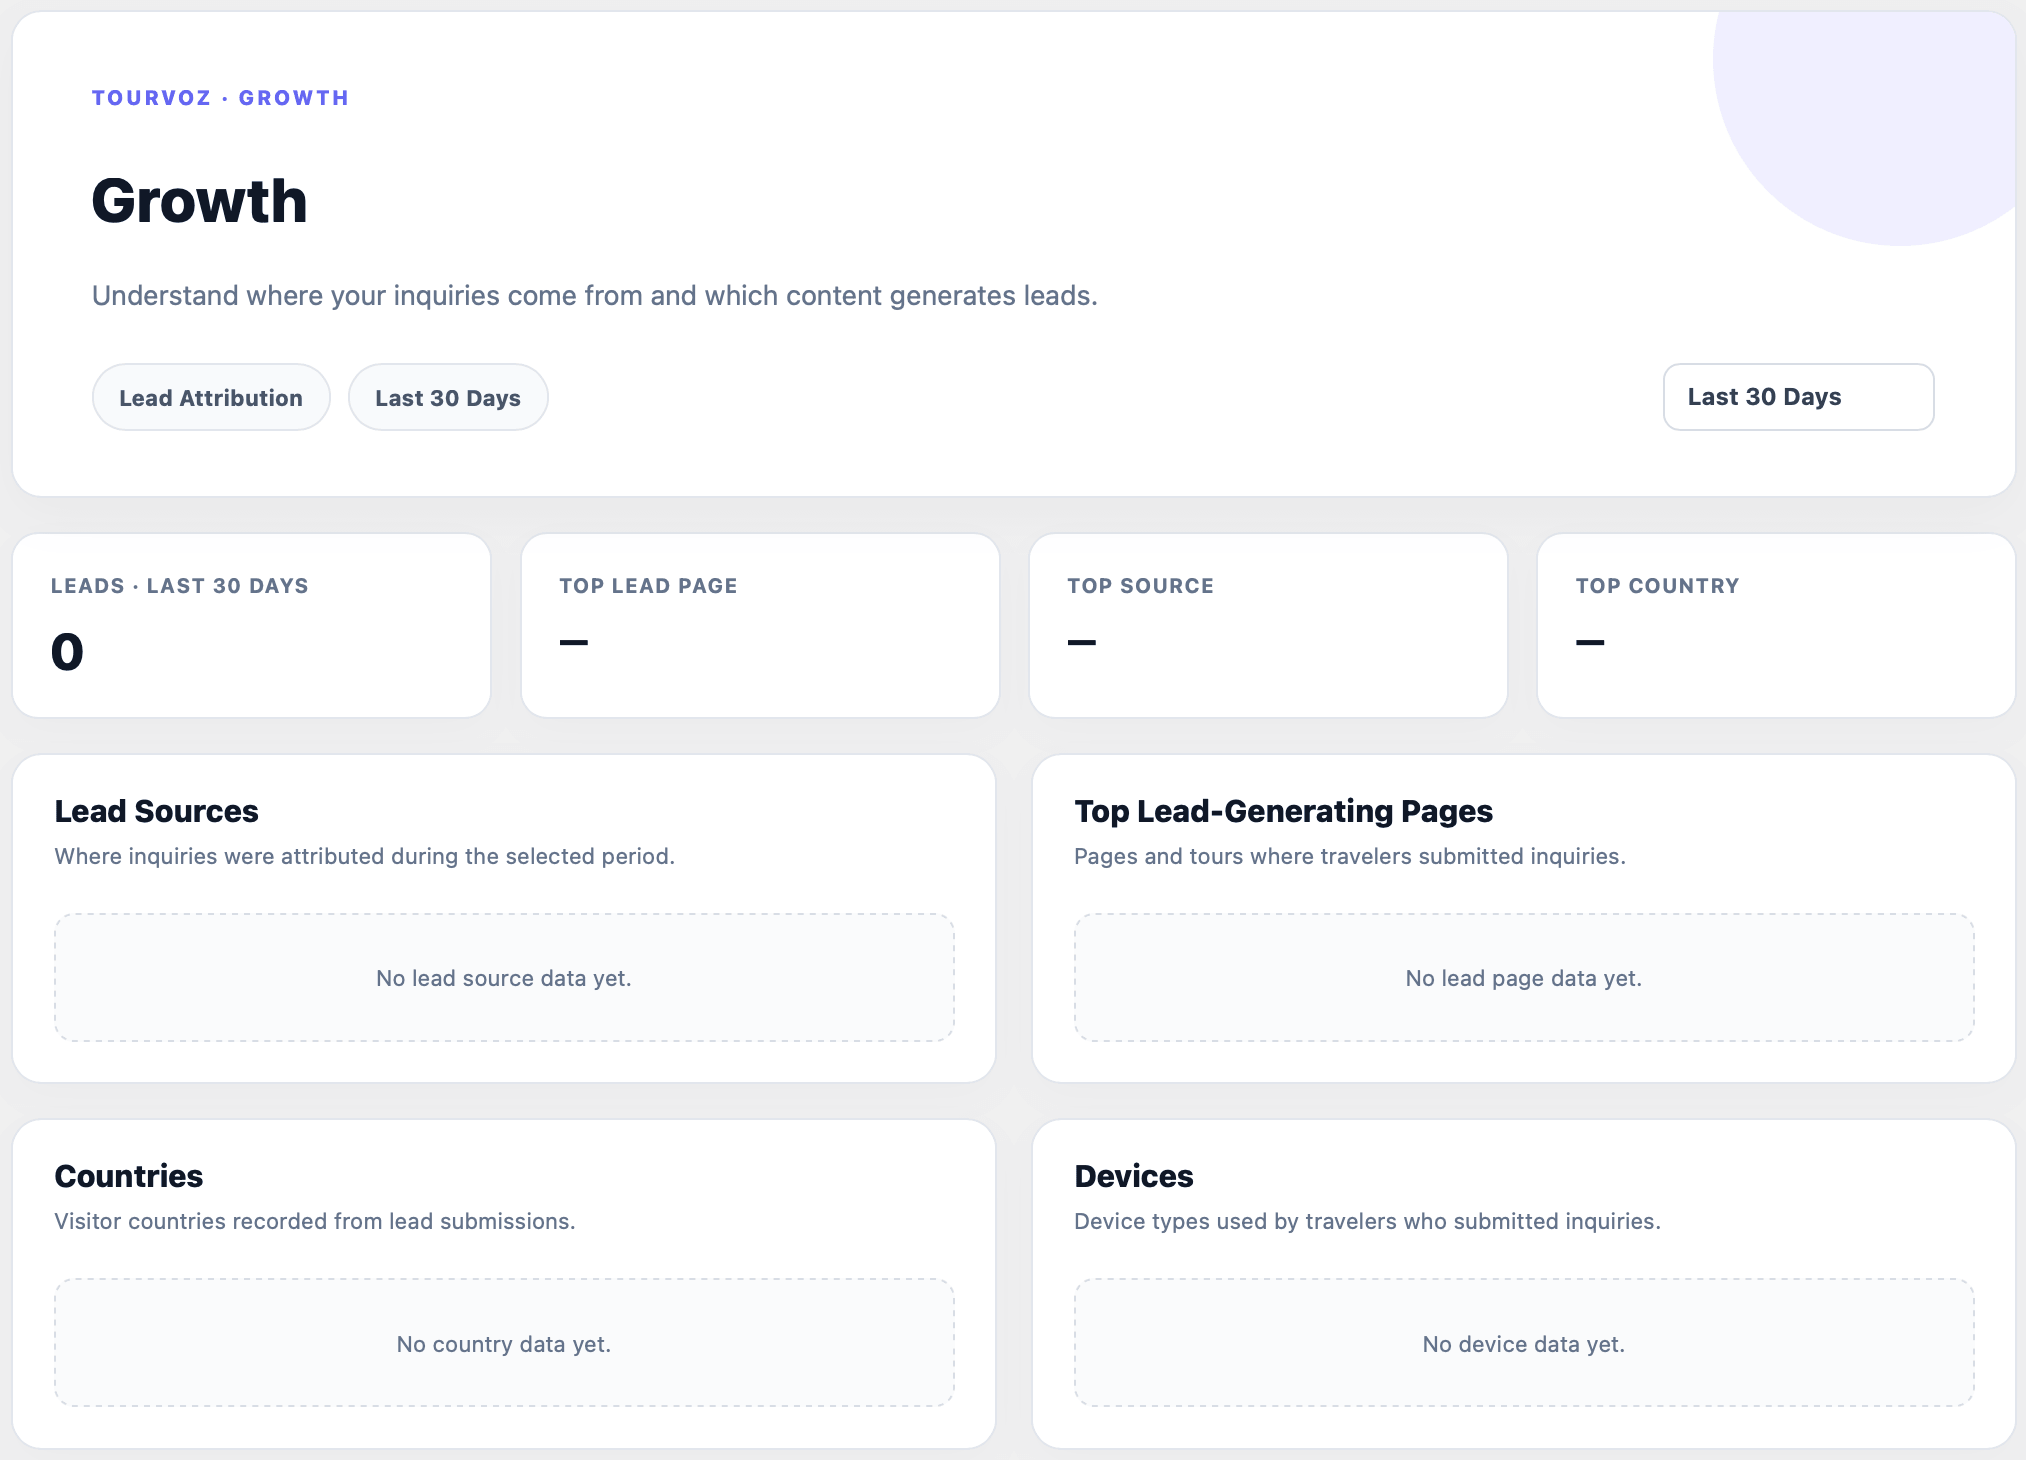
The data shown here is tied to Lead submissions and is designed to help you understand which sources and content generated inquiries.
Review Key Lead Metrics
The top of the page provides a date-range selector and summarizes key Lead Attribution metrics for the selected period.
The number of Leads recorded during the selected period.
The leading page associated with inquiry submissions during the selected period.
The leading inquiry source during the selected period.
The leading country recorded from inquiry submissions during the selected period.
The screenshot shows Last 30 Days. When you change the date range, interpret the metrics in the context of the currently selected period.
Lead Sources
Lead Sources shows where inquiries were attributed during the selected period, helping you understand which sources contributed to actual Lead submissions.
If there is no lead-source data for the selected period, this area displays No lead source data yet..
Top Lead-Generating Pages
Top Lead-Generating Pages shows the pages and Tours where travelers submitted inquiries. This helps you identify which website content is actually generating Leads.
As data accumulates, use this section to compare pages and Tours based on where travelers actually submit inquiries.
Countries & Devices
Countries
Shows visitor countries recorded from Lead submissions, helping you understand where travelers who submit inquiries are located.
Devices
Shows the device types used by travelers who submitted inquiries.
If there is no corresponding Lead data yet, the Countries or Devices section will display its empty-state message.
Reviews & Testimonials
Reviews lets you organize genuine traveler feedback and third-party review-platform information as social proof across your website.
Reviews Overview
Open Reviews from the dashboard to view configured Review Sections and create new review or testimonial sections.
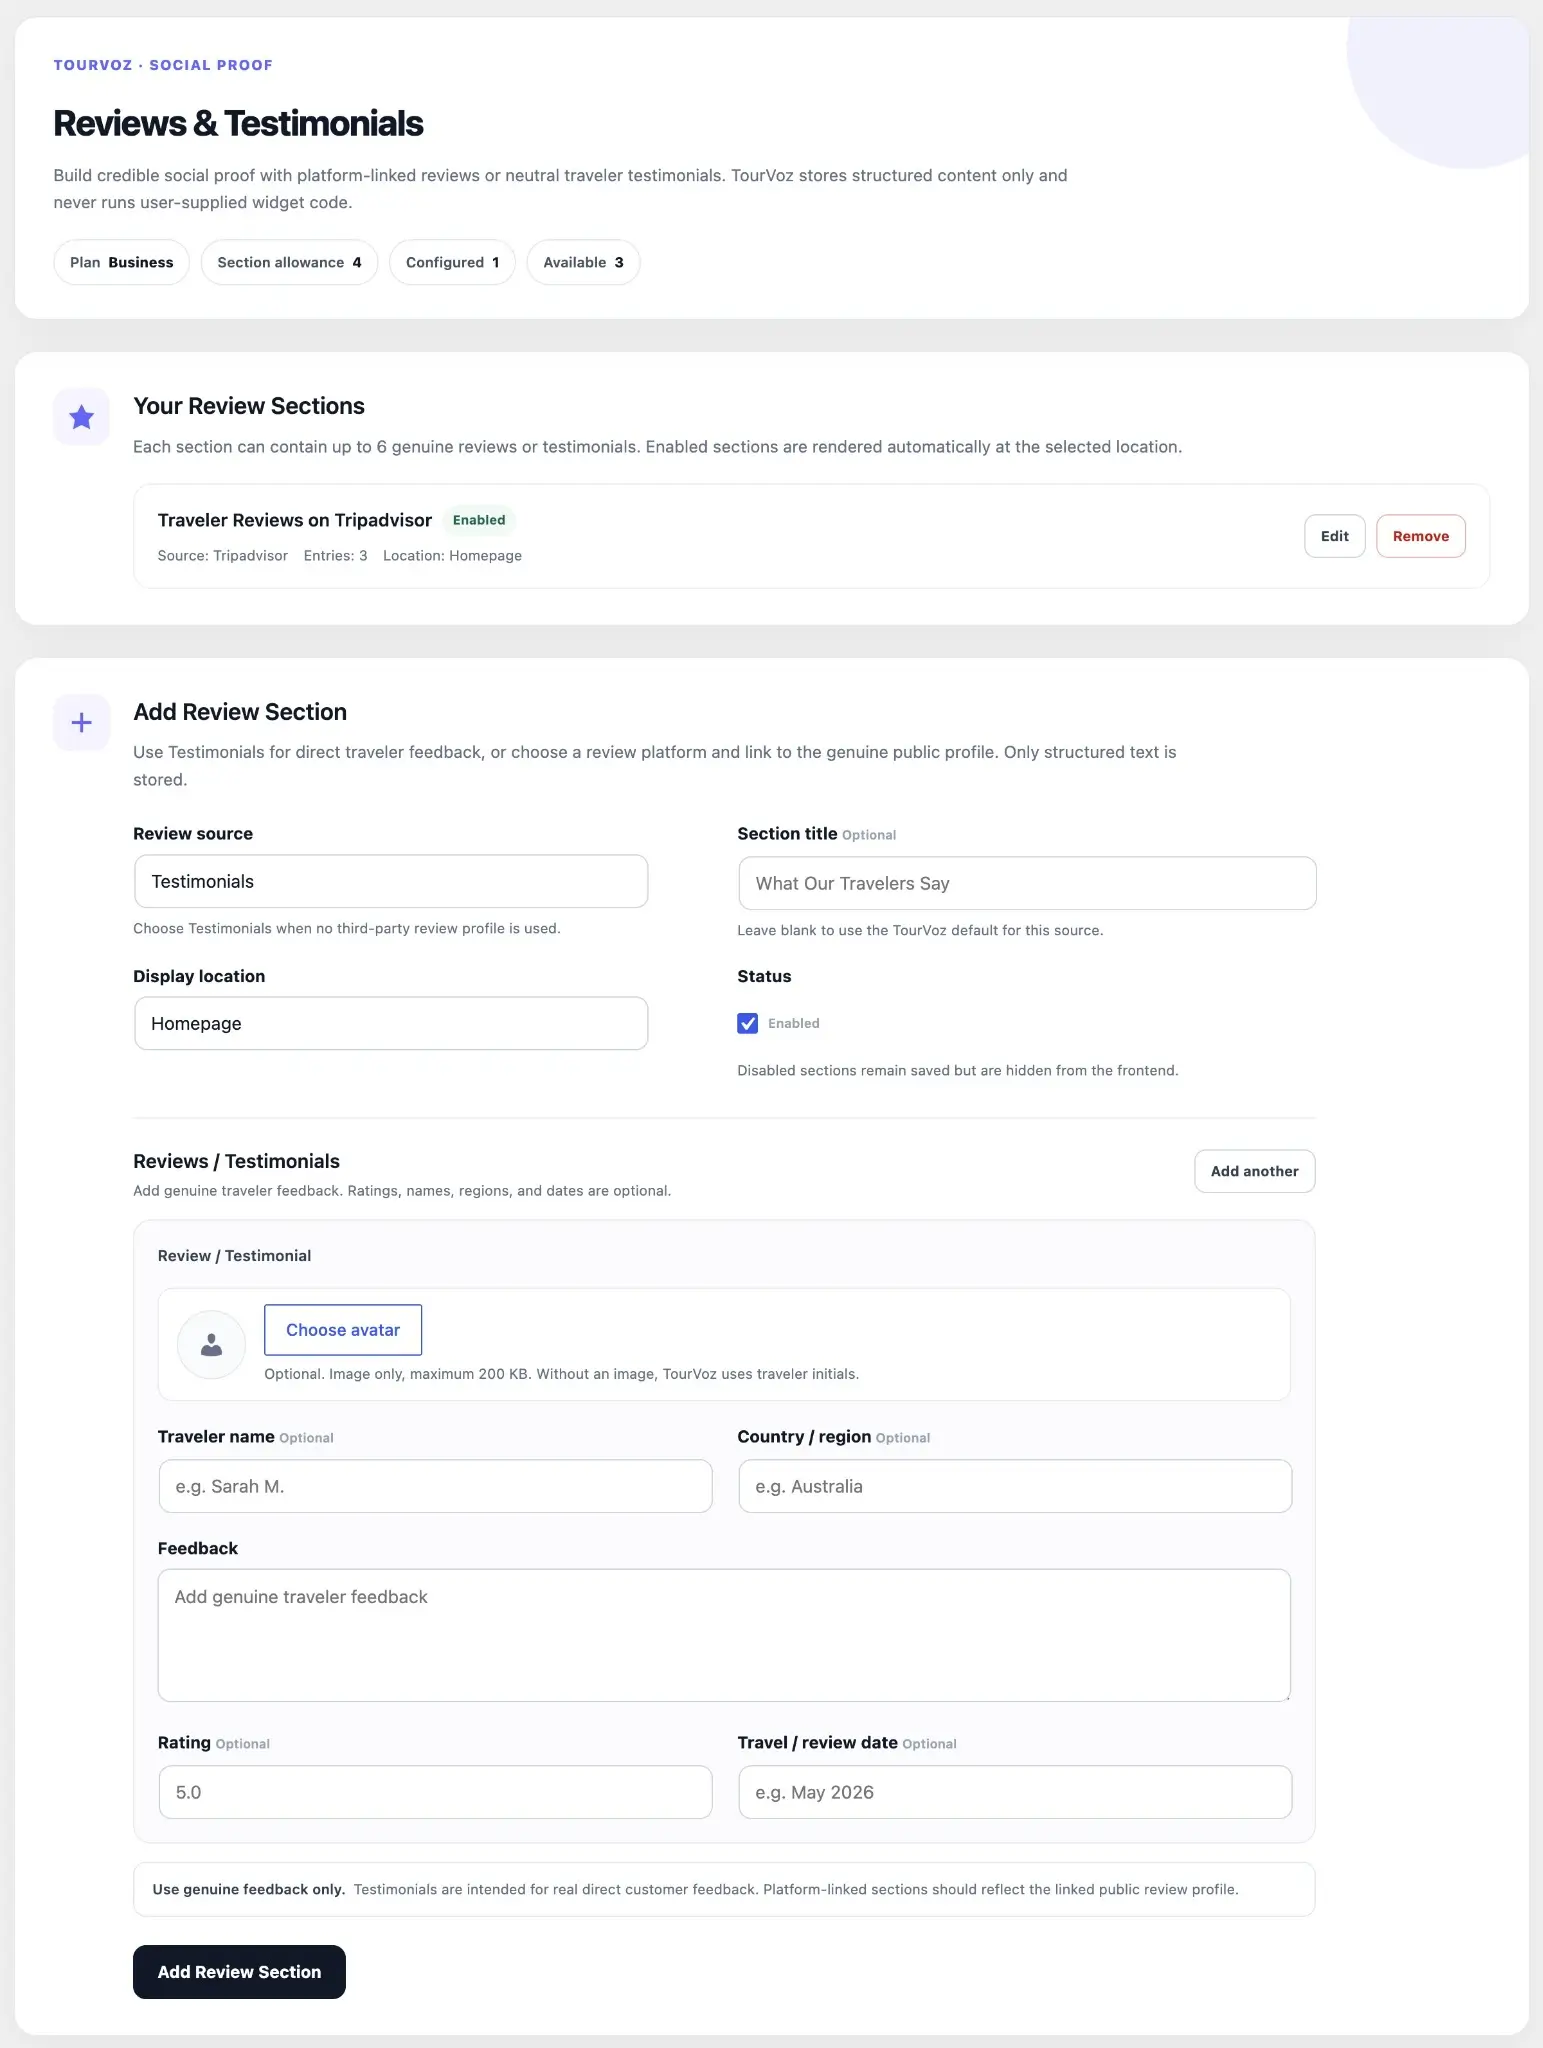
The top of the page shows the current plan, Section allowance, configured count, and available count. Each section can contain up to 6 genuine reviews or testimonials.
Testimonials should contain real direct traveler feedback. Platform-linked sections should correspond to a genuine public review profile. TourVoz stores structured content only and does not run user-supplied widget code.
Create a Review Section
In Add Review Section, choose the Review source first, then add an optional Section title. Leave it blank to use the TourVoz default for that source.
After setting the source, display location, status, and review content, click Add Review Section.
Choose a Review Source
Current sources include Testimonials, Tripadvisor, Google Reviews, Trustpilot, Facebook, and GetYourGuide.
Use Testimonials for genuine direct traveler feedback. Third-party platform sources are for Review Sections associated with genuine public review profiles.
Selecting a third-party platform does not mean TourVoz automatically imports or synchronizes reviews from that platform.
Set Display Location and Status
Choose where the Review Section appears. Current options are Homepage, About, or Tours.
Keep Enabled selected to show the section. Disabled sections remain saved but are hidden from the frontend.
Add Testimonials
With Testimonials selected, enter genuine traveler feedback directly and use Add another to add more entries.
Optionally add a traveler image. The interface specifies a maximum of 200 KB; without an image, TourVoz uses traveler initials.
Traveler name, optional.
Traveler country or region, optional.
Enter genuine traveler feedback.
Rating, optional.
Travel or review date, optional, for example May 2026.
Manage Review Sections
Existing sections appear under Your Review Sections with Source, Entries, Location, and current status.
Use Edit to change an existing section or Remove to delete one you no longer need.
Use Testimonials for genuine direct feedback. Keep platform-linked sections consistent with the corresponding public review profile.
Languages
Languages lets you set the website's default language and choose the additional languages visitors can switch to on the frontend.
Website Languages Overview
Open Languages from the dashboard to see your plan's language allowance, the website default language, and the number of languages currently enabled.
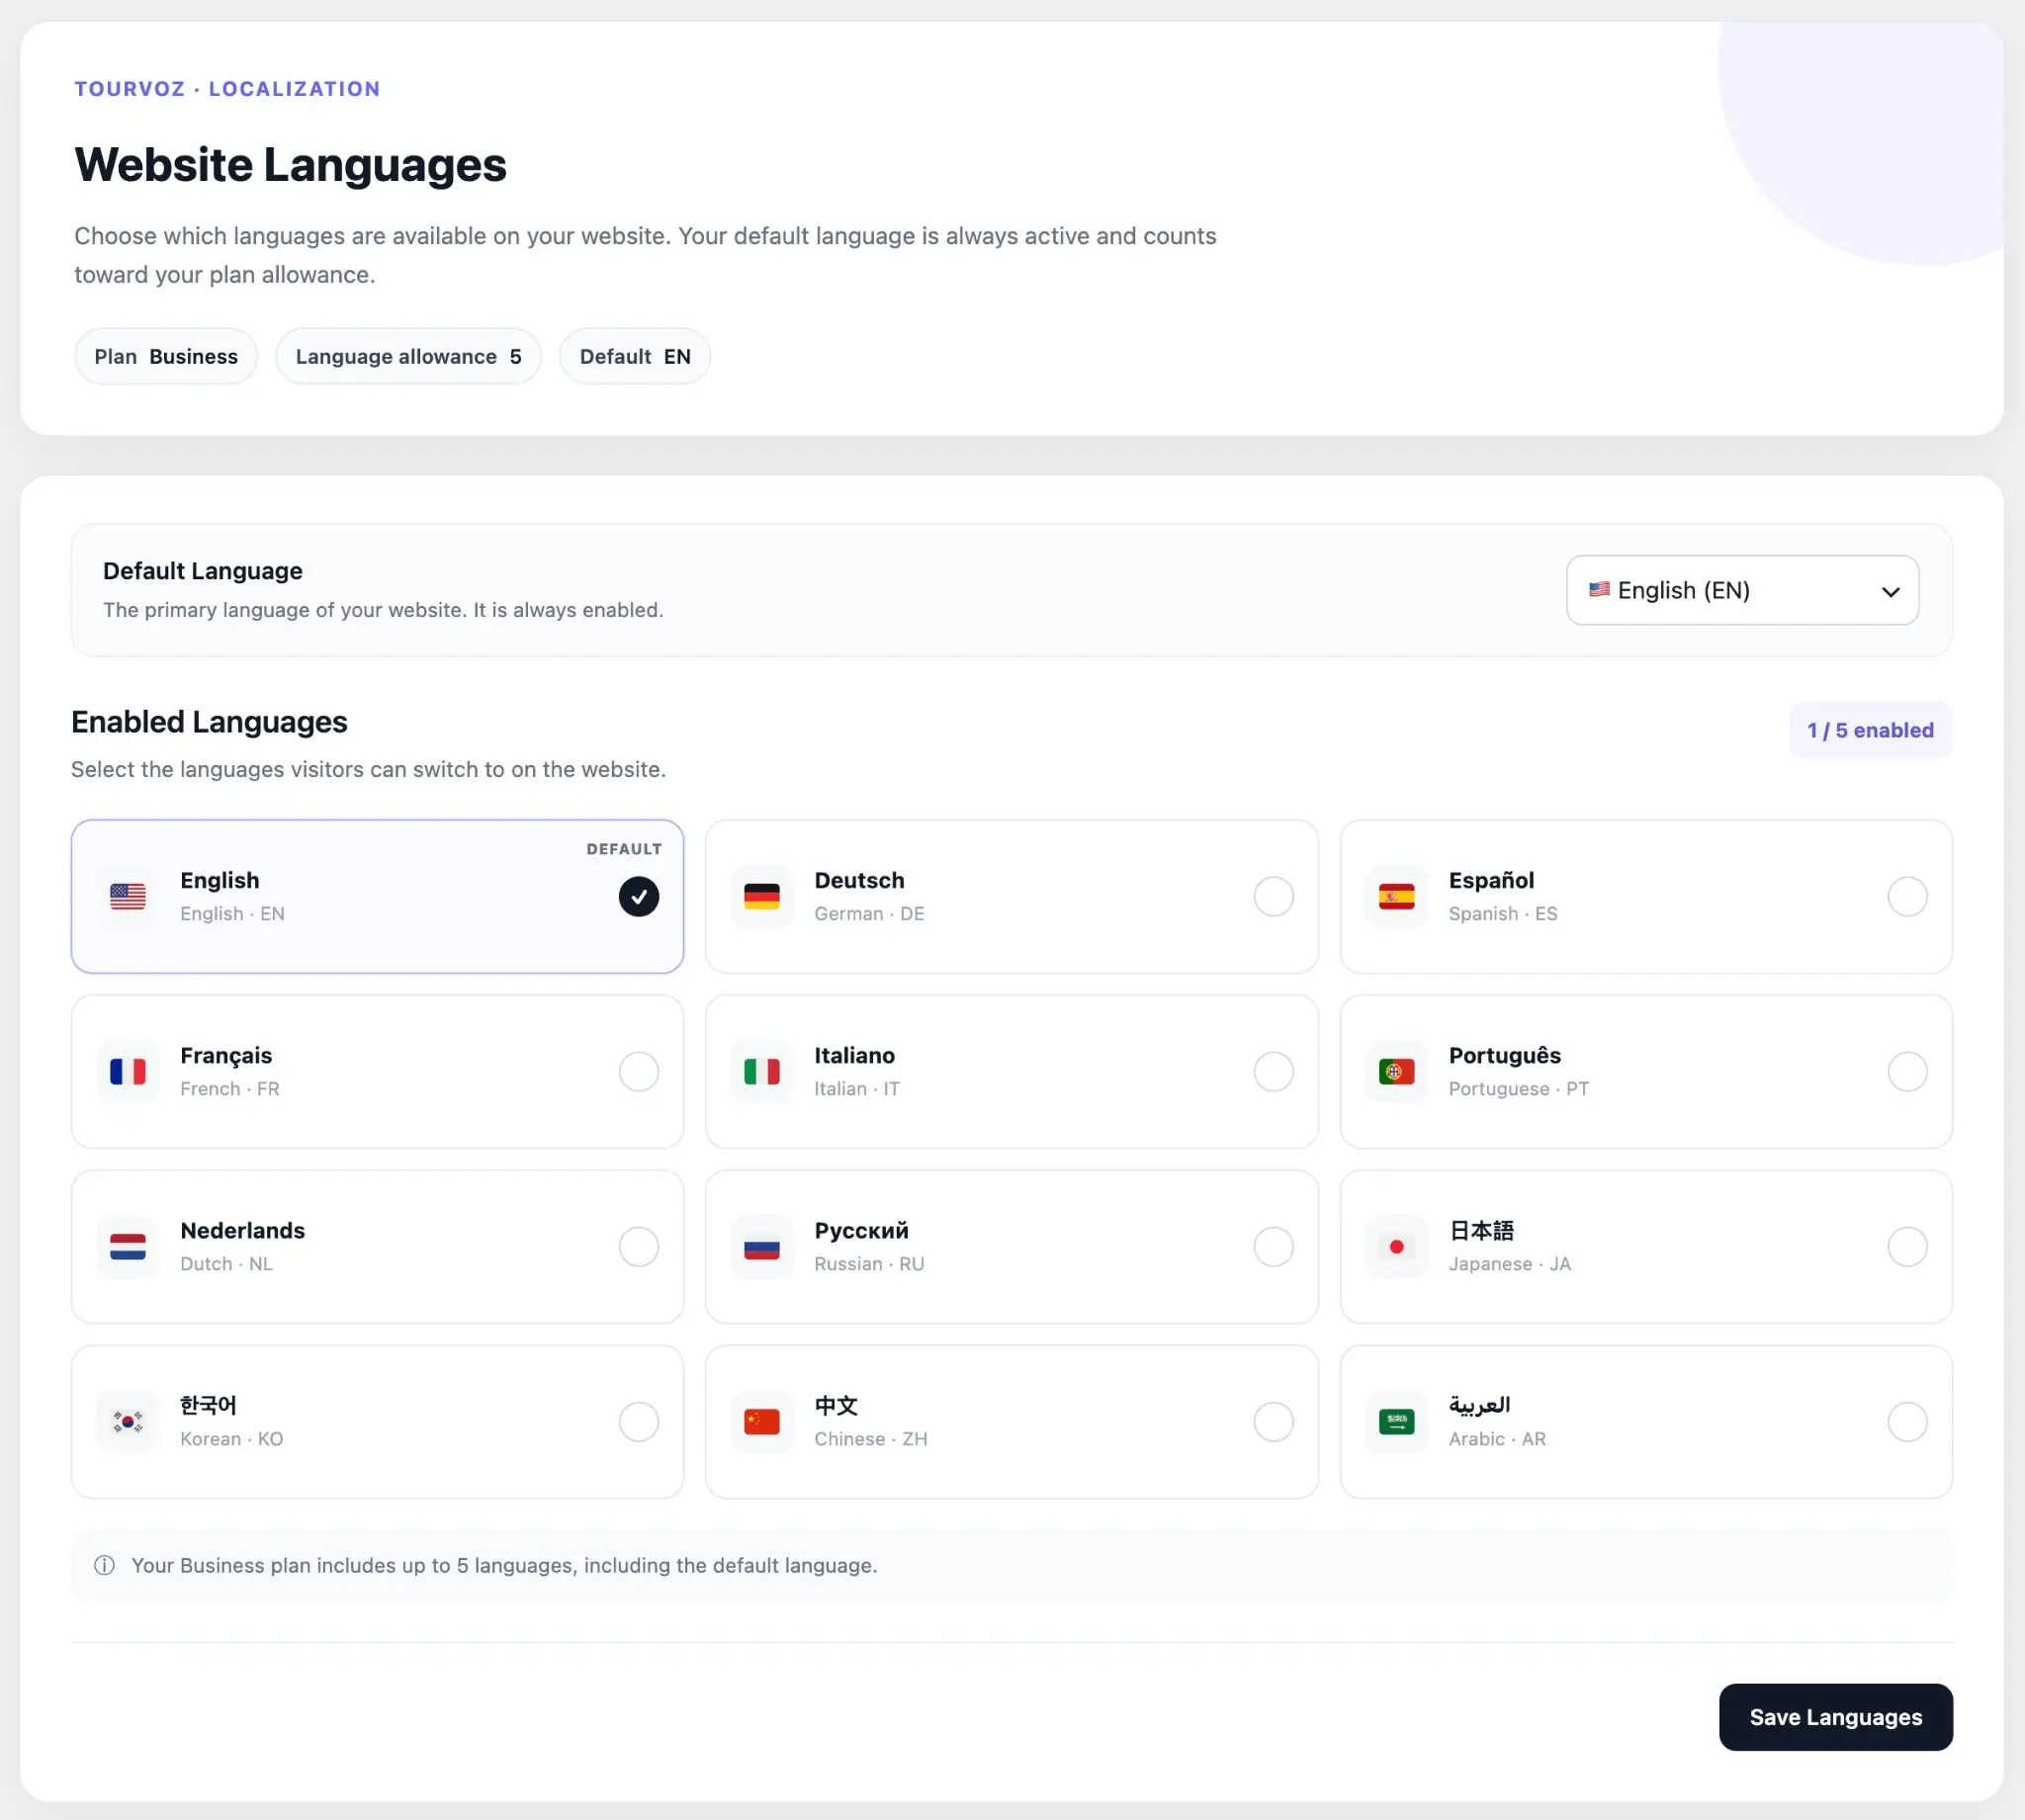
The Languages screen controls which languages are available on the website. Enabling a language by itself does not mean existing pages, Tours, or other content have automatically been translated into that language.
Set the Default Language
Default Language is the primary language of your website. Use the dropdown to select the language you want to use as the default.
The default language is always enabled and counts toward your plan's Language allowance.
Enable Additional Website Languages
Under Enabled Languages, select the languages visitors should be able to switch to. The current interface includes English, Deutsch, Español, Français, Italiano, Português, Nederlands, Русский, 日本語, 한국어, 中文, and العربية.
The default language is marked DEFAULT. Enable additional languages according to your target markets and the content you are prepared to maintain.
Prioritize languages for which you are ready to provide and maintain content instead of enabling extra languages simply to increase the language count.
Check Your Language Allowance
Language allowance at the top of the page shows how many languages your current plan supports. The Enabled Languages area also shows how many are currently enabled.
The default language uses one allowance slot. For example, 1 / 5 enabled means one language is currently enabled and the plan allows up to five languages in total.
Save Language Settings
After choosing the default language and Enabled Languages, click Save Languages to save the configuration.
The enabled languages then become available website languages. You can continue preparing the corresponding multilingual content for the languages you intend to offer.
Live Chat
Live Chat connects a Chatway chat widget to your TourVoz website so visitors can start real-time conversations with your team.
Live Chat Overview
Open Live Chat from the dashboard to connect a configured Chatway widget to your website.
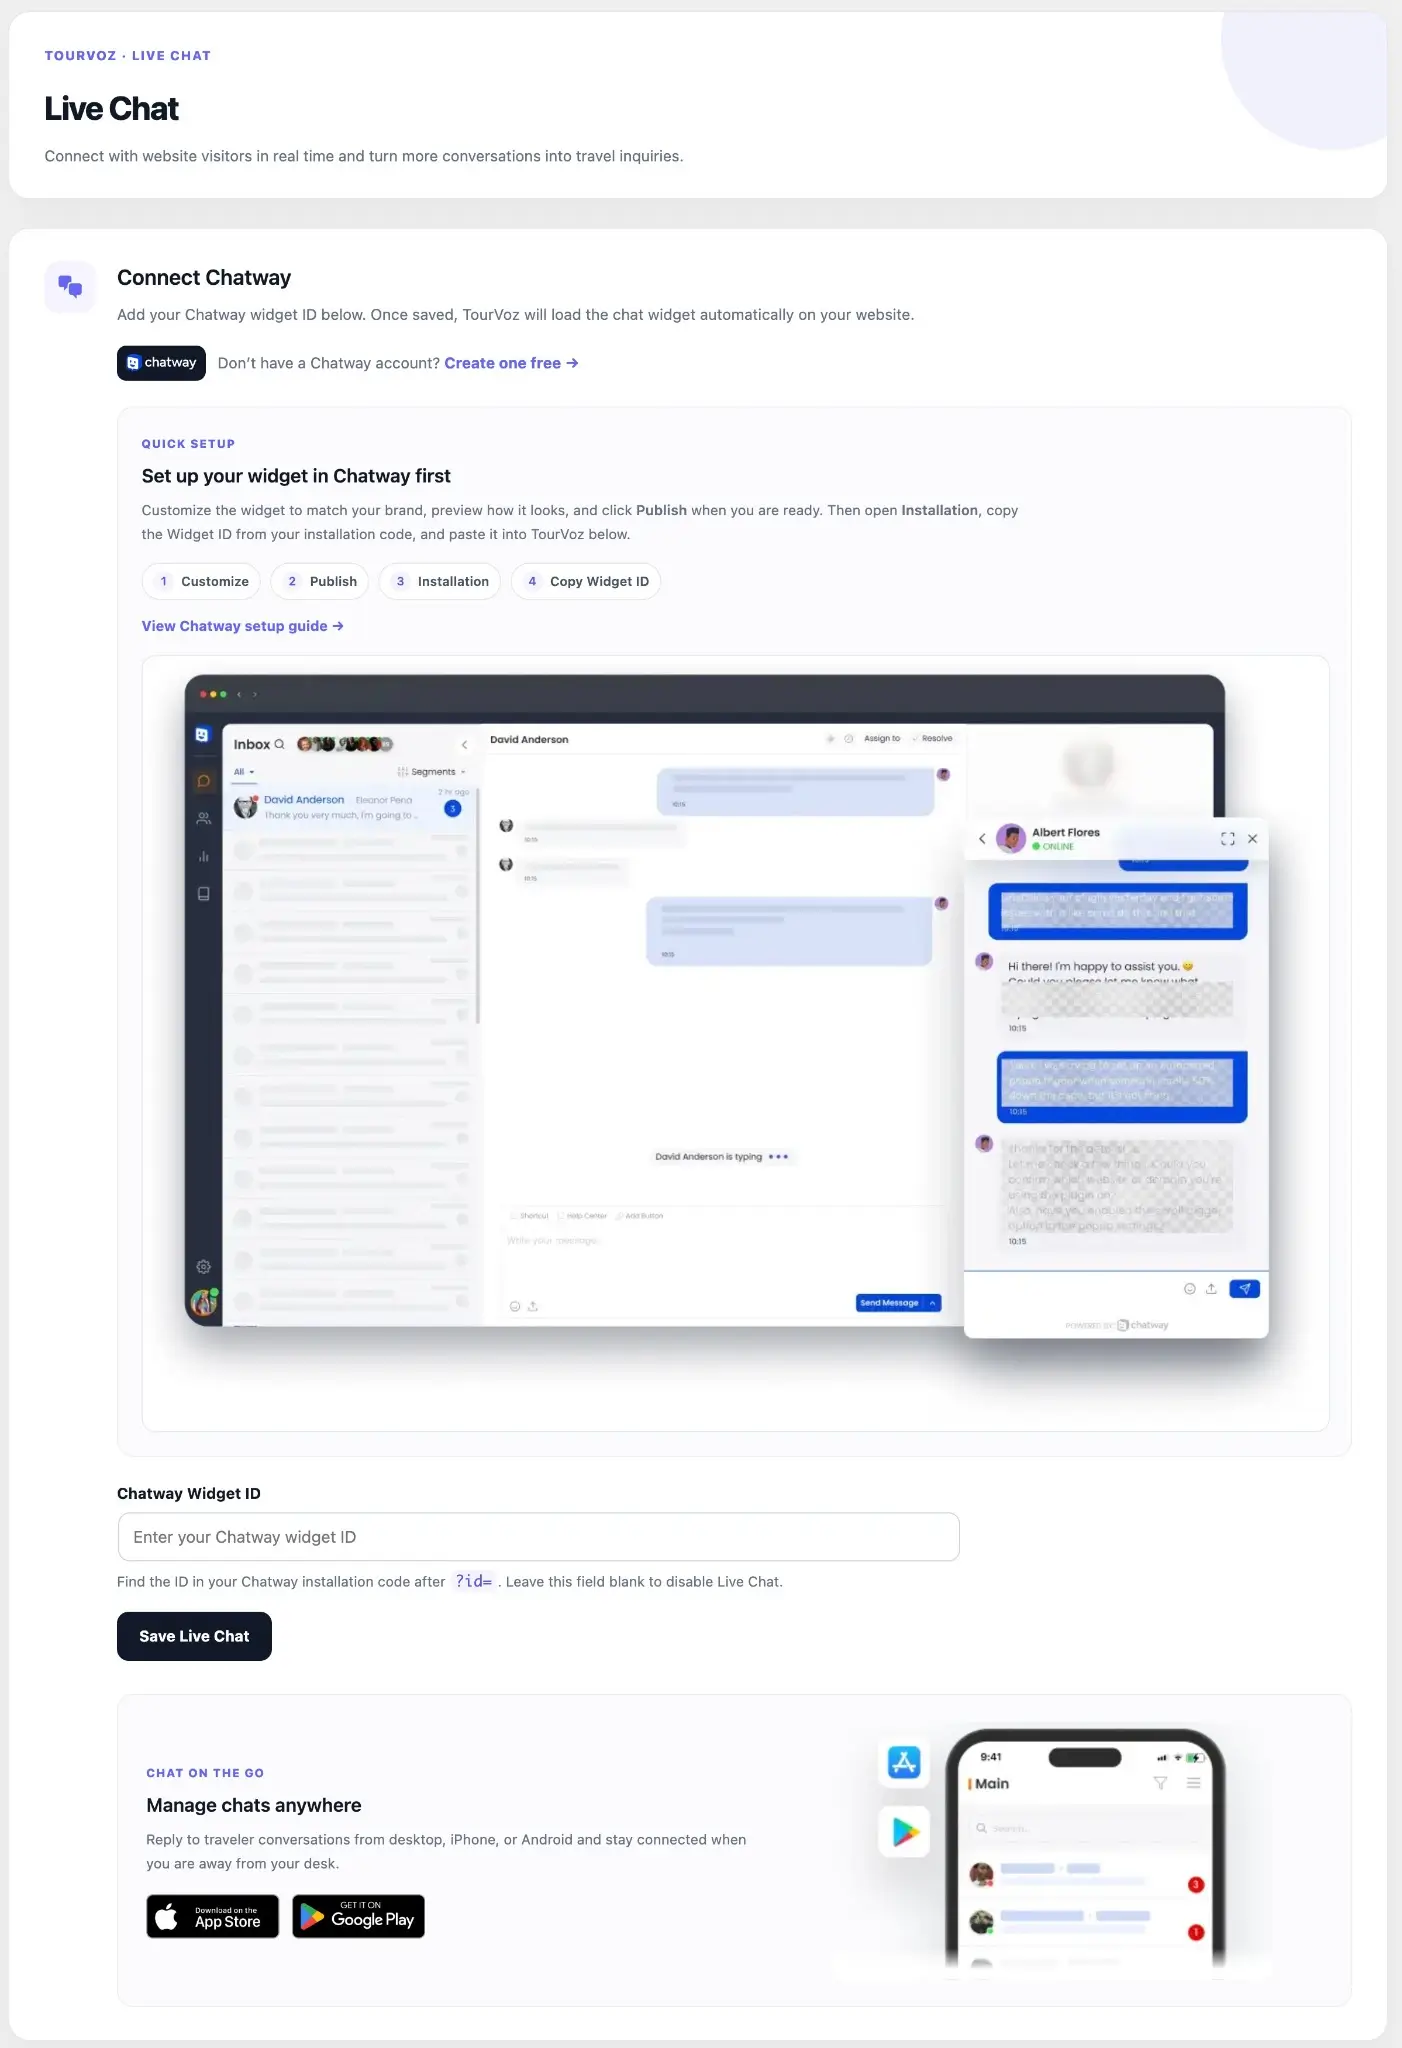
You do not need to paste the full third-party widget code into TourVoz. Once the Chatway widget is configured, only its Widget ID is required.
Set Up the Widget in Chatway First
If you do not already have a Chatway widget, configure it in Chatway first. The Quick Setup shown in TourVoz follows this sequence:
Customize the chat widget to match your website and brand.
Publish the widget in Chatway when the setup is ready.
Open the Installation area in Chatway.
Find and copy the Widget ID from the installation code.
Get the Chatway Widget ID
In the Chatway installation code, find the Widget ID that appears after ?id= and copy that ID.
The TourVoz field stores the Chatway Widget ID. Do not paste the complete JavaScript or third-party installation code.
Connect Chatway to TourVoz
Paste the copied ID into Chatway Widget ID, then click Save Live Chat.
Once saved, TourVoz automatically loads the corresponding Chatway chat widget on your website. Visitor conversations can be handled through Chatway's management interface; the page also provides links to its mobile apps for replying on mobile devices.
Disable Live Chat
To stop displaying live chat, leave the Chatway Widget ID field blank and save the settings.
Enter a valid Chatway Widget ID and save the settings whenever you want to enable Live Chat again.
Custom Domain
Custom Domain lets you connect your own branded domain to your TourVoz website while keeping the original TourVoz subdomain available.
Custom Domain Overview
Open Custom Domain to view the current website address, requested custom domain, connection status, DNS instructions, and verification controls.
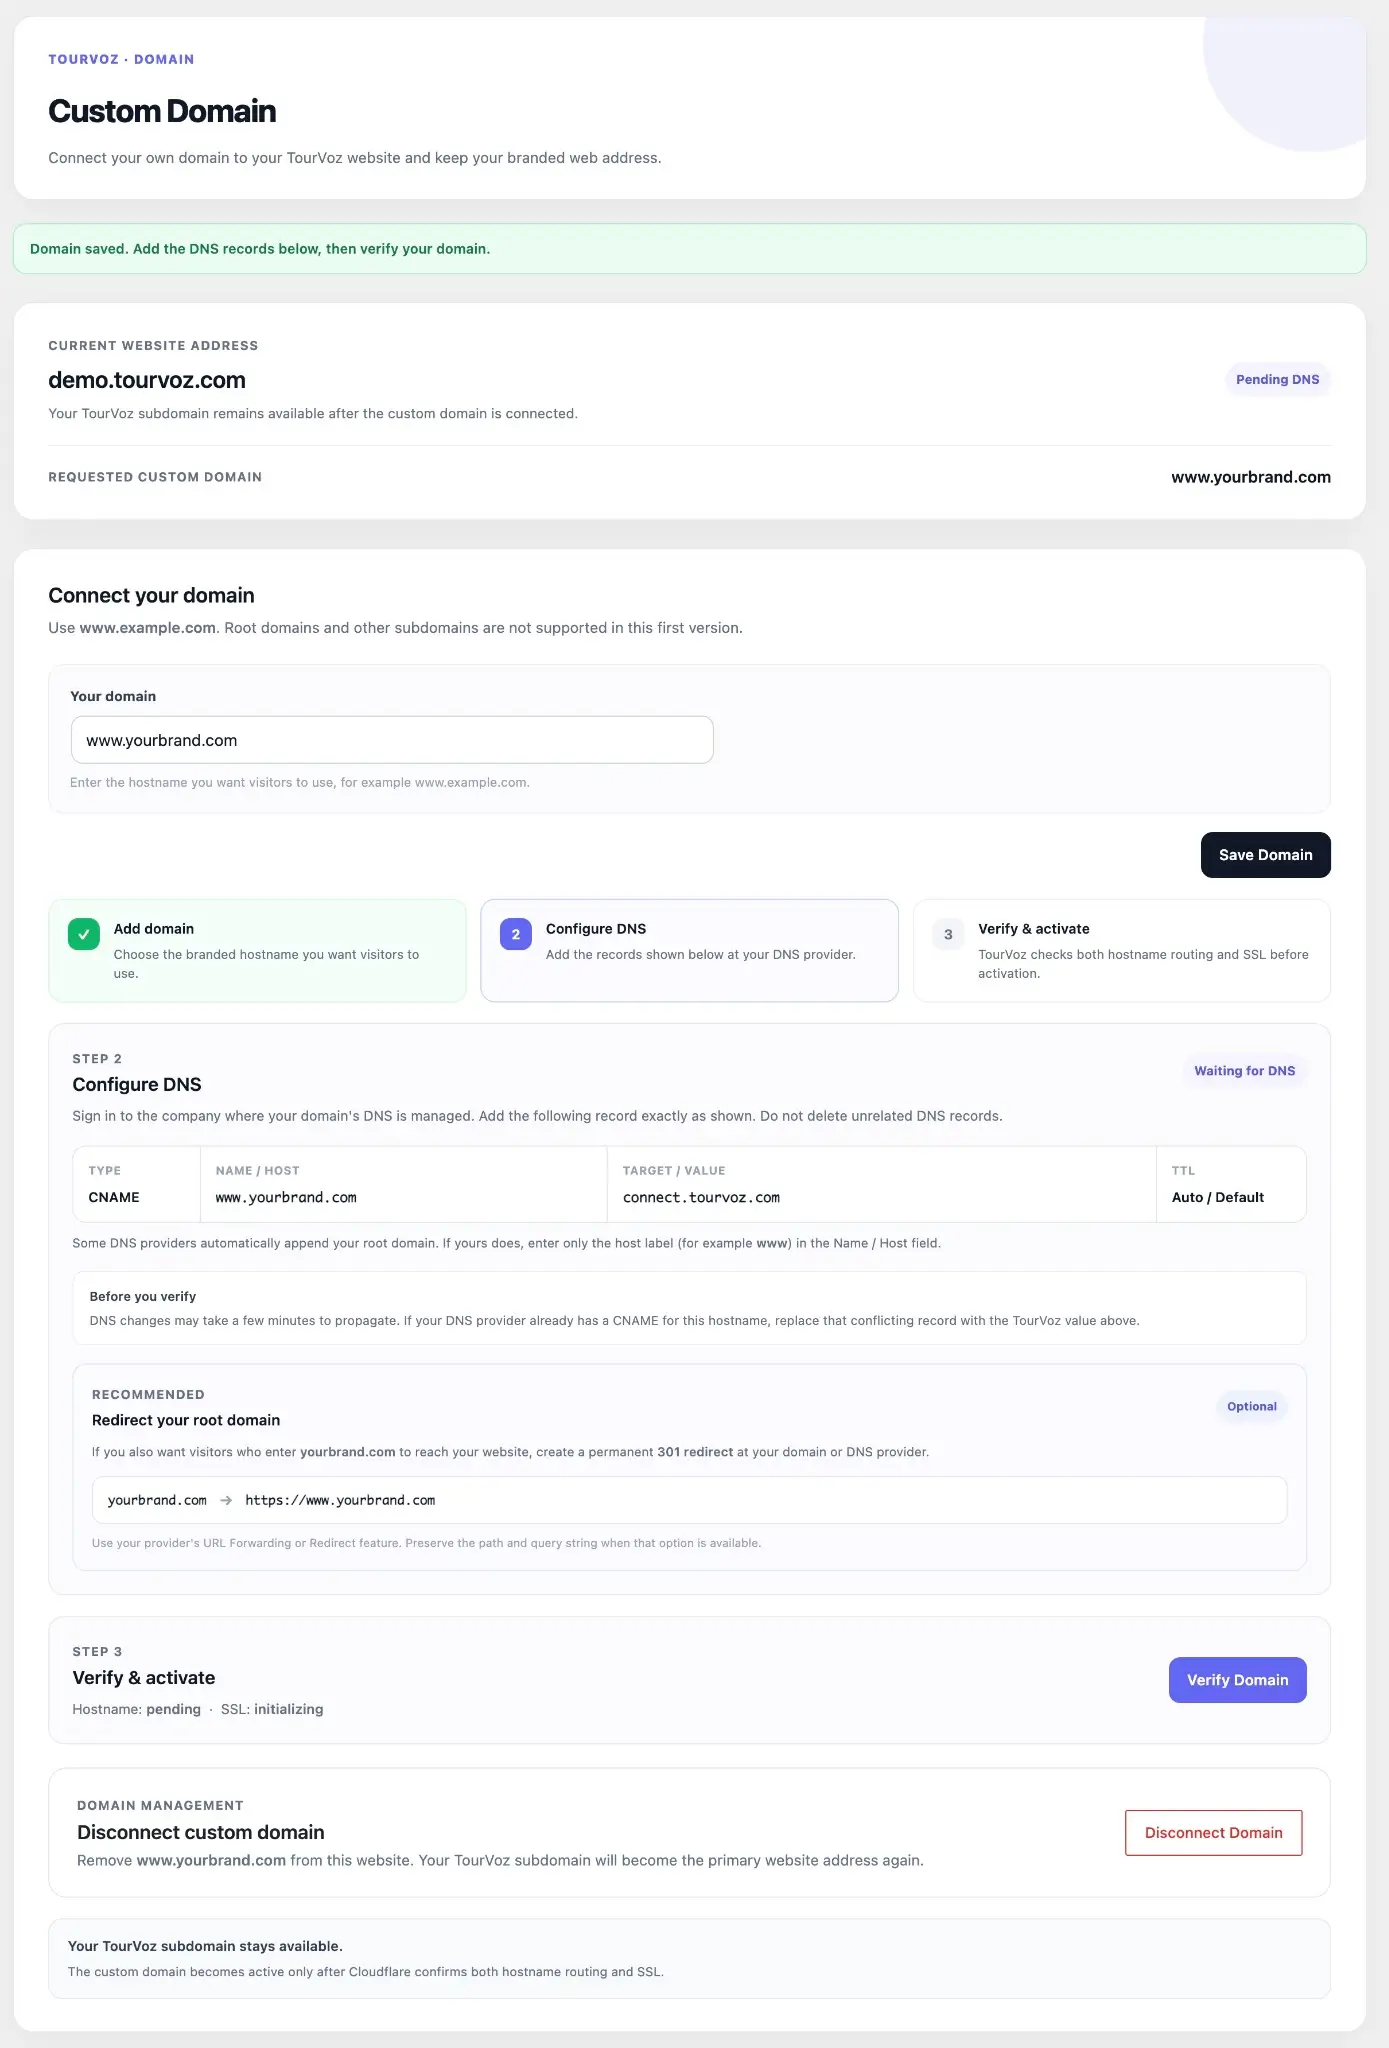
Your original TourVoz subdomain remains available after the custom domain is connected.
Add a Custom Domain
Enter the full hostname you want visitors to use in Your domain, for example www.yourbrand.com, then click Save Domain.
The current interface requires an address such as www.example.com. Root domains and other subdomains are not supported as the connected address in this version.
Configure DNS
After saving the domain, sign in to the provider that manages your DNS and add the record shown by TourVoz. The current connection method uses a CNAME.
Add a CNAME record.
Use the value shown on the page. Some DNS providers automatically append the root domain, so you may only need the host label, such as www.
Use the value shown by TourVoz; the example screen shows connect.tourvoz.com.
Use Auto / Default.
If this hostname already has a CNAME, replace only the conflicting record. DNS changes may take time to propagate.
Verify & Activate
After the DNS record is configured and begins resolving, return to TourVoz and click Verify Domain.
TourVoz checks hostname routing and SSL before activation. While the connection is being prepared, the page may show Pending DNS, Waiting for DNS, or SSL initialization.
If verification does not succeed immediately, allow time for propagation and try Verify Domain again.
Set Up a Root Domain Redirect
If visitors should also reach the site from the root domain, such as yourbrand.com, create a permanent 301 redirect at your domain or DNS provider to https://www.yourbrand.com.
The interface recommends using your provider's URL Forwarding or Redirect feature and preserving the path and query string when available.
Disconnect the Custom Domain
If you no longer want to use the current custom domain, click Disconnect Domain under Domain Management.
The custom domain is removed from the website and the TourVoz subdomain becomes the primary website address again.
Connecting a custom domain does not remove the original TourVoz subdomain.
Team
Team lets you manage the people who can access your TourVoz website and review the team seats included with your plan.
Team Overview
Open Team to invite new members and review each member's role, status, and the number of seats currently available.
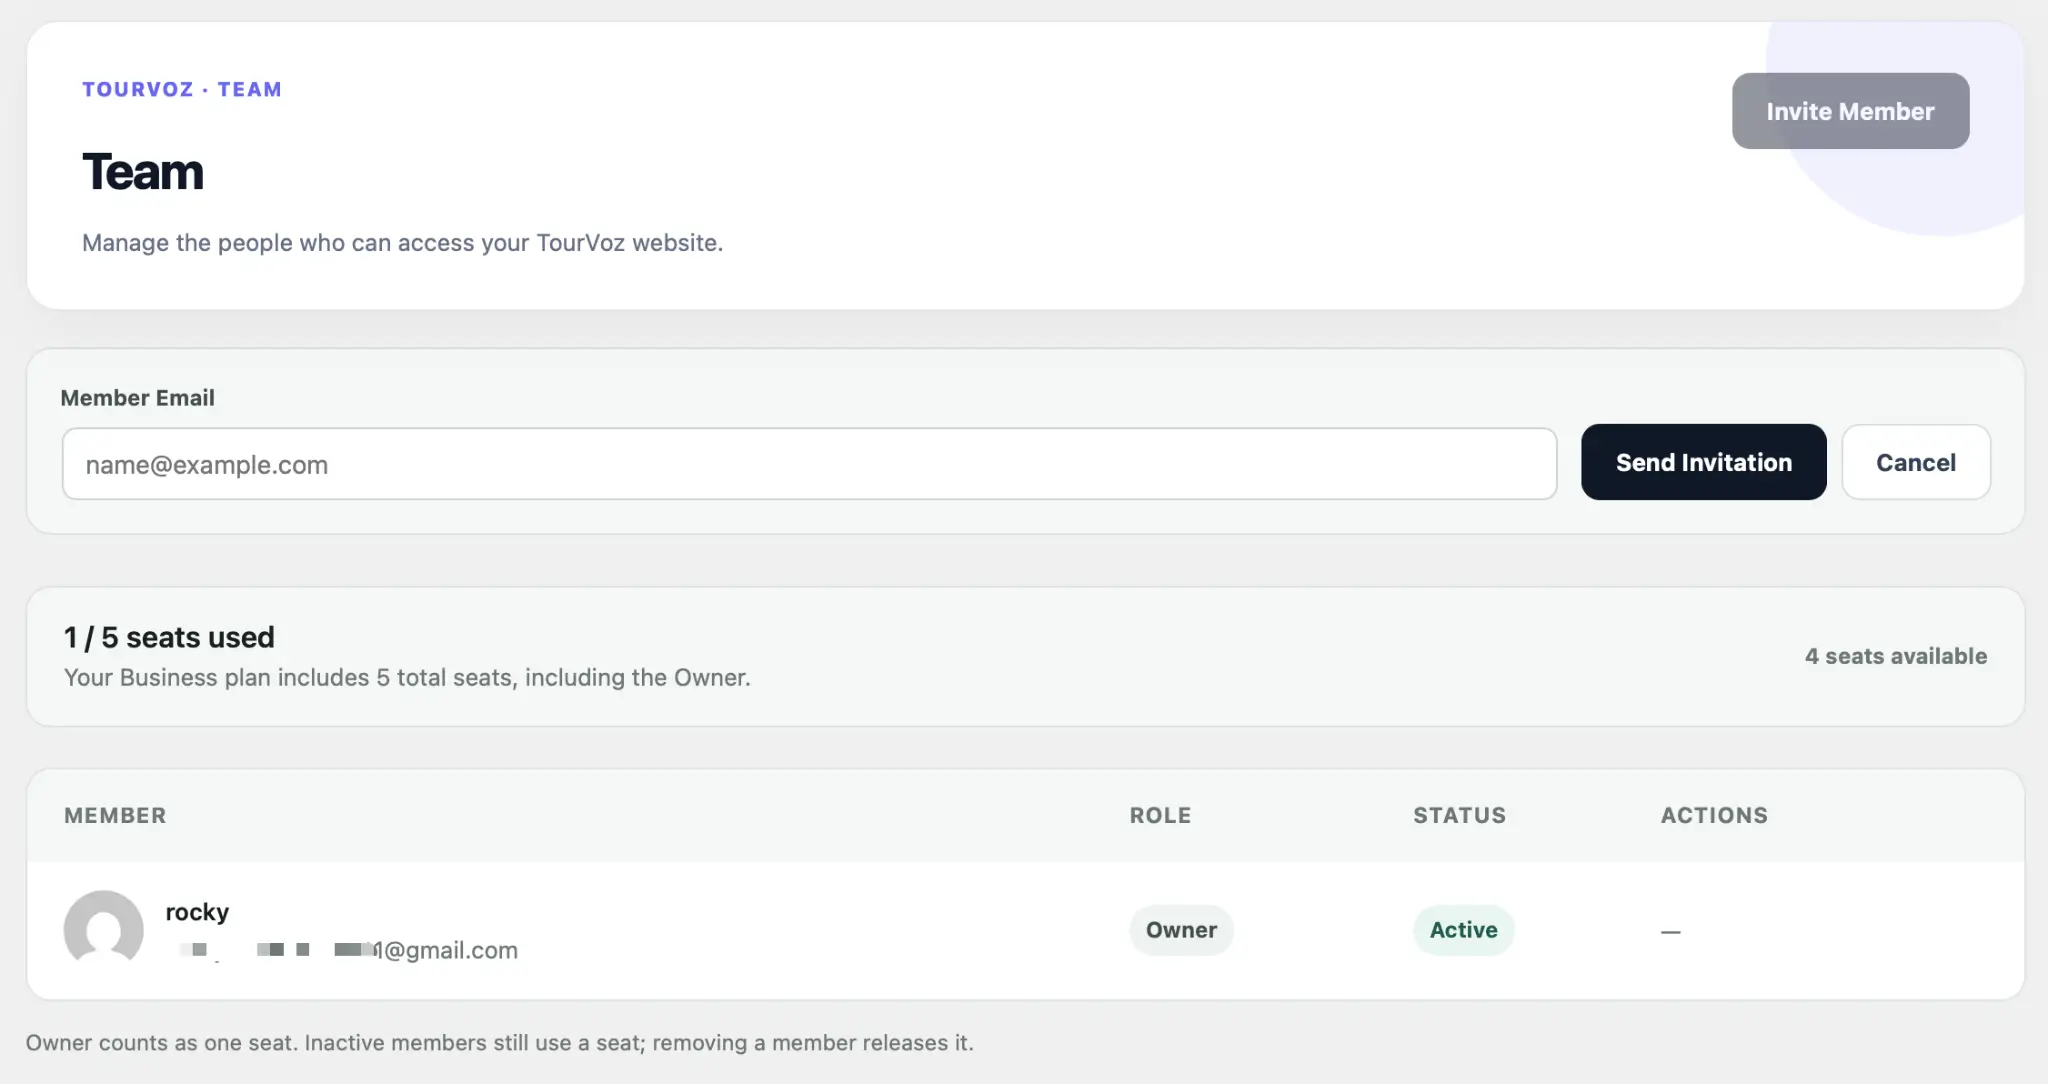
Invite a Team Member
Click Invite Member, enter the team member's email address under Member Email, and then click Send Invitation.
Click Cancel if you do not want to send the invitation.
Send the invitation to the person who should have access to this TourVoz website.
Review Team Seats
The page shows your current seat usage, such as 1 / 5 seats used, together with the number of seats available.
The website Owner is included in the total seat count. The total and available seats shown on the page depend on the current plan.
Member Status & Management
The member table includes Member, Role, Status, and Actions so you can review the people who currently have access to the website.
Shows the member's name and email address.
Shows the member's role on the current website, such as Owner.
Shows the member's current status, such as Active.
Available member-management actions appear here. The Owner does not show standard member actions in the current view.
Making a member inactive does not release the seat. The seat becomes available again only after that member is removed from the team.
Support
Support lets you contact the TourVoz team about website, domain, billing and account issues, or feature requests, and review requests submitted from the current website.
Support Overview
Open Support to choose a request category and send the details directly to the TourVoz team. My Support Requests shows recent requests submitted from the current website.
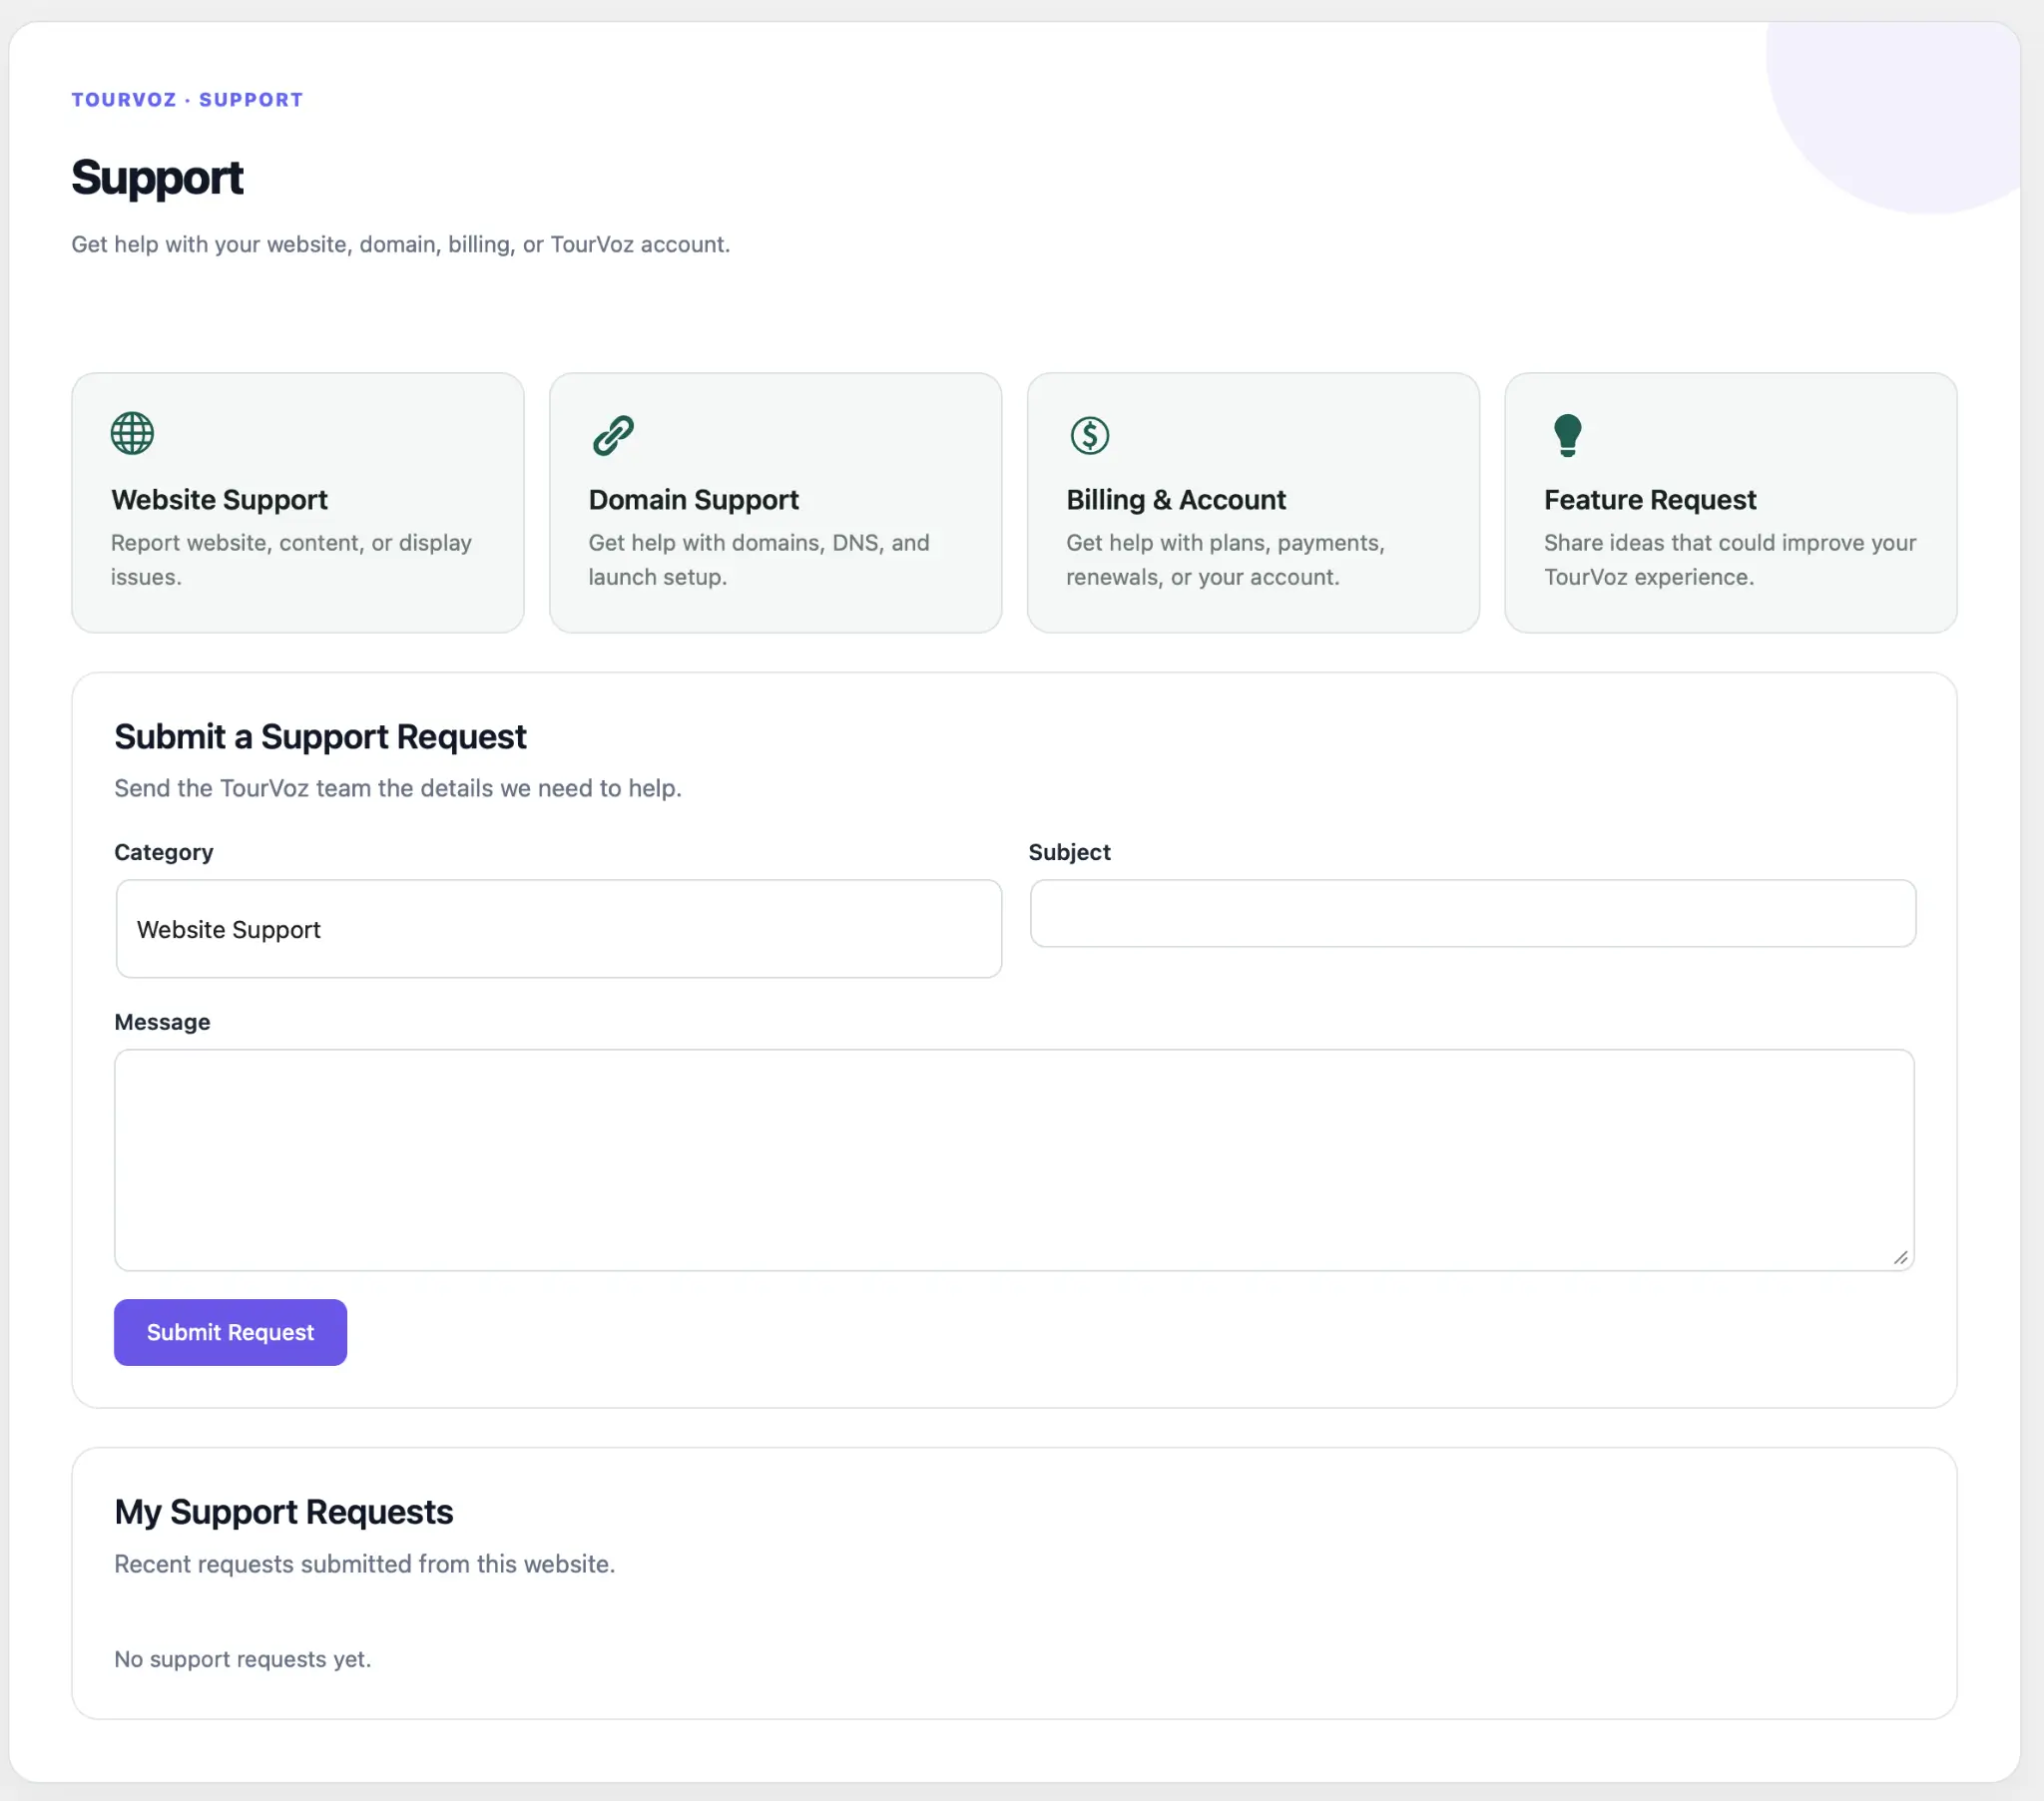
Choose a Support Category
Before submitting a request, select the category that best matches the issue:
For website, content, or display issues.
For domains, DNS, and launch setup.
For plans, payments, renewals, or account-related questions.
For ideas that could improve or extend the TourVoz experience.
Selecting the most relevant Category makes the scope of your request clearer.
Submit a Support Request
Complete the fields under Submit a Support Request:
Select the type of support request.
Enter a short title that summarizes the issue.
Describe what happened and what you need help with.
Click Submit Request when the information is ready.
When reporting an issue, include the affected page, the steps you took, and what happened so the support team can understand the request clearly.
View Support Requests
My Support Requests displays recent support requests submitted from the current website.
If no requests have been submitted yet, the page shows No support requests yet.
Plan & Billing
Plan & Billing lets you review the current website plan, subscription status, renewal information, and resource usage, and choose a plan and billing cycle when needed.
Review Your Subscription
The top of the page summarizes the current website subscription, including Website, Account Email, Current Plan, Account Status, Created, Renewal Date, and Domain.
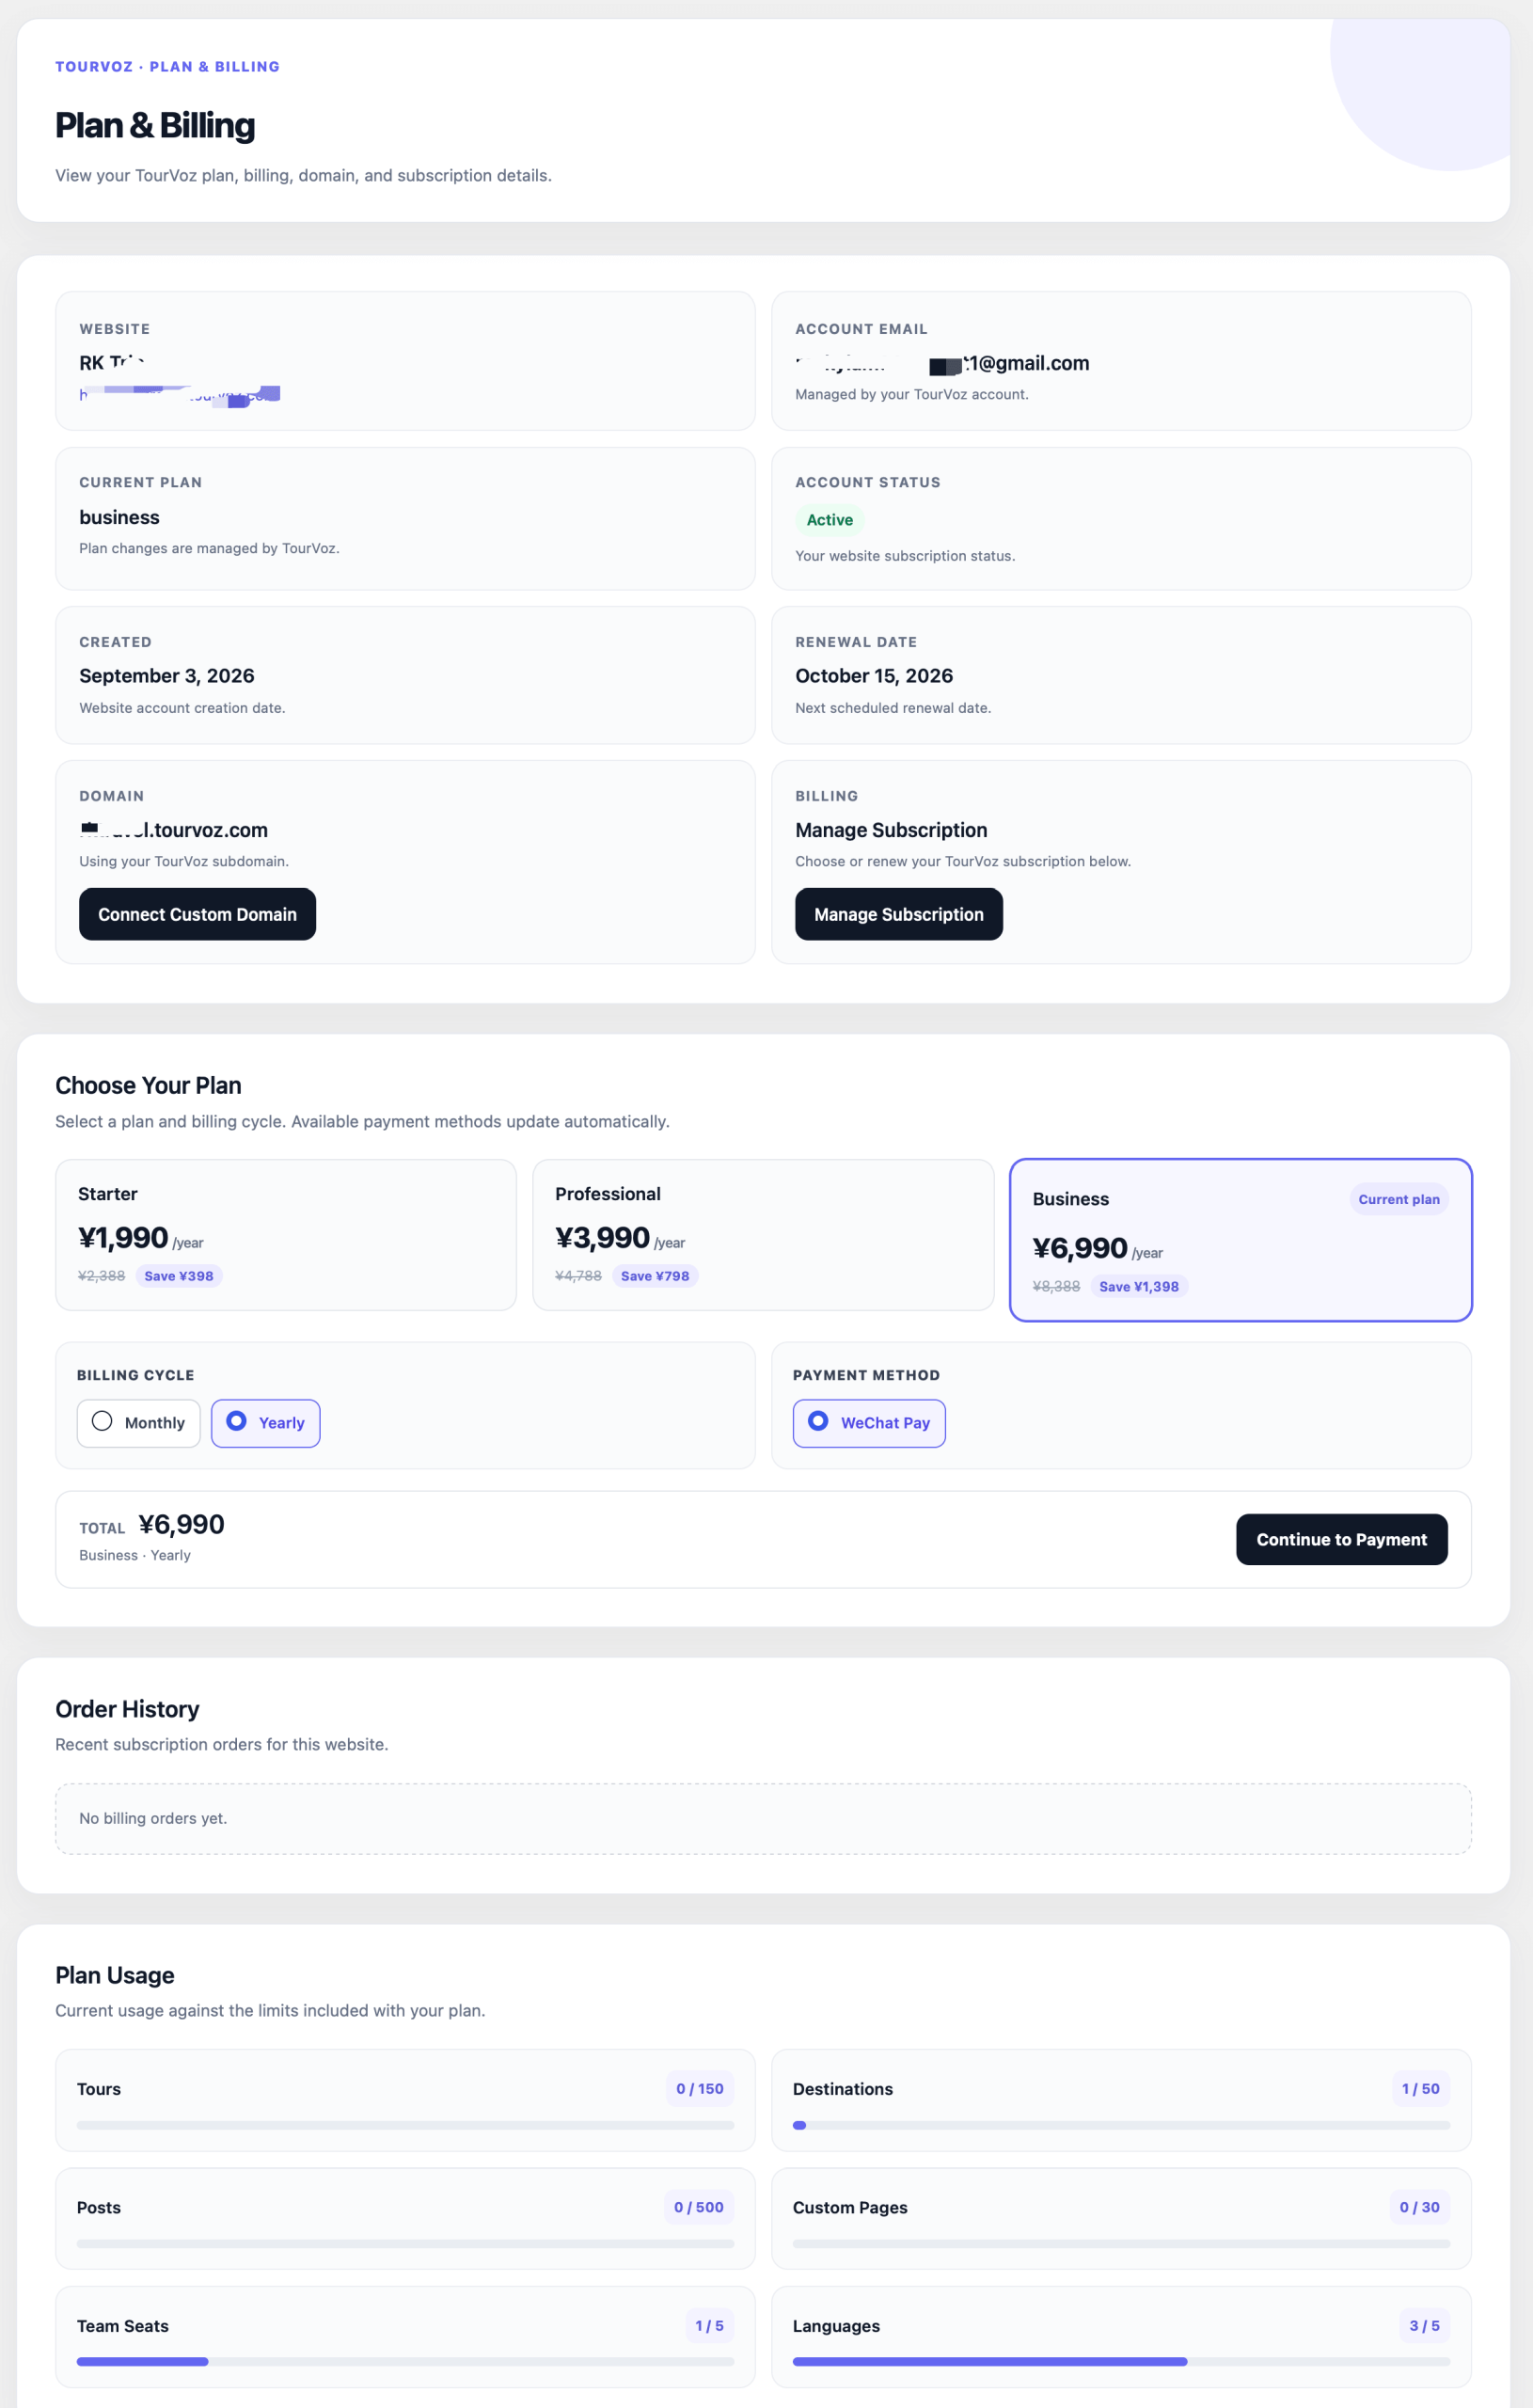
Shows the plan currently assigned to the website.
Shows the current website subscription status, such as Active.
Shows the next scheduled renewal date.
Shows the current website address. Use Connect Custom Domain when you want to connect your branded domain.
Choose a Plan & Billing Cycle
Under Choose Your Plan, select the plan you want and then choose an available Billing Cycle. The plan currently assigned to the website is marked Current plan.
The Total updates according to the selected plan and billing cycle. Plan pricing, allowances, and available billing cycles should always be checked on the current Plan & Billing page.
This documentation does not hard-code specific prices or resource limits. Check the live account page before upgrading or renewing.
Payment & Order History
Payment Method shows the payment methods currently available. After selecting a plan, billing cycle, and payment method, click Continue to Payment to continue the payment process.
Manage Subscription opens the subscription-management entry point for the current website.
Order History shows recent subscription orders for this website. If there are no orders yet, the page displays No billing orders yet.
Review Plan Usage
Plan Usage shows how much of each included resource the current website is using against its plan limit.
The current page tracks usage for Tours, Destinations, Posts, Custom Pages, Team Seats, and Languages.
If you cannot add more content, members, or languages, check the corresponding usage here to see whether the current plan allowance has been reached.
My Profile
My Profile lets you manage the personal details and password for the account you are currently signed in with.
Manage Personal Details
Personal Details shows the basic information for the current account, including Username, Nickname, and Email.
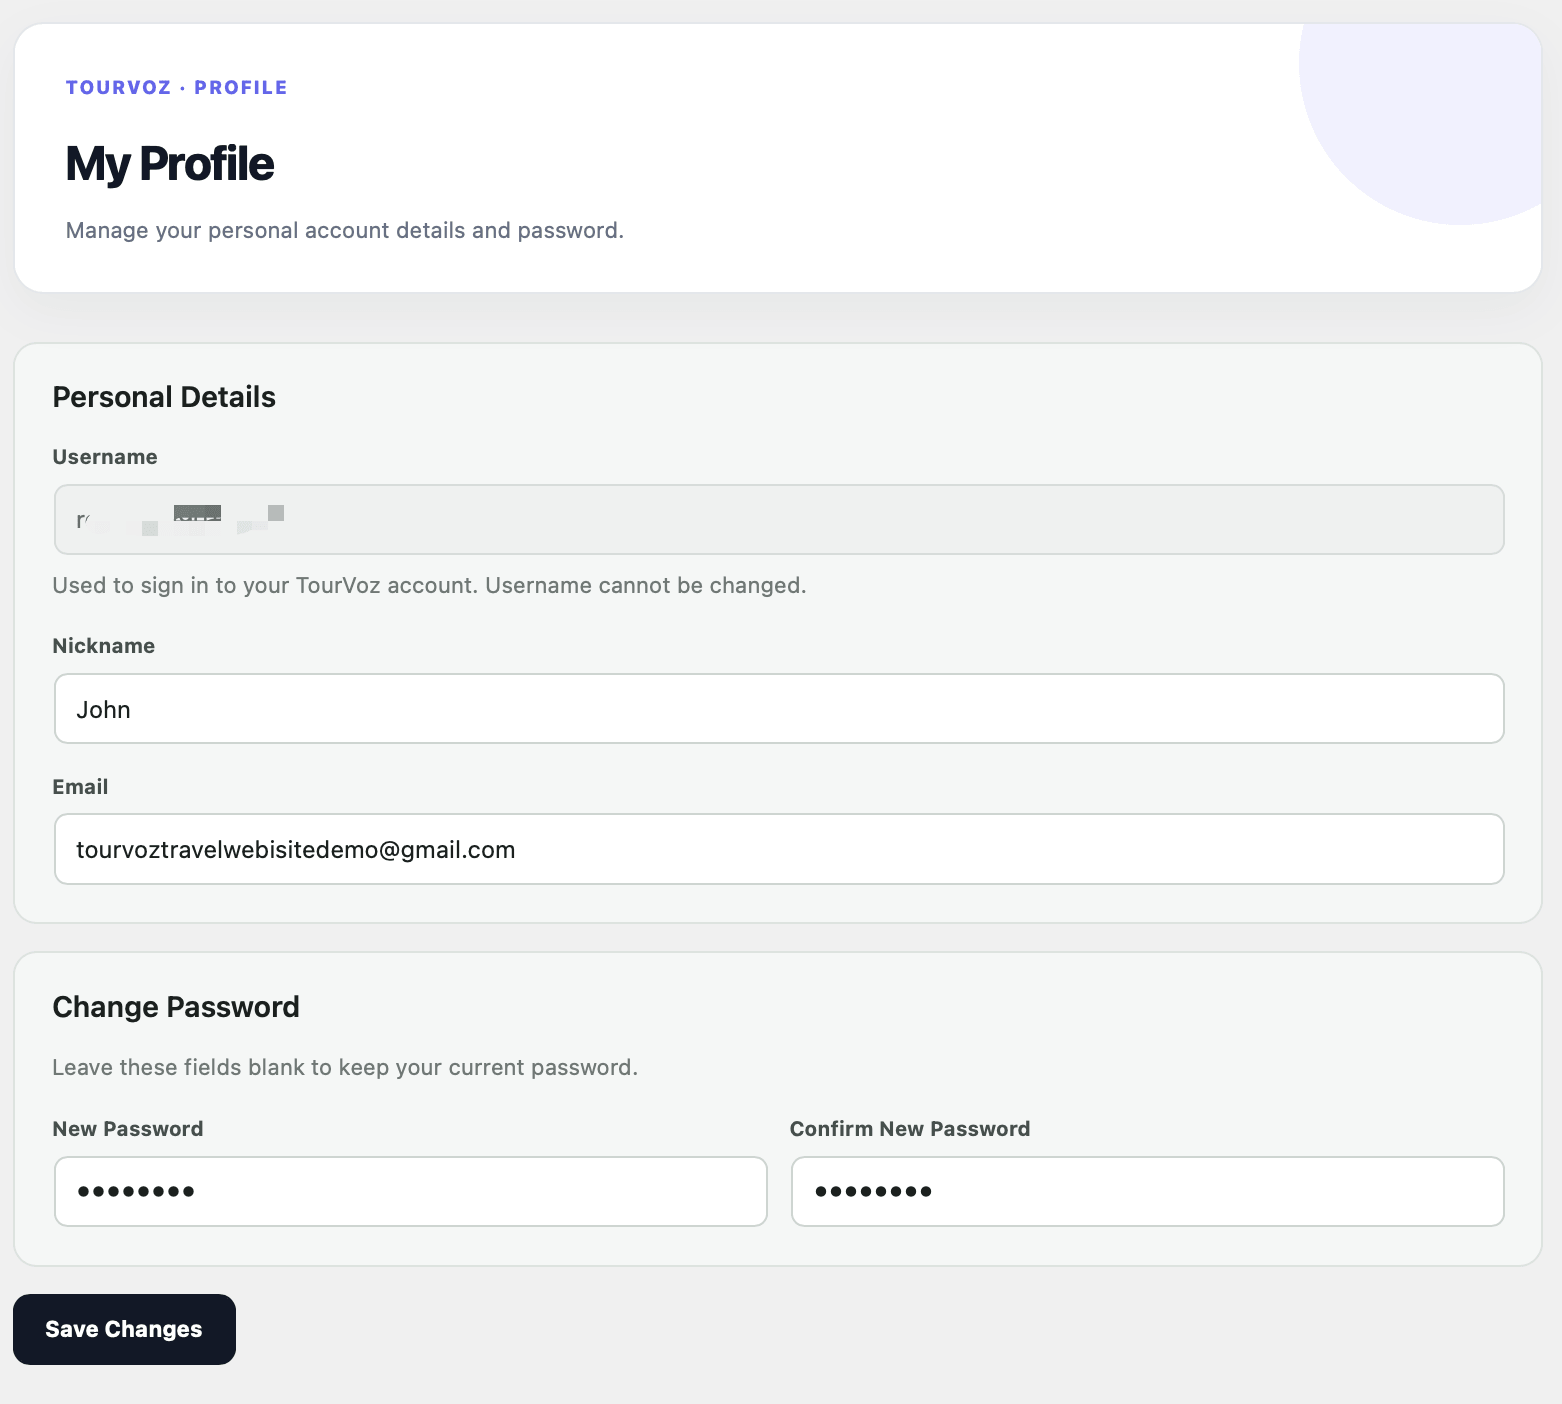
Used to sign in to your TourVoz account. The username cannot be changed.
Updates the nickname for the current account.
Updates the email address for the current account.
Change Your Password
To change your password, enter the new password in New Password and enter the same password again in Confirm New Password.
If you do not want to change your current password, leave both password fields blank.
After updating your personal details or password, click Save Changes at the bottom of the page.